8 Basic Git Workflow
In this section, we’ll put together the basic Git workflow, and show how all these many terms and commands actually fit together. We’ll start completely from scratch, and work our way up to a full-fledged Git repository.
I find that the best way to learn anything is to actually do it on a real project, as it’s hard to conceptualize what’s going on when you’re just reading about it, or even working through a toy example. And because we research infectious diseases in CIDD, we’ll build up a repository that contains a notebook for an SIR model (Susceptible-Infected-Removed), and do it in both Python and R as that should allow most people to follow along with the code in a language they’re familiar with. Look for the following drop-down sections to reveal the simulation code you need.
R Code
Python Code
Throughout this section, we’ll be demonstrating the workflow using GitKraken, but the same principles apply to the command line. In fact, below each section that highlights a GitKraken feature, I’ve included a drop-down section that shows the equivalent command line commands. Just look for the following drop-down sections to reveal the commands.
Terminal Commands
8.1 Creating a New Repository
We’ll create a new repository on GitHub, and then clone it to our local machine. We’ll follow the steps outlined in the GitHub First section. So, in summary:
- On your computer, decide where you want to store all your Git repositories, and create a folder for them
- Mine has the path ~/Documents/Repos/, but you can put it wherever you want
- Create a new repository on GitHub, and name it
sir-model- Make sure you inialize it with a README.md, Description, R/Python .gitignore template (depending on the language you’d like to follow along with), and an MIT license
- Open GitKraken
- Open the “Clone” window using cmd+N/ctrl+N
- Click on the “GitHub” button and select the
sir-modelrepository- Make sure the clone path is set to the folder you created in step 1
- Click “Clone” and wait for the repository to be cloned to your computer
The repo should now be cloned to your computer, and you should be able to see it in the “Open a repo” section of GitKraken, which you can access using cmd+O/ctrl+O.
Terminal Commands
# Make the directory to store all your Git repos
# -p flag will create the directory and any parent directories that don't exist, but not overwrite anything
mkdir -p ~/Documents/Repos

# Change into the directory
cd ~/Documents/Repos

# Clone the repository
[email protected]:GITHUB_USERNAME/sir-model.git

# Change into the repository
cd sir-model
8.2 Giving Our Repository Some Structure
Now that we have a repository, we need to give it some structure. We’ll start by fleshing out the README, which will act as a guide for how we want to structure our repository. This is a good practice to get into as it will help you think carefully about how you want to organize your code, and will help you and others understand what’s going on in your repository, as it’s easy to skip this step and end up with a repository that’s hard to decipher.
Let’s first add the core components. Copy the following into the README.md file:
## Repository Title
### About This Project

### Repository Structure

### Built With

### Getting Started

### Usage

### License
This project is licensed under the MIT License - see the [LICENSE](LICENSE) file for details

### Contact

### AcknowledgementsThe ## and ### are used to denote different levels of headings in Markdown. I prefer to use a level-2 heading for the title of the repository, and level-3 headings for the different sections, as I find it makes the README easier to read; level-1 headings are quite large.
Now, rename the “Repository Title”, and this is a good spot to create our first commit before we start to fill in a few of the sections.
8.2.1 Creating The First Commit
At this stage, we have a repository with a README, but we haven’t actually saved any changes to the repository as far as Git is concerned. When we cloned our repository, the README.md only contained the text that GitHub added by default (the repo name and short description - you can check this on GitHub if you’d like). If you open up GitKraken, you’ll see that it is showing that we have made changes to a file, indicated by the pencil icon in the commit history section, as well as the note above the commit message box that says “1 file change in working directory”.
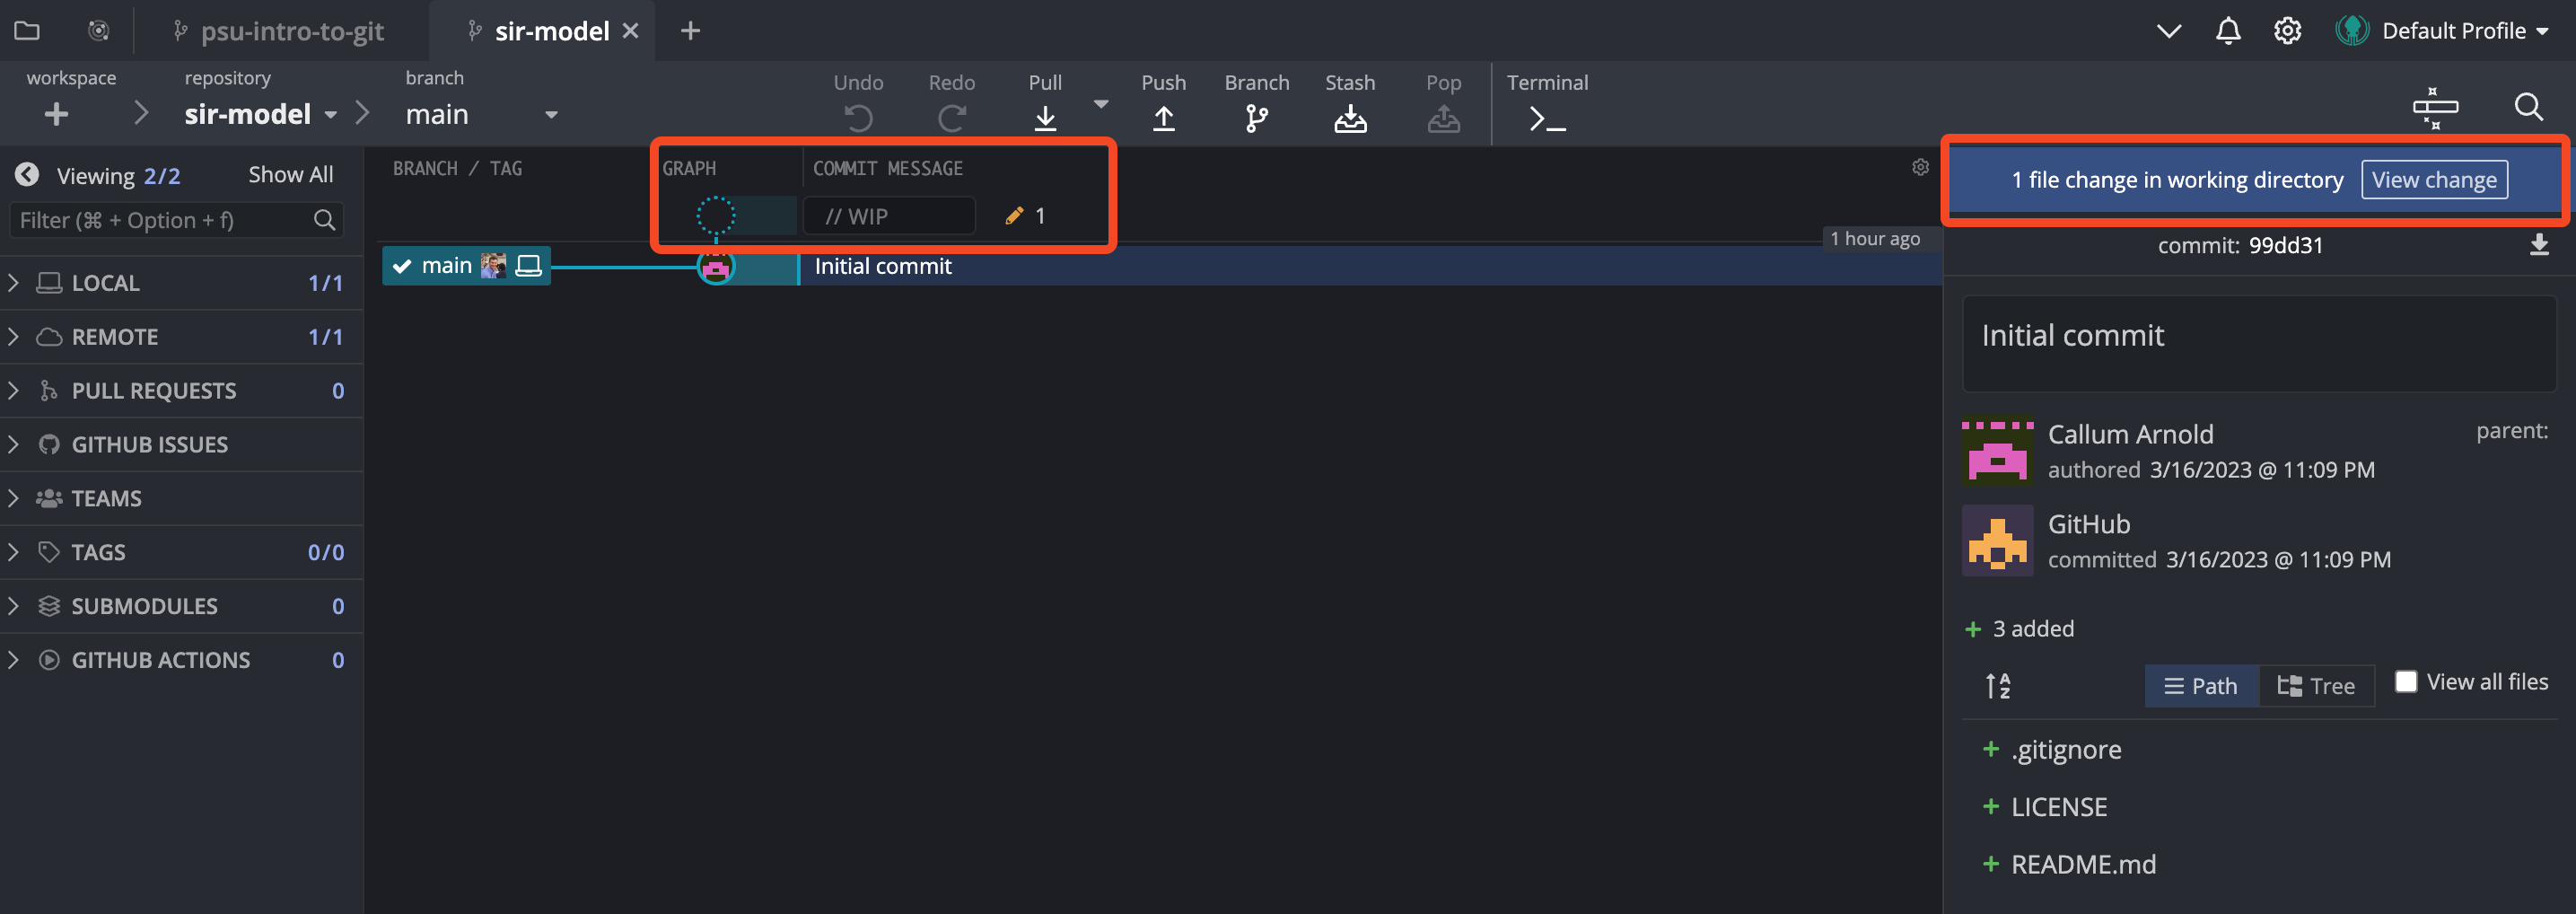
Clicking on either of these sections will present you will the below window, which shows you the changes that have been made to the file. You will also notice that the changes are unstaged, which means they will not be included in the next commit.
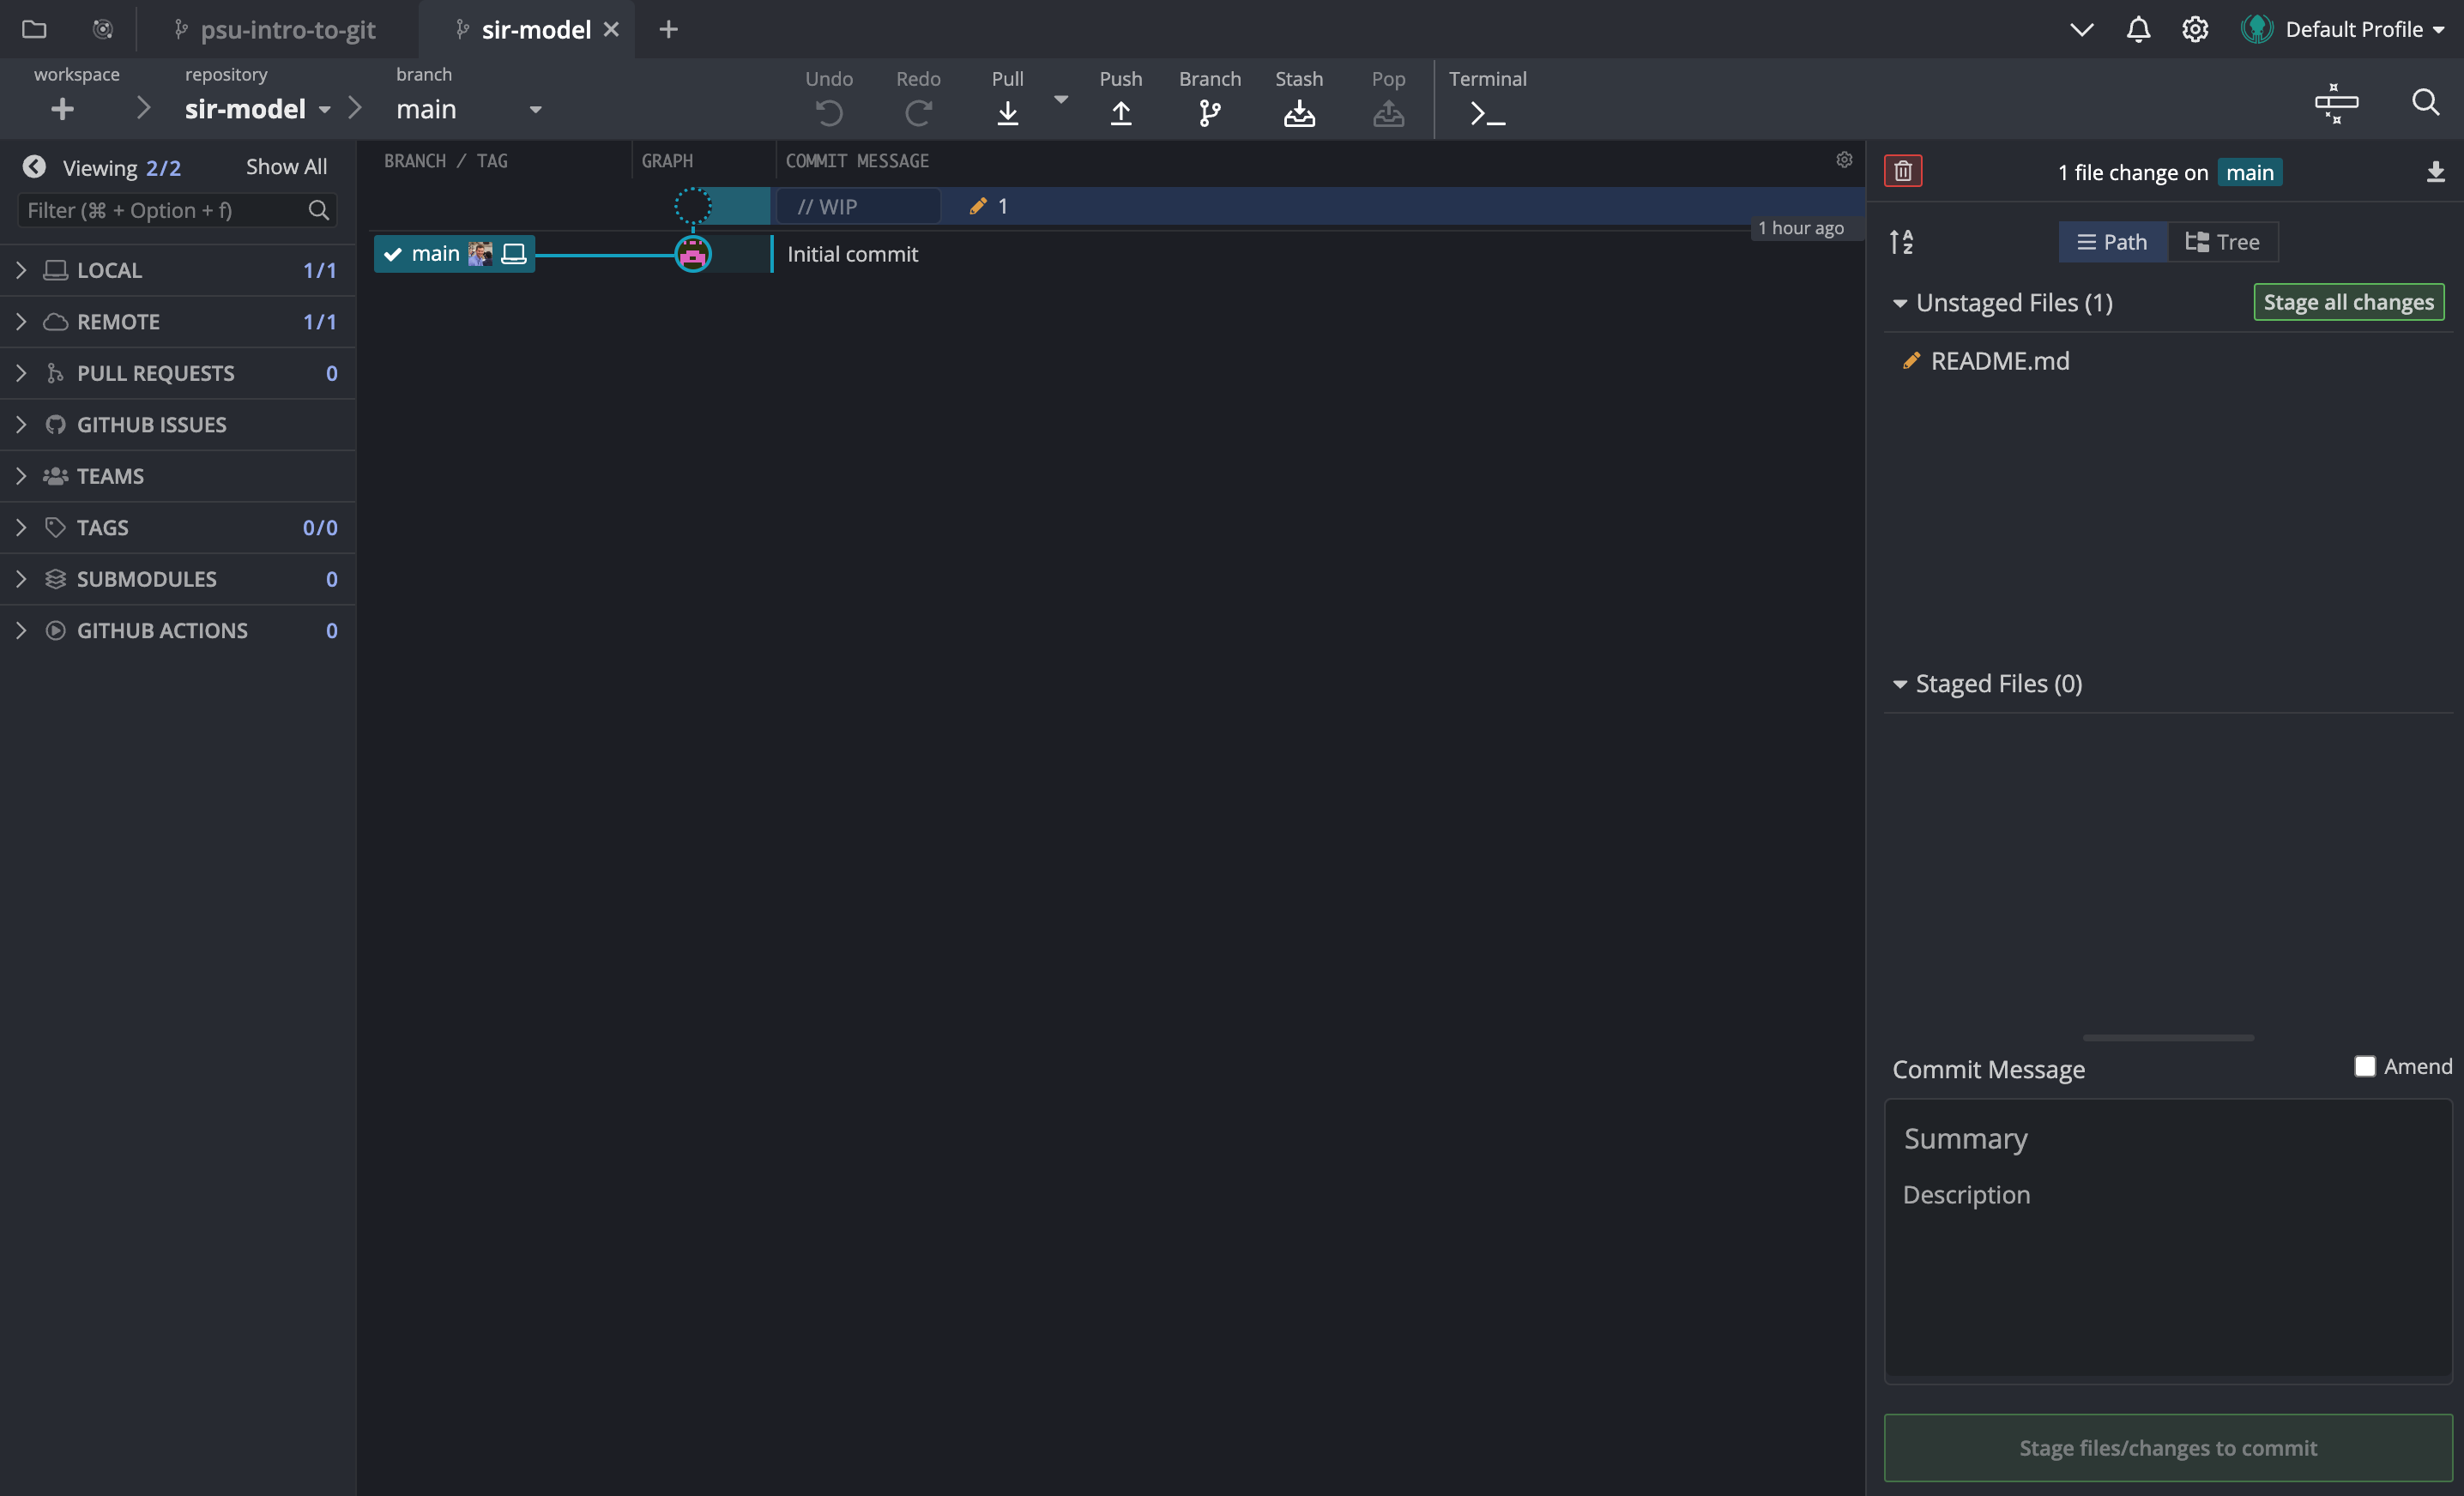
Clicking on the README.md file will open up the file diff in the GitKraken editor, and you can see that the changes are highlighted in green (for additions) and red (for deletions). Once we are happy with the changes, we can stage them and write the commit message. The commit message title should be short and descriptive, and the body should contain more details about the changes that were made, if necessary for clarity.
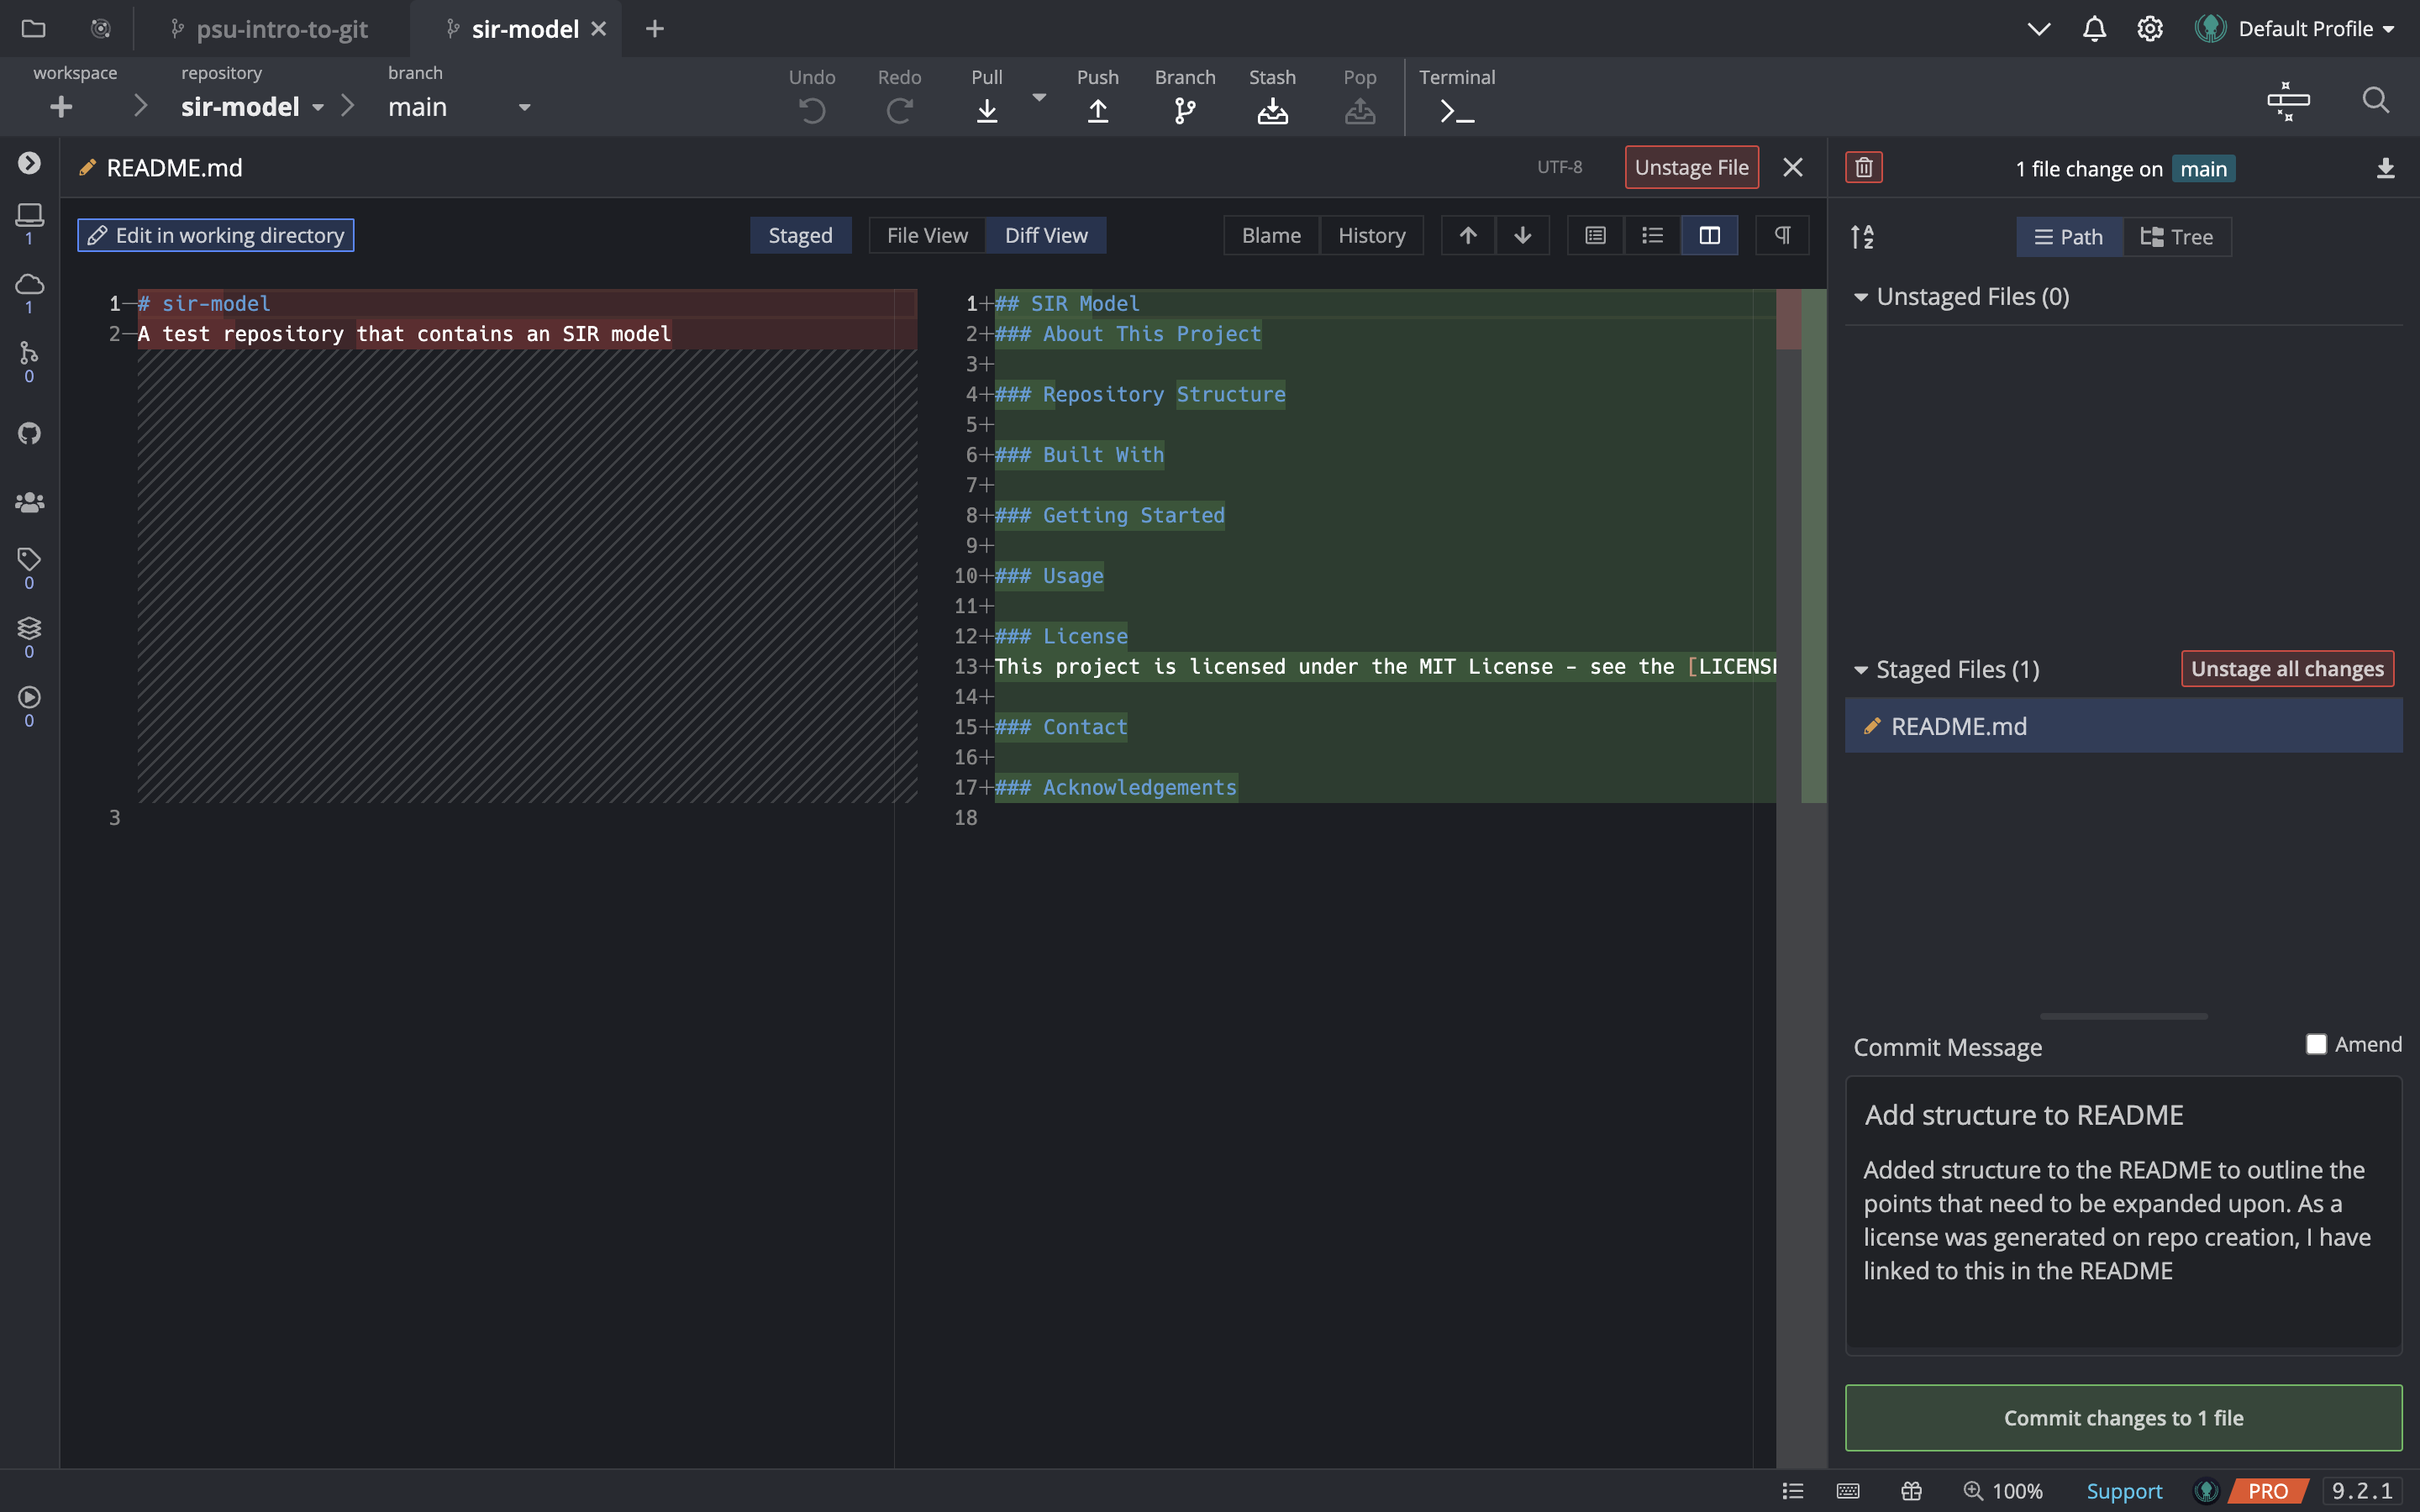
Your diff view may look different than mine shown here e.g., it may default to lines being shown above each other, rather than side-by-side. You can change this if you would like, by clicking on the buttons in the top-right corner of the editor window, just below the button that says “Unstage File”.
Now that we’ve made our first commit, we will see that the pencil icon has disappeared and we have a similar view to what we started with when we cloned the repository. The key difference is now there are two main branches being shown in the Git history. The one with the computer that is highlighted is the local branch, which is the branch that is stored on our computer. The other branch is the remote branch, which is the branch that is stored on GitHub. Because we’ve just made a commit, the local branch is ahead of the remote branch by one commit as we haven’t pushed our changes to GitHub yet. We’ll do that later after we’ve added a few more things to the README.
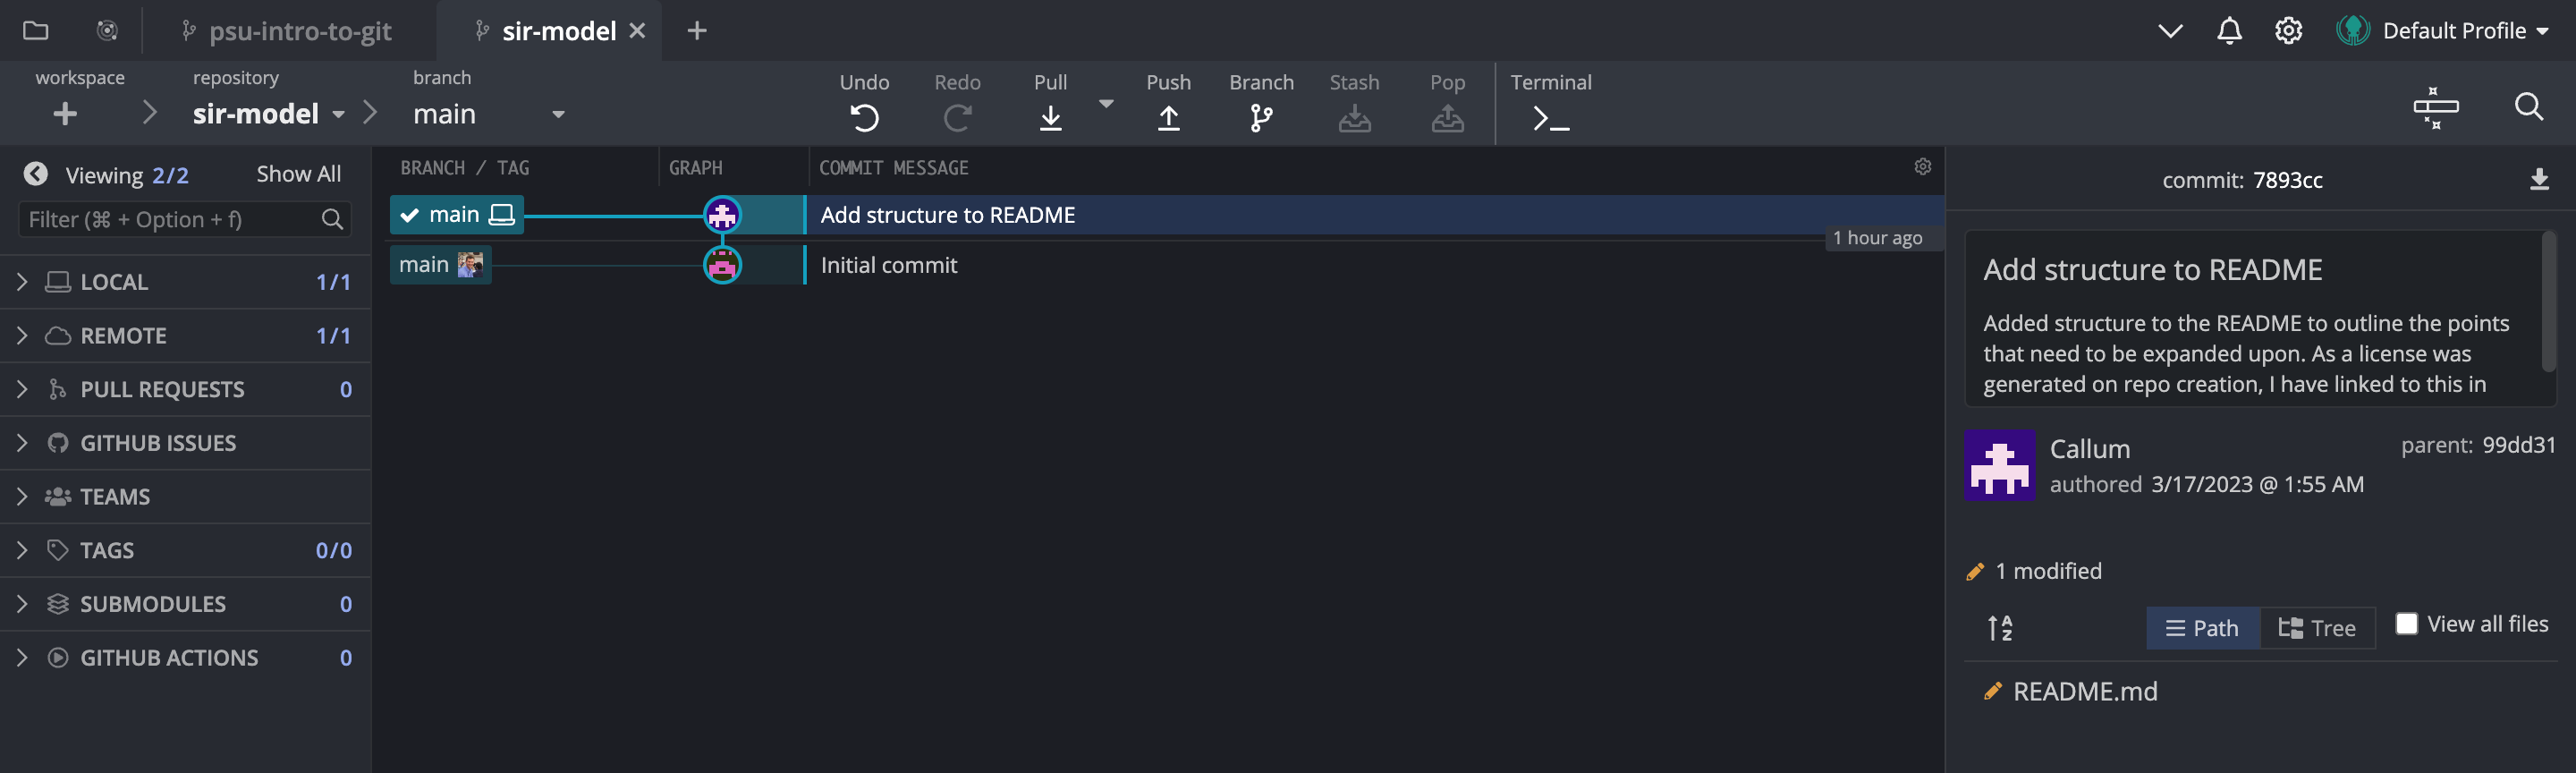
So for now, let’s continue to flesh out the README.
Terminal Commands
# Check what files have been changed
# -vv flag will show where the files have changed and display the diff
git status -vv

# Stage all changes
git add .

# Commit changes
git commit -m "Add structure to README" -m "Added structure to the README to outline the points that need to be expanded upon. As a license was generated on repo creation, I have linked to this in the README"
8.2.2 About This Project
Our project is going to contain an SIR model with births and deaths, which is a simple model of infectious disease transmission. The SIR model is a compartmental model, which means that it divides the population into different compartments (Susceptible, Infected, and Removed), and tracks how people move between these compartments. Not everyone is familiar with this, so we’ll probably want to include this information in the README. Similarly, we’ll likely want to include the basic differential equations that govern the model, and the parameters that we’ll use to run the model (as well as a short description of what they mean). As we’re going to use some code from Ottar’s Epidemics book (chapter 2), we’ll also want to include a link to the book (and citation). To add this to a README.md file, we can use the following syntax:
```math
\begin{align}
\frac{dS}{dt} &= \mu (N - S) -\beta S \frac{I}{N} \\
\frac{dI}{dt} &= \beta S \frac{I}{N} - \gamma I - \mu I \\
\frac{dR}{dt} &= \gamma I - \mu R
\end{align}
```

```math
\begin{align}
\mu &= \frac{1}{50*52} \\
\beta &= 2 \\
\gamma &= \frac{1}{2} \\\\

N &= 1000 \\
S_0 &= 999.0 \\
I_0 &= 1.0 \\
R_0 &= 0.0
\end{align}
```
This will render as:
\[\begin{align} \frac{dS}{dt} &= \mu (N - S) -\beta S \frac{I}{N} \\ \frac{dI}{dt} &= \beta S \frac{I}{N} - \gamma I - \mu I \\ \frac{dR}{dt} &= \gamma I - \mu R \\\\ \mu &= \frac{1}{50*52} \\ \beta &= 2 \\ \gamma &= \frac{1}{2} \\\\ N &= 1000 \\ S\_0 &= 999.0 \\ I\_0 &= 1.0 \\ R\_0 &= 0.0 \end{align}\]
Fill in these details, and then we’ll move on to the next section we can complete.
8.2.3 Repository Structure
We can’t fill in all of this section until we know exactly what the code is going to do, but we can at least give a rough outline.
To start, I like to use the following folders to help organize my code, but you are welcome to use whatever structure works best for you:
```
.
├── data/
├── figs/
├── funs/
├── out/
└── src/
```

- `data/` contains ...
- `figs/` contains ...
- `funs/` contains ...
- `out/` contains ...
- `src/` contains ...- data/ will contain any raw data that we use in our analysis, and is not edited by hand
- figs/ will contain any figures that we generate
- funs/ will contain any functions that we write to help us with small, repeatable things e.g. functions to format tables in a notebook
- out/ will contain any output from our analysis, e.g. intermediate datasets that have been cleaned and are ready for analysis, tables, etc
- src/ will contain any code that we write to do our analysis, e.g. notebooks, scripts, etc
- If you work with multiple languages, it might make sense to have subfolders for each language, e.g. src/python/ and src/R/
You will want to ensure that your descriptions of each of the folders includes enough detail that you (and anyone else reading your project) can understand what’s going on, but not so much detail that it becomes hard to read. And remember, these folders will not appear in the Git history until they contain a file that Git can track.
It’s quite nice to include an ASCII tree to visualize the structure of the repository, and there are a couple of ways to generate this. If you use VSCode, you can install the ASCII Tree Generator extension, which will allow you to right-click on a folder and select “Generate Tree String” to generate a tree for that folder. If you use R with RStudio, you can use the fs::dir_tree() function from the {fs} package. If you want to do it semi-manually, you can just use this website.
8.2.4 Contact and Acknowledgements
These are pretty self-explanatory, and easy to fill in now.
8.2.5 Making a Second Commit
Now we’ve added a bit more to the README, let’s make another commit. The process is exactly the same as before, so nothing much to go through here.
8.3 Installing the Necessary Packages
To run the code, we’ll need to install a few packages. In both R and Python I’m using packages to manage the environments to try and make the code more reproducible. In R, this is the {renv} package, and in Python, this is the {poetry} package.
If you use Python, you are likely already familiar with the pip package manager and the concept of virtual environments, and but R users may not be. This is too big of a topic to go into detail here, but the basic premise is that the package manager takes a snapshot of all the installed packages and their dependencies, along with their version numbers, and stores this information in a file called a lockfile. Doing this means that if someone clones your repository, and your repo has a lockfile, they can run just one command to install all of the packages that you used to run your code, and not worry about incompatible versions of packages being installed that would cause errors.
Here, I’ve provided the lockfiles for both R and Python, so you can just run the commands below to install the packages.
R Code
Install the {renv} package if you don’t already have it installed:
install.packages("renv")Copy the renv.lock file to the root of your repository. Then, run the following command in your R terminal:
renv::restore()Python Code
Install the {poetry} package if you don’t already have it installed. How you do this will depend on your operating system, but you can find instructions here. Make sure the poetry package is available in your PATH by running the following command in your terminal:
poetry --versionCopy the poetry.lock and pyproject.toml files to the root of your repository. Then, run the following command in your terminal:
poetry installThis code was developed in a pyenv virtual environment, using Python 3.11.0.
8.4 Adding Simulation Code
Let’s start writing our simulation. As mentioned, we’ll adapt code from Ottar’s book. We’ll start by creating the src/ folder, and then creating a new file called sir_model.R / sir_model.py in that folder. Copy the below code into that file.
R Code
library(deSolve)
library(tidyverse)

theme_set(theme_minimal())

sirmod <- function(t, y, parms) {
  # Pull state variables from y vector
  S <- y[1]
  I <- y[2]
  R <- y[3]

  # Pull parameter values from parms vector
  beta <- parms["beta"]
  mu <- parms["mu"]
  gamma <- parms["gamma"]
  N <- parms["N"]

  # Define equations
  dS <- mu * (N  - S)  - beta * S * I / N
  dI <- beta * S * I / N - (mu + gamma) * I
  dR <- gamma * I - mu * R
  res <- c(dS, dI, dR)

  # Return list of gradients
  list(res)
}


times <- seq(0, 26, by = 1/10)
parms <- c(mu = 0, N = 1, beta =  2, gamma = 1/2)
start <- c(S = 0.999, I = 0.001, R = 0)

out <- ode(y = start, times = times, func = sirmod, parms = parms)
out_df <- as_tibble(out) %>%
  pivot_longer(cols = -time, names_to = "state", values_to = "number") %>%
  mutate(
    time = as.numeric(time),
    number = as.numeric(number),
    state = factor(state, levels = c("S", "I", "R")),
    number = round(number, 6)
  )

ggplot(out_df, aes(x = time, y = number, color = state)) +
  geom_line(linewidth = 2) +
  labs(x = "Time", y = "Number", color = "State")
Python Code
import numpy as np
import pandas as pd
from scipy.integrate import solve_ivp
from plotnine import *

def sirmod(t, y, beta, mu, gamma, N):
    # Unpack states
    S, I, R = y

    # Define equations
    dS = mu * (N - S) - beta * S * I / N
    dI = beta * S * I / N - (mu + gamma) * I
    dR = gamma * I - mu * R

    # Return list of gradients
    return dS, dI, dR

tmin = 0
tmax = 26
tstep = 1 / 10
times = np.arange(tmin, tmax, tstep)

beta = 2
mu = 0
gamma = 1 / 2
N = 1
parms = (beta, mu, gamma, N)

S0 = 0.999
I0 = 0.001
R0 = 0
start = (S0, I0, R0)

out = solve_ivp(
    sirmod, [tmin, tmax], np.array(start), args=parms, t_eval=times
)

out_df = (
    pd.DataFrame(out.y).transpose().rename(columns={0: 'S', 1: 'I', 2: 'R'})
)
out_df['time'] = out.t
out_df = out_df.melt(id_vars='time', value_vars=['S', 'I', 'R']).rename(
    columns={'variable': 'state', 'value': 'number'}
)

theme_set(theme_minimal())

(
    ggplot(out_df, aes(x='time', y='number', color='state'))
    + geom_line(size=2)
    + labs(x='Time', y='Number', color='State')
)
We’ve now made some substantial changes to the repository, so let’s make a commit. The process is exactly the same as before.
8.5 Updating the README
8.5.1 Mistake in our Model Description
Now that we’ve added some code, let’s go back and update the README. Looking at what we’ve written, we can see that the code is actually different from what we had in the README, so we’ll need to update that. Examining the code, we can see that we’ve run the model on fractional populations, not whole numbers, so we’ll need to update the description of the model to reflect that.
Go back and adjust the \(S_0\) … values in the equations to represent fractions, and then update the description of the model to reflect that.
Because we’ve made some changes that are distinct from the other changes we’ve made, we’ll again want to make a commit for these changes.
8.5.2 Expanding Upon the README
Now we have some code, we can expand upon sections of the README. The first thing we can do is to add some text to the “Getting Started” section. I’ve used the {renv} package to manage the R environment for this project, so I’ll add some text to the README to reflect that.
R Code
I've used the `{renv}` package to manage the R environment for this project.
For more details on how to use `{renv}`, see [this article](https://rstudio.github.io/renv/articles/renv.html), but in brief, it creates a snapshot of the installed packages and their versions.

To get started, you will need to install `{renv}` as usual (i.e., `install.packages("renv")`), and then run `renv::restore()` to install the packages that are used in this project (the record in the ***renv.lock*** file).
The following text can be added to the “Usage” section.
To run the SIR model, you can open the ***src/sir_model.R*** file and run the code as usual.Python Code
I've used the `{poetry}` package to manage the R environment for this project.
For more details on how to use `{poetry}`, see [this page of the documentation](https://python-poetry.org/docs/basic-usage/), but in brief, it creates a snapshot of the installed packages and their versions.

To get started, you will need to install `{poetry}` using system-dependent commands (see [the official documentation](https://python-poetry.org/docs/) for these commands), and then run `poetry install` to install the packages that are used in this project (the record in the ***poetry.lock*** file).
The following text can be added to the “Usage” section.
To run the SIR model, you can open the ***src/sir_model.py*** file and run the code as usual.8.5.3 Amending the README Commit
We forgot to update the “Built With” section of the README, but we don’t want to make a whole new commit just for that, as making tons of tiny small commits will make it harder to read and navigate the Git history if you need to reference past work. Thankfully, this change aligns with the previous commit, so we don’t need to make a new commit. Instead, we can amend the previous commit to include the changes we’ve made.
We want to add the following text to the “Built With” section of the README.
R Code
- [R version 4.2.1 (2022-06-23)](https://cran.r-project.org/bin/macosx/)
- [`{renv}`](https://rstudio.github.io/renv/articles/renv.html) for package management
Python Code
- [Python version 3.11.0](https://www.python.org/downloads/)
- [`{poetry}`](https://python-poetry.org/docs/) for package managementWe can only amend staged changes to the most recent commit, and only if we haven’t pushed it to GitHub yet. If we’ve already pushed the commit, we’ll need to make a new commit. If you do not make a new commit and try and just amend it, you’ll get an error because Git wants to avoid rewriting history that might have been accessed by others, resulting in conflicting Git histories on different machines.
Once we’ve made and saved the changes to the README.md, we can stage them and then amend the previous commit.
As per usual, when we save and stage the changes, we’ll see the diff in the GitKraken interface, as below.
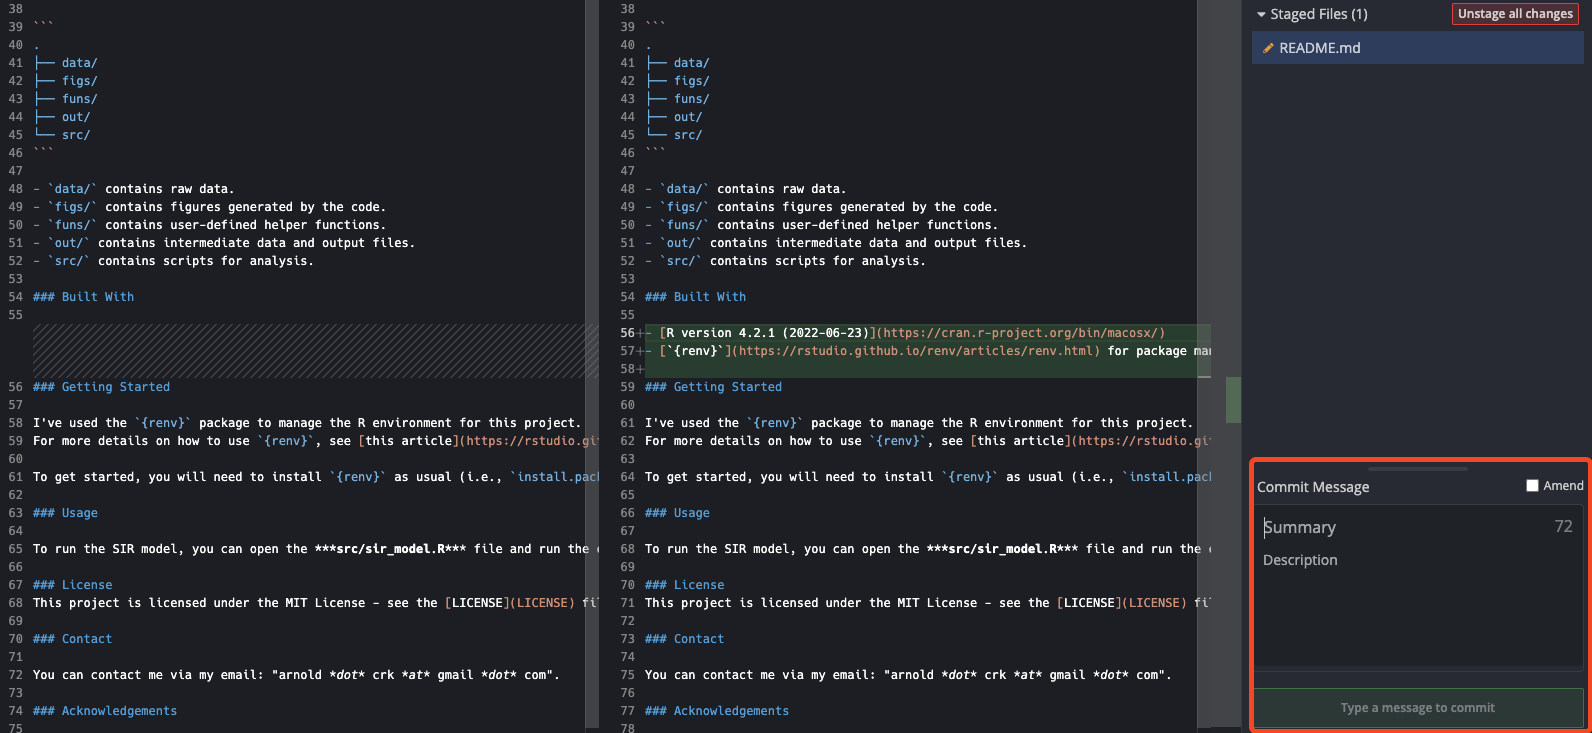
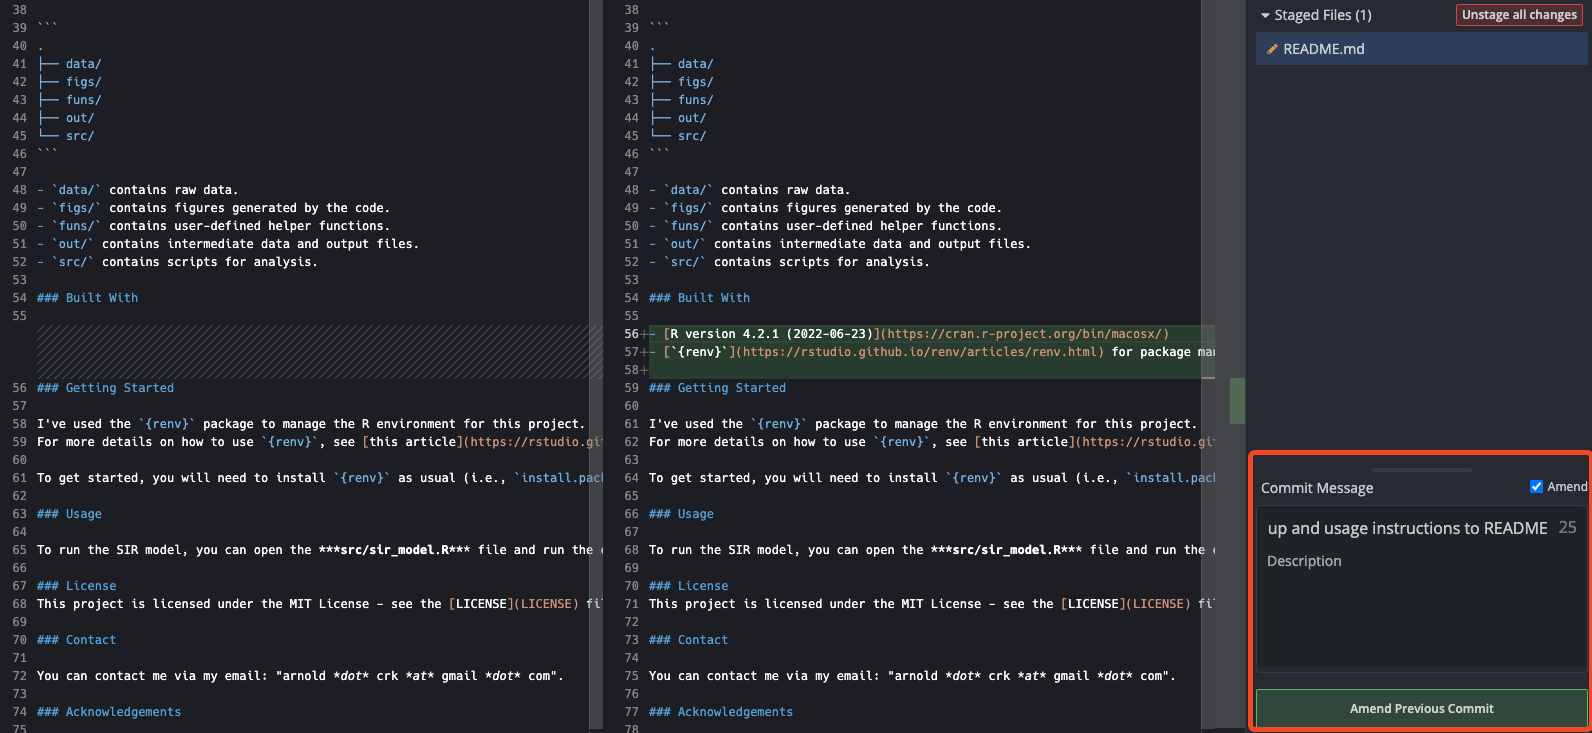
You can see that just above the “Commit Message” input section, there is a button for “Amend”. Clicking this will amend the previous commit to include the changes we’ve made. As such, it will set the commit message to the same as the previous commit, so there is nothing else to do. During the amend process, GitKraken will also change the text of the “Commit” button from “Commit changes to X file(s)” to “Amend Previous Commit”, as below.
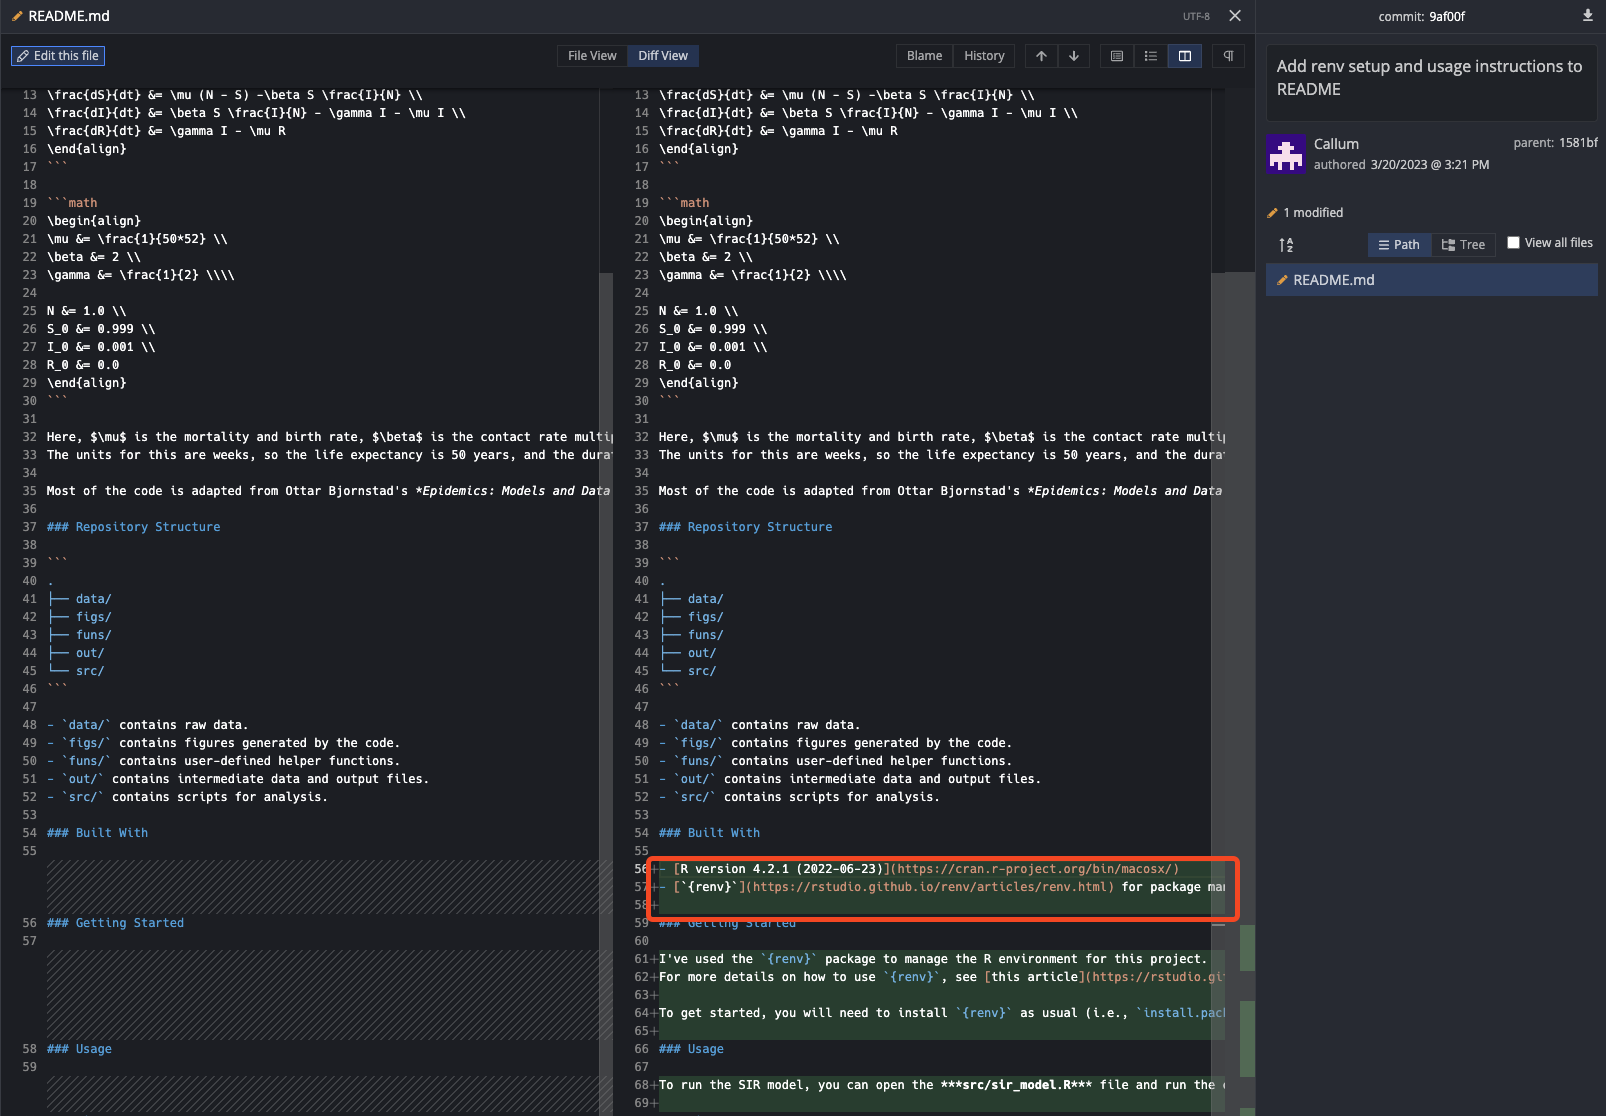
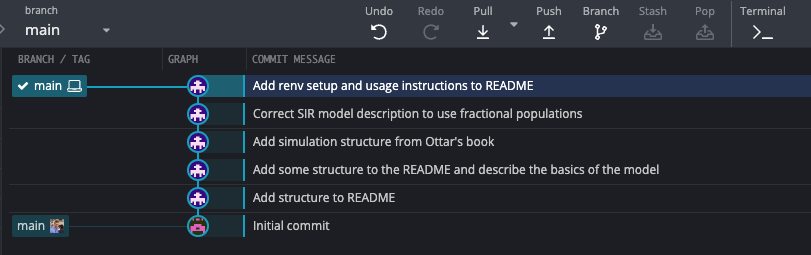
Once we’ve amended the commit, can examine the Git history and see that there is only one commit that refers to the changes we’ve made to the README.md file. Equally, if we look at the diff of this commit, we can see that our amended changes are included.
Terminal Commands
# Check and stage changes
git status -vv
git add .

# Amend changes
git commit --amend

# Examine the Git history and find the commit ID for the commit you want to diff
# --oneline: show each commit on a single line, rather than the default multi-line format which shows the commit message and other details
# --graph: show a graphical representation of the Git history, which is useful when you have branches and merges
# --decorate: show the names of all references (branches, tags, etc.) that point to the commit
# --all: show the Git history for all branches
git log --oneline --graph --decorate --all

# Diff the commit (replace with your commit ID)
git diff 0de4674If you do not specify the commit ID, the diff of the most recent commit will be shown.
If you try to diff a commit that is particularly long i.e., has a lot of line changes, you will enter a special interactive mode that is based on Vim. There are a number of commands you’ll need to know.
d: scroll the page downu: scroll the page upj: move the cursor down one linek: move the cursor up one lineq: quit the interactive mode and return to the terminal
To see a cheat sheet with more Vim commands, see here.
See here for some git aliases that can make your git log prettier.
8.6 Our First Push
Now that we’ve made some substantial changes to the repository, we can push them to GitHub. This is pretty straightforward to do, and we can do it from the GitKraken interface.
On the GitKraken client, there is a button in the top toolbar that is an up arrow, with the description “Push”. When we hover over it, it shows the text “Push to origin/main”.
Pushing the changes will bring the version of the code on GitHub up-to-date with the version of the code on our local machine. We can see that the main branch with out GitHub user photo is now in-line with the main branch of our local machine.

We can also confirm this is the case by navigating to our repository on GitHub and looking at the Git history.

The Git history on GitHub will show the relative time that the commit was made, not pushed to GitHub.
Terminal Commands
# Push changes
git push
8.7 Collaborating on a Project
Up until now, we’ve just been working on our own, but what if we want to collaborate with others on a project? There are a couple of ways we can do this, but the easiest is to add collaborators to our repository on GitHub.
Just for reference, you could set up a GitHub organization and then add collaborators to that, but that’s a bit more complicated than what we’re doing here.
For open-source projects where you want to allow others to make suggestions for their contributions, without directly giving them access to the repository, you can use the “fork and clone” model, where people can fork the repository and then make a pull request to merge their changes into the original repository. This is far more complicated than what we’re doing here, so we won’t cover it, but you can learn more about it in Jenny Bryan’s Happy Git with R book chapter, the Atlassian tutorial, and/or the official GitHub tutorial that demonstrates with a repository that you can practice on.
We’ll practice where you can add me as a collaborator to your SIR repository.
First, go to “Settings > Access > Collaborators” on your repository on GitHub.
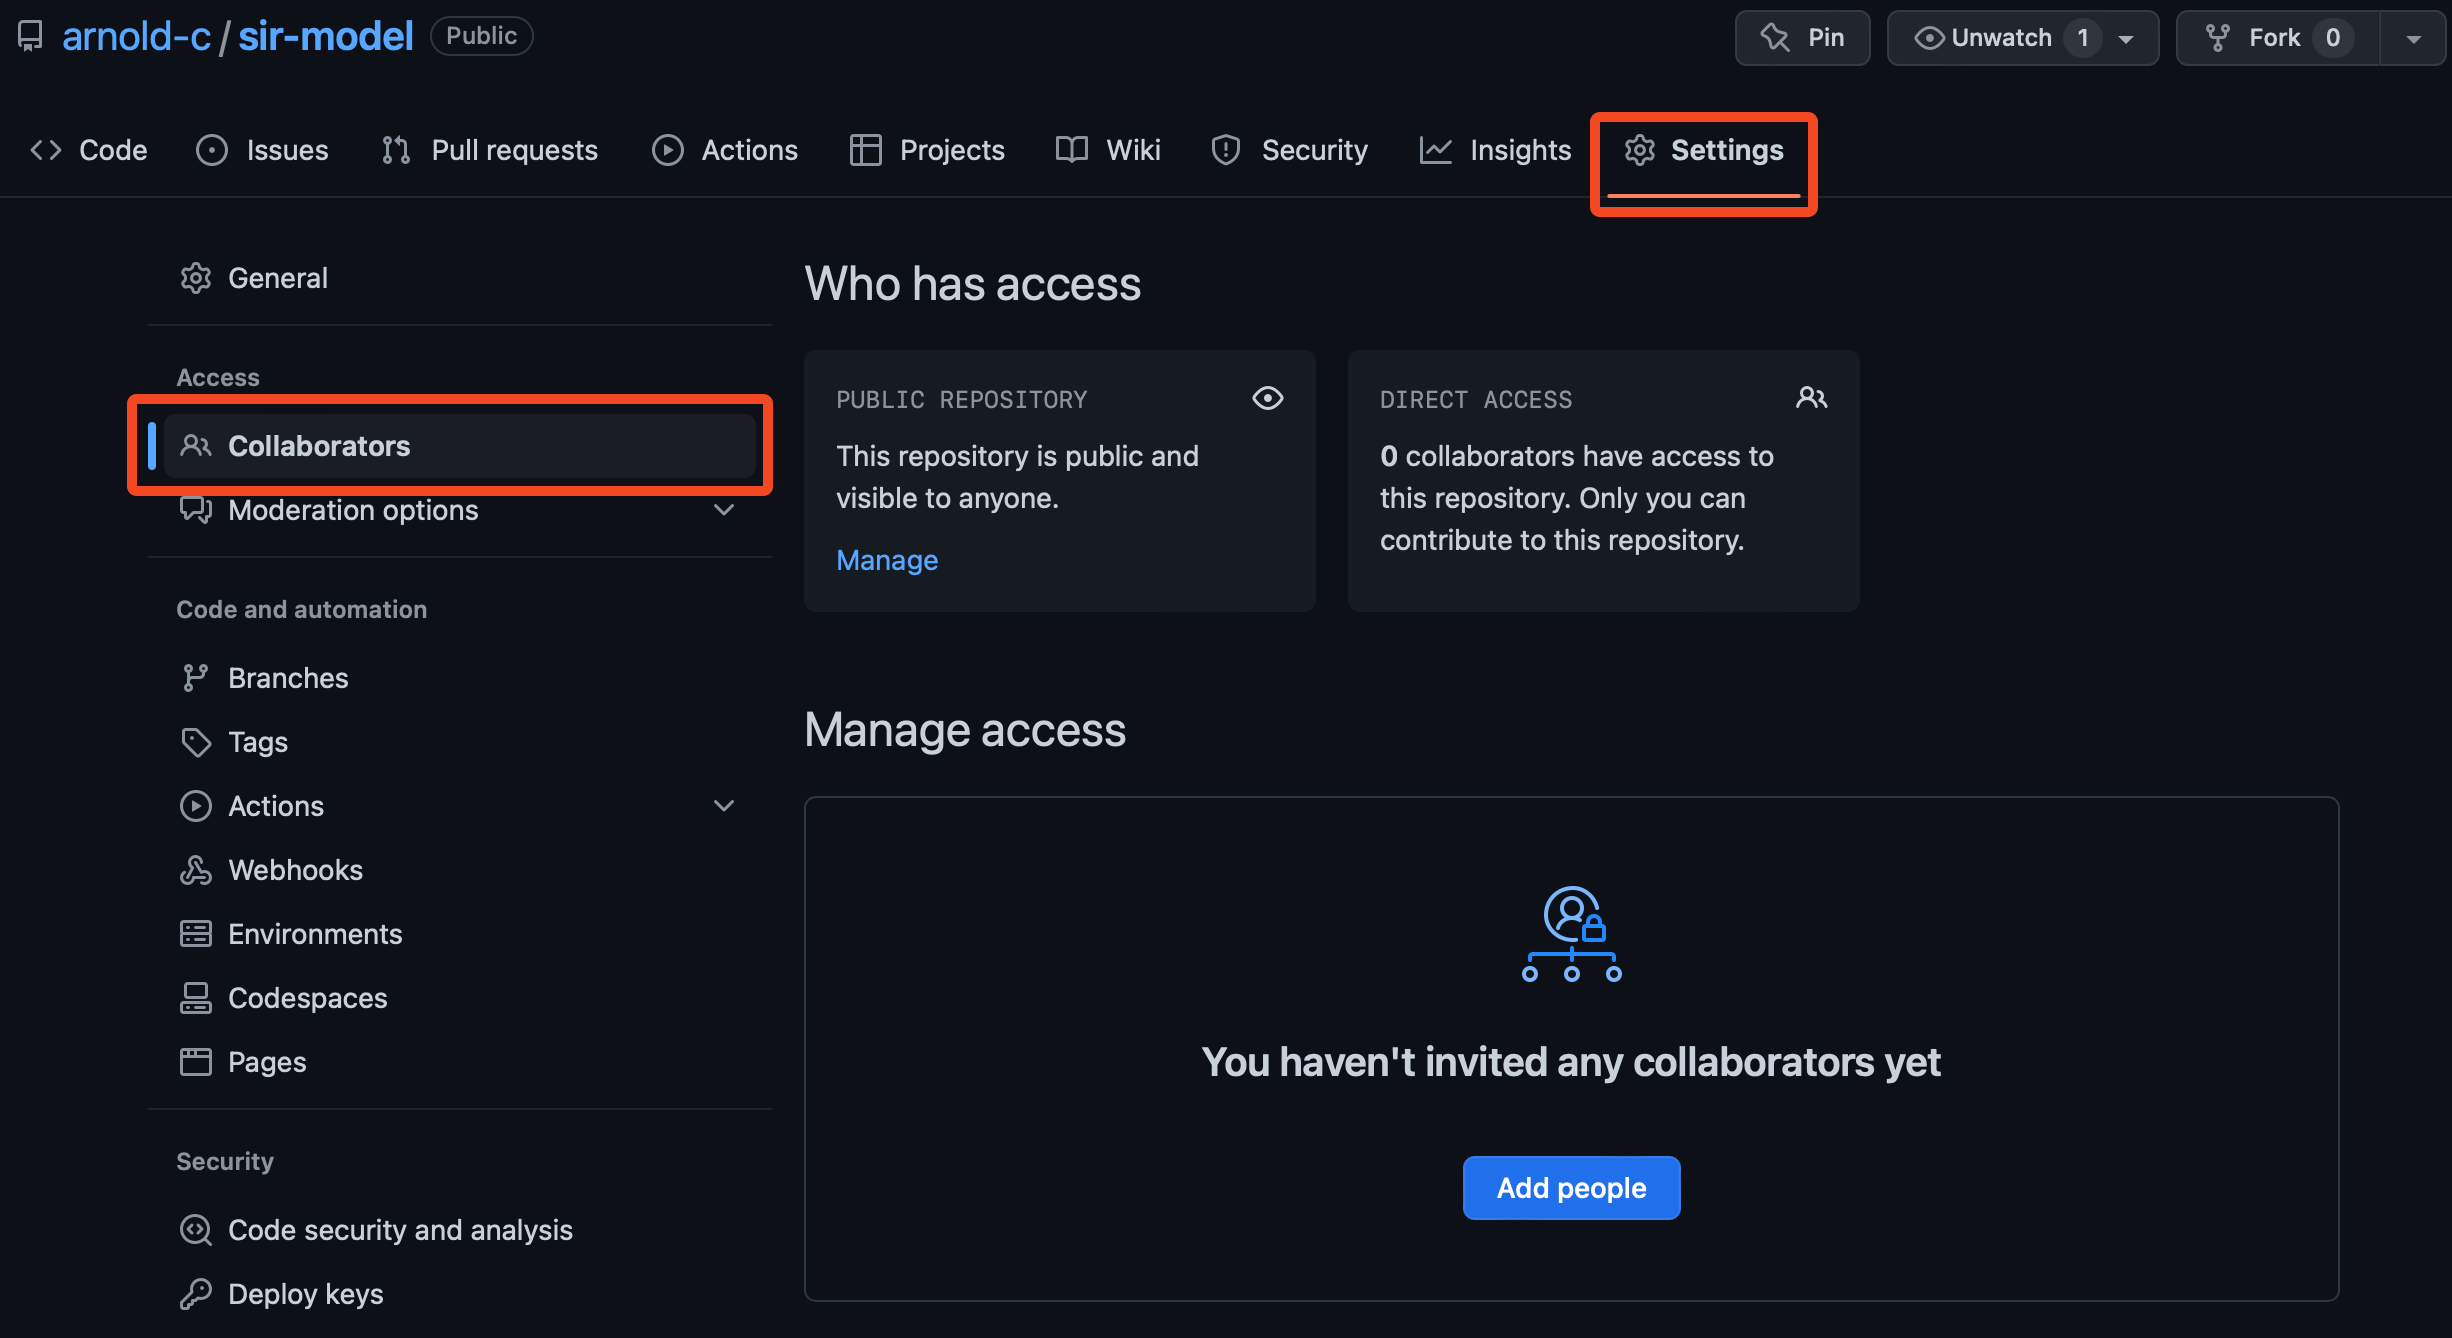
You can see that there are no collaborators at the moment, but click on the “Add people” button to add me as a collaborator. From here, you can type in my GitHub username, arnold-c, and then click on the “Add arnold-c to this repository” button.
From here, I’ll make the following change to the README.md file under the “Built With” section.
- [`{deSolve}`](https://cran.r-project.org/web/packages/deSolve/index.html) for solving differential equationsWhat you will notice is that when I make this change, it will be reflected in the Git history on GitHub, but not in your local repository. However, this will discrepancy will not immediately be apparent, as our computer hasn’t checked in with GitHub to see if there are any changes since we last pushed. To do this, we will use the fetch command.
In this instance, I’ve just made the change myself directly in GitHub, which will have a similar effect to it being made by a collaborator.
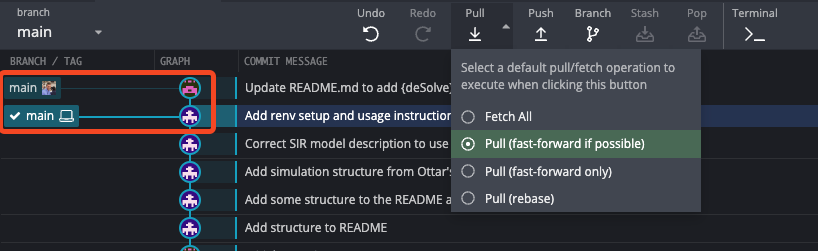
To fetch the changes, we can use the GitKraken interface. Clicking on the “Pull” button will bring up a menu, where we can select the “Fetch All” option. Once the changes have been fetched, we can see that there is a new commit in the Git history, and our remote branch is now ahead of our local branch.
In some cases, GitKraken will automatically fetch changes, but here’s how you can do it manually (this is worth doing routinely if you’re collaborating with others, just to be safe).
Pulling the changes will bring our local branch up-to-date with the remote branch. The default pull behavior is to “fast-forward if possible”, which means that the local branch will be moved to the commit that the remote branch is pointing to. It does this by performing a merge. There are some instances (that we are unlikely to run into for a while) where this can cause issues, which is why there are options to “fast-forward only” and “rebase”. If you want to learn more, you can read about it here and here. For the time-being, just stick with the default behavior and you’ll be fine!
When working on a collaborative project, get into the habit of fetching routinely to see if there are any changes that you need to pull. If you leave it too long, you might end up with a lot of changes to pull and it might be difficult to figure out what’s going on. Even worse, you might end up making changes to old versions of the code, which will cause conflicts when you try and pull/push/merge the changes.
Terminal Commands
# Fetch changes
git fetch

# Pull changes
git pull