9 Branching Strategies
OK, so we’ve covered quite a lot of ground here, and this should be enough to get you started with Git. But there’s one more helpful feature of Git I’d like to talk about: branching.
As mentioned earlier, branches are a way to keep track of different versions of your code. They’re also a way to keep your code organized and to keep your work separate from other people’s work. For the purposes of this workshop, we’re just going to look at how we can use branching to avoid making breaking changes to the code that others see and are basing our work on (that includes ourselves, too!).
9.1 When To Branch
There are a couple of different philosophies on when to branch, but the one that’s now encouraged in software development is to make small, discrete branches for each feature, and regularly merge them back into the main branch. It is commonly referred to as the GitHub Flow - see this video for an example using the command line instructions. What you generally want to avoid are long-lived branches that are worked on for a long time, because they can get out of sync with the main branch and become difficult to merge back in, which was traditionally the workflow that was advocated for by the “git flow” philosophy. Fortunately for us, the short-lived branch workflow is well-suited to the pace and development style of scientific software.
We could just code directly on the main branch, but if we make a mistake and want to roll back changes, this could have a big impact on the work of others. Instead, we can create a new branch for this feature, and then merge it back into the main branch when we’re done. This allows others to keep working off the code on main while we work on our new feature in isolation. When our code is working as we want it, we can merge it back into the main branch, and they will then be able to access it.
Let’s go back to our SIR model example and see how we can use branching.
9.2 Branching Example
9.2.1 Creating a Branch
Let’s say that we want to add some code that calculates the final size of the epidemic for a range of transmission parameters (i.e., varying \(R_0\) to adjust \(\beta\)). Because our desired feature is a nice discrete piece of work that isn’t dependent on other work, we can make a branch for it. Importantly, it’s a relatively small and self-contained feature so it shouldn’t proliferate into a long-lived branch as we work on it i.e., we shouldn’t end up in a situation where there is a never-ending list of tasks to perform before we can consider the feature complete.
To create a new branch, we navigate to GitKraken and make sure our local machine is up to date with the remote repository i.e., perform a pull and resolve any conflicts. Making sure we’re on the main branch (we should be as we haven’t created any branches yet), we can create a new branch by clicking on the “Branch” button in the middle of the GitKraken toolbar, and then typing in a branch name.
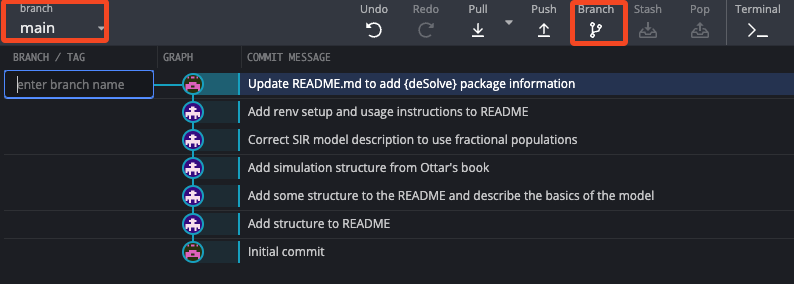
After entering a name, a new branch will be created, and we can see that we’re now on the new branch, final-size-calc. Hovering our mouse of the branch icon, we can see that both main and final-size-calc are listed, and we can switch between them by double-clicking on the branch we want to switch to. This also shows that both branches are currently at the same commit, as indicated by the horizontal marker pointing to the same commit.

Now we’re ready to start adding code.
Terminal Commands
# checkout changes the branch
# -b creates a new branch with the given name
git checkout -b final-size-calc
9.2.2 Adding Code
Add the following R code to the end of the sir_model.R / sir_model.py file:
R Code
# Candidate values for R0 and beta
R0 <- seq(0.1, 5, length = 50)
betas <- R0 * 1/2

# Calculate proportion infected for each value of R0
# map2_dfr is a {purrr} function that applies a function to two vectors i.e., it is a vectorized version of a for loop, and returns a data frame
final_size_df <- map2_dfr(
  .x = betas,
  .y = R0,
  .f = function(.x, .y) {
    equil <- runsteady(
      y = c(S = 1 - 1E-5, I = 1E-5, R = 0),
      times = c(0, 1E5),
      func = sirmod,
      parms = c(mu = 0, N = 1, beta = .x, gamma = 1/2)
    )

    tibble(
      R0 = .y,
      final_size = equil$y["R"]
    )
  }
)

ggplot(final_size_df, aes(x = R0, y = final_size)) +
  geom_line(linewidth = 2) +
  labs(x = "R0", y = "Final size")
Python Code
# Candidate values for R0 and beta
R0 = np.linspace(0.1, 5, 50)
betas = R0 * 1 / 2

solve_ivp(
    sirmod, [tmin, 1e5], start, args=parms
).y[2, -1]

final_size_df = pd.DataFrame({"R0": R0, "final_size": np.zeros(len(R0))})

for (index, beta) in enumerate(betas):
    p = (beta, mu, gamma, N)
    final_size_df.final_size[index] = solve_ivp(sirmod, [tmin, 1e5], start, args=p).y[2, -1]

(
    ggplot(final_size_df, aes(x='R0', y='final_size'))
    + geom_line(size=2)
    + labs(x='R0', y='Final size')
)
After staging and committing the changes, we’ll see that our final-size-calc branch is now ahead of the main branch by one commit. We’ll also notice that final-size-calc only exists locally, and not on the remote repository.
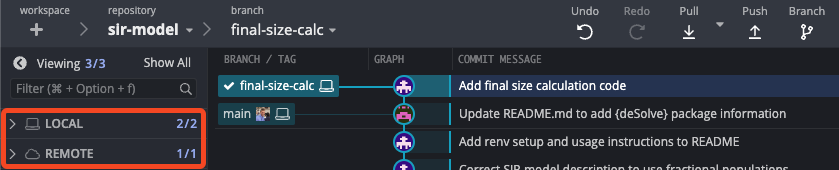
This is expected as we haven’t pushed the final-size-calc branch to the remote repository yet, so GitHub doesn’t know about it. So let’s push the commit.
GitKraken will immediately ask us to name the remote branch. Click “Submit” with the default to avoid any confusion that may be caused by using a different name locally and remotely for the same branch.

We’ll now see that both our local machine and GitHub are pointing to the same commit for the final-size-calc branch.
Terminal Commands
# Stage and commit the changes
git add .
git commit -m "Add final size calculation code"

# Show git tree
git log --graph --decorate --oneline --all

# Push the commit to the remote repository
# -u sets the upstream branch to the remote branch of the same name
# origin is the name of your remote (the default name)
# final-size-calc is the name of the local branch you want to push
git push -u origin final-size-calc
9.2.3 Merging the Branch
Now we’ve added code and pushed it to GitHub, we can keep going and add more code to the final-size-calc branch. But in this case, we’re done, so we can merge the final-size-calc branch back into the main branch. You can do this on your local machine, but let’s do it on GitHub with a pull request, as this is more appropriate for collaborative work, and doesn’t require any additional steps when we’re working on our own, so is a better default workflow.
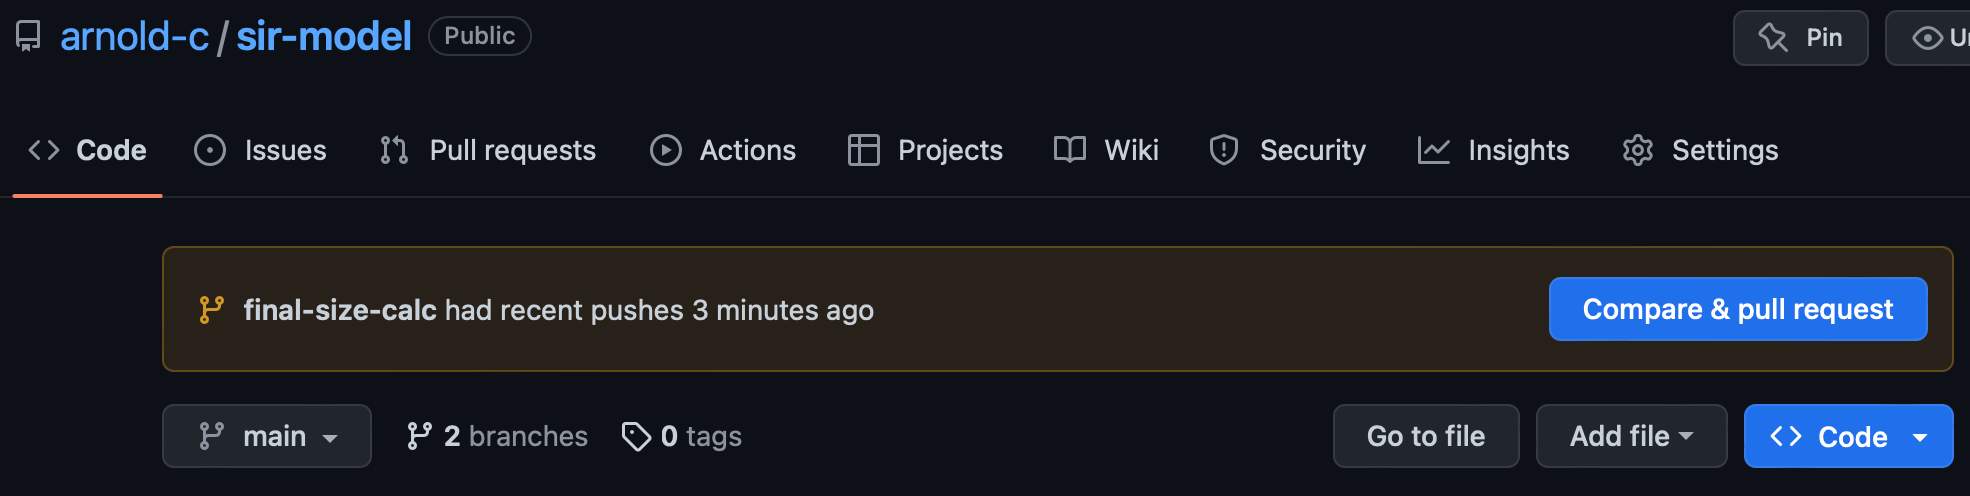
Navigating to GitHub, we see that final-size-calc has recent pushes and GitHub prompts us to start a pull request. Go ahead and click “Compare & pull request”.
Doing so, we are presented with a lot of information. The key points are that there are two buttons at the top of the page that allow you to select which branches are being compared in the pull request, i.e., you want to merge together. The base branch is the branch that you want to merge into, and the compare branch is the branch that you want to merge from. So in this example, our changes happened on the final-size-calc (compare) branch, and we want to merge them into the main (base) branch. Because there are no conflicting changes, e.g., changes to the same lines of code, GitHub can automatically merge the branches for us, hence the “Able to merge” message.
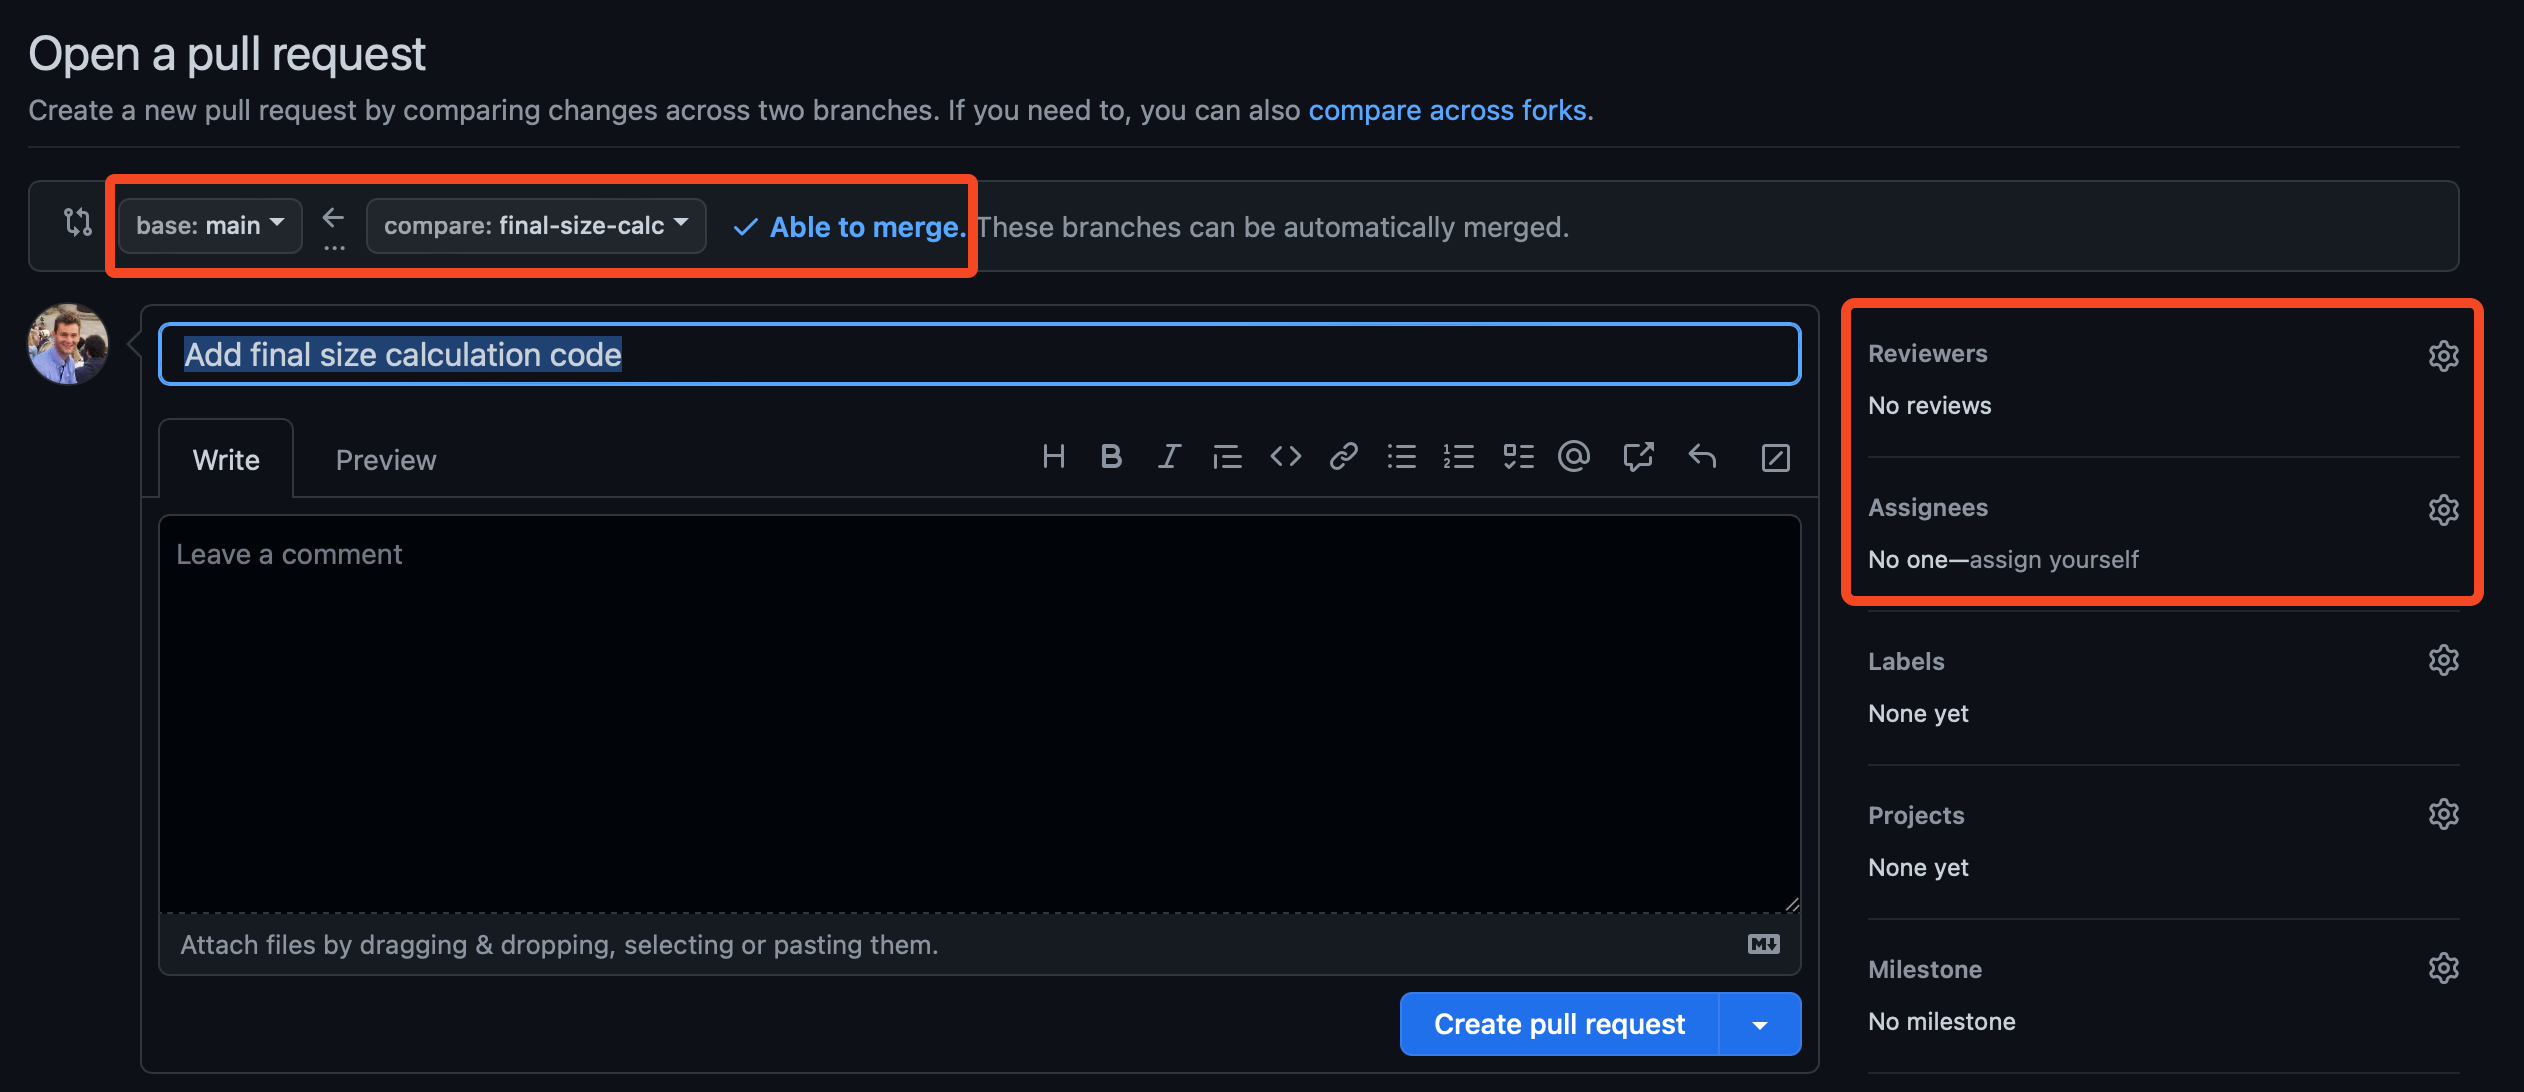
As we only made one commit, the pull request message defaults to the commit message. In instances where you’ve made multiple commits, you can edit the pull request message to provide a more detailed description of the changes you’ve made.
On the right hand side of the pull request page, you will see the option to add reviewers, assignees etc. This is useful for collaborative work where you want collaborators to check your work for correctness, and is a good habit to get into. You can also use GitHub Projects to keep track of your work and upcoming tasks, so linking to a project can help you visualize the work you’re doing and how it fits into the bigger picture.
After clicking “Create pull request”, GitHub will go through some checks to make sure that the branches can be merged, and notify any reviewers that you’ve added. It uses GitHub Actions to do this, which is a powerful tool for automating tasks, and worth exploring in more detail when you’re comfortable with Git and GitHub.
Assuming everything checks out, you can click “Merge pull request” to merge the branches.
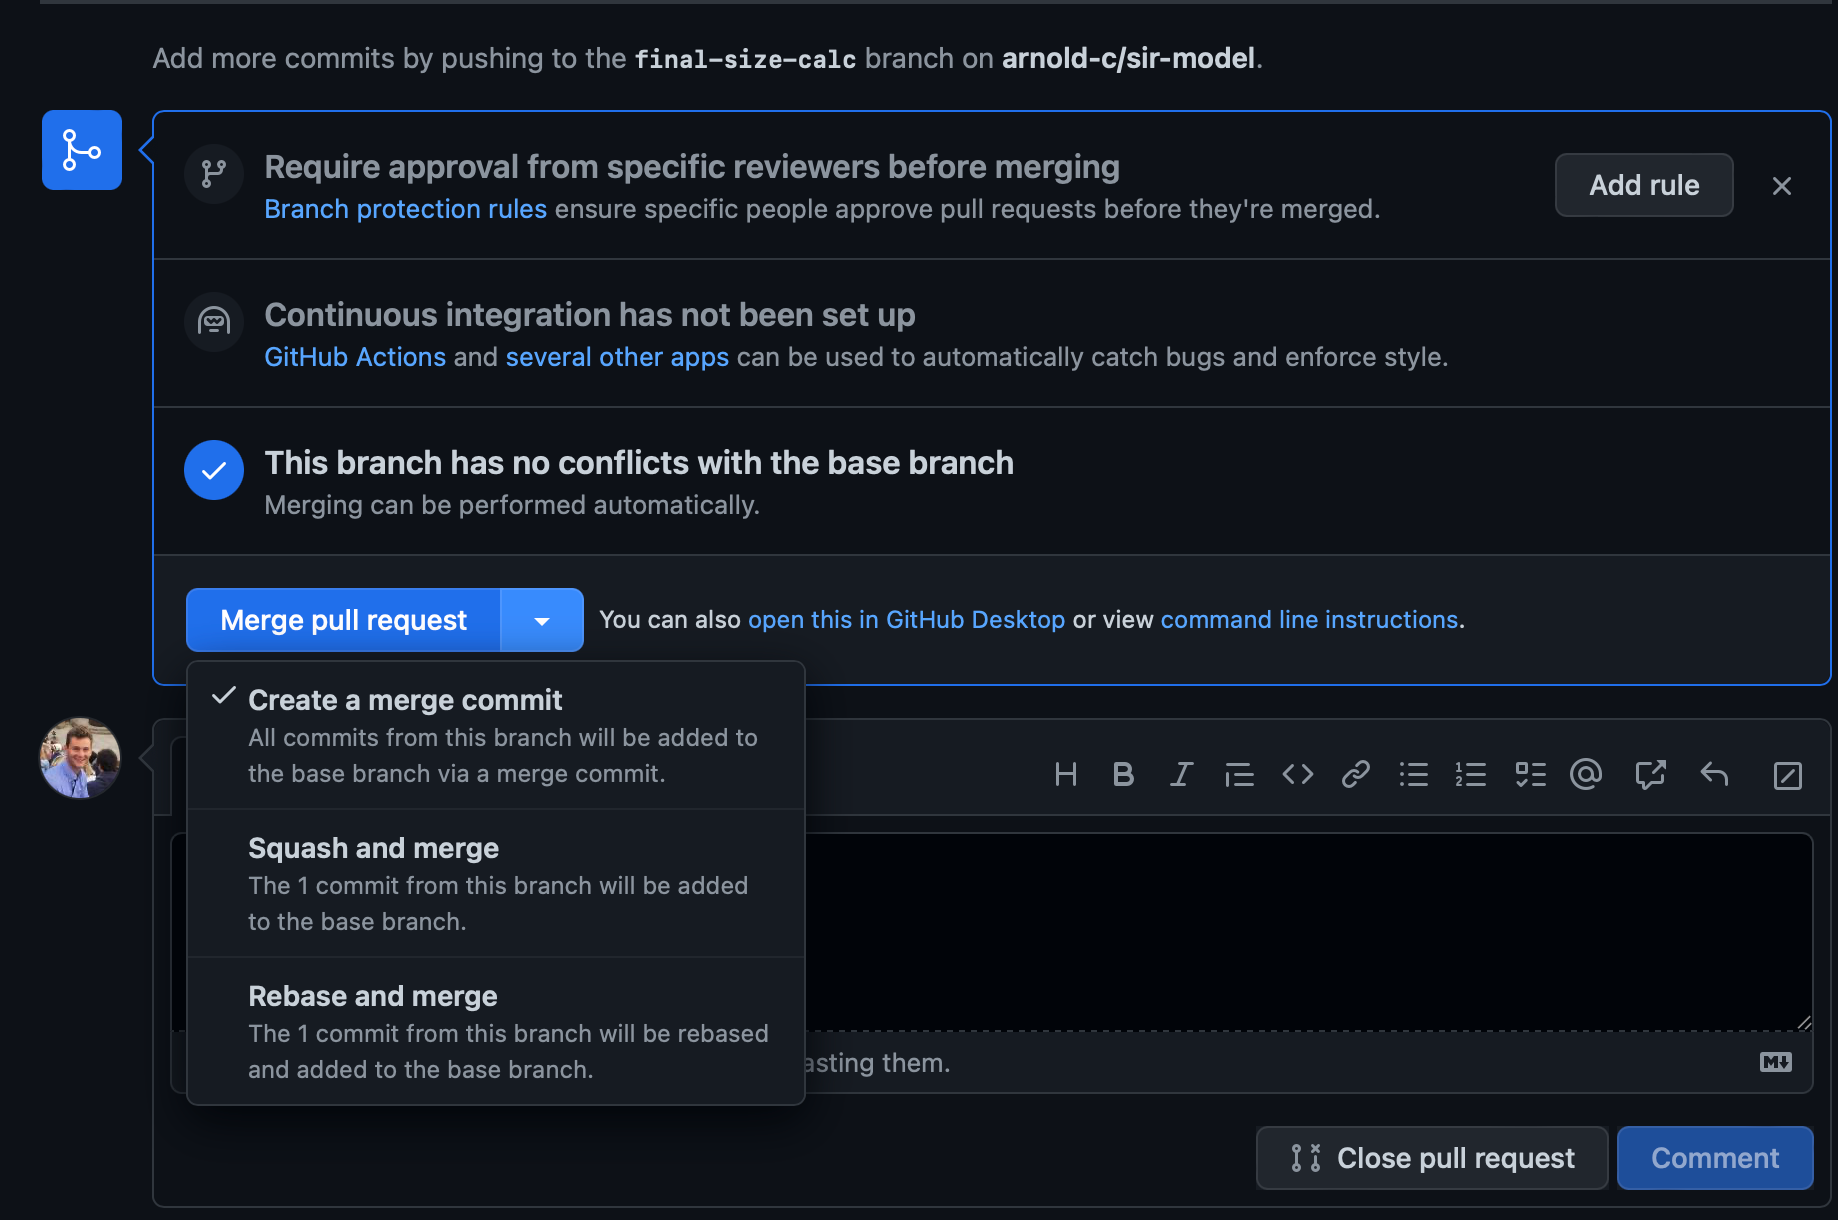
Clicking on the drop-down menu of the “Merge pull request” button will allow you to choose how to merge the branches. The default retains all of the commits in the comparison branch separate, which is useful if you want to keep a record of all the changes you made.
“Squash and merge” will combine all of the commits on the comparison branch into a single commit, which is useful if you want to don’t need to keep a record of exactly how you ended up with the final version of the new code, and just want to show that you added the feature.
“Rebase and merge” will add all the commits from the comparison branch to the end of the base branch, which is useful the files modified in the pull request are in conflict with changes in the base branch.
You can find more information about the different pull request merge methods here.
9.2.4 Cleaning Up Our Repository
After successfully merging the branches, we can delete the final-size-calc branch as it is no longer needed. Don’t worry, you still have your full Git history, and the branch can always be restored if required, but this is a good way to keep your repository tidy and avoid accidentally making changes to an old branch.
To delete the remote branch, just click on the “Delete branch” button that appears after merging the pull request.
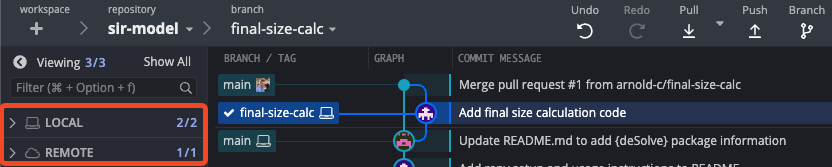
At this point, we can head back to GitKraken. One really nice feature of GitKraken is that it’s easy to see what we’ve done as it shows us the Git tree. This is something that you can’t do in the command line, or the GitHub Desktop application, and is a really useful way to keep track of your work, particularly if you have a lot of, or long-lived, branches (which you know you shouldn’t!).
Here, we can see that there is now only one branch remotely, but two locally.
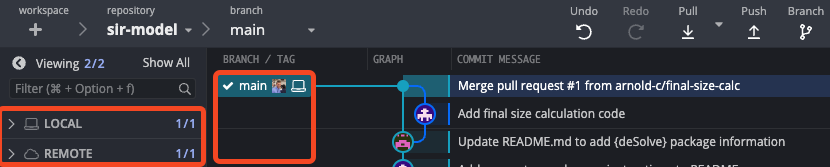
If we double-click on the main local branch, we will checkout that branch, i.e., we will switch to it. We then pull the changes from the remote and main will now be up to date on our local machine.
If we now right click on the final-size-calc local branch, we can delete it by selecting the option “Delete final-size-calc”. We will now see the updated Git history.
Terminal Commands
# Delete the remote branch
git push -d origin final-size-calc

# Delete the local branch
git branch -d final-size-calc