10 How to Collaborate
Often in science, we’re not the only people who are working on a project. If we are working with others, it is worth learning about effective ways to use Git, allowing for asynchronous collaboration and minimizing the risk of merge conflicts. Fortunately for us, much of this revolves around the branching concept outlined in the previous chapter.
10.1 Feature Branches
The main principal is that every new feature/change, where that is a bug fix or new model, has its own branch. Ideally, each one will will only be a small change, but sometimes this gets away from us and results in 500 lines changes.
10.1.1 Why GitHub Issues
GitHub has a couple of useful features that make this easy to work with, as well as track progress in your todo list of features. The first key concept is the liberal use of GitHub issues. For every feature I want to add, I create an issue (I promise this is going somewhere). Each issue should be small enough that is only does one thing and is easy to understand and review (though it will likely be comprised of multiple commits).
For example, say I have just added my final size calculation code and I realize that I want update my model to be an SEIR model instead of an SIR model. I could just make a new branch and be done with it, but creating an issue allows us to track which commits are involved in the change. It also allows us to outline a number of changes we wish to make over the next short while and link them, making it easier to remember what we wanted to do when we come back to a project, as well as who was working on the changes.
10.1.2 Creating an Issue
To create an issue, simply navigate to your project in GitHub, click on the Issues tab, and then on the “New Issue” button.
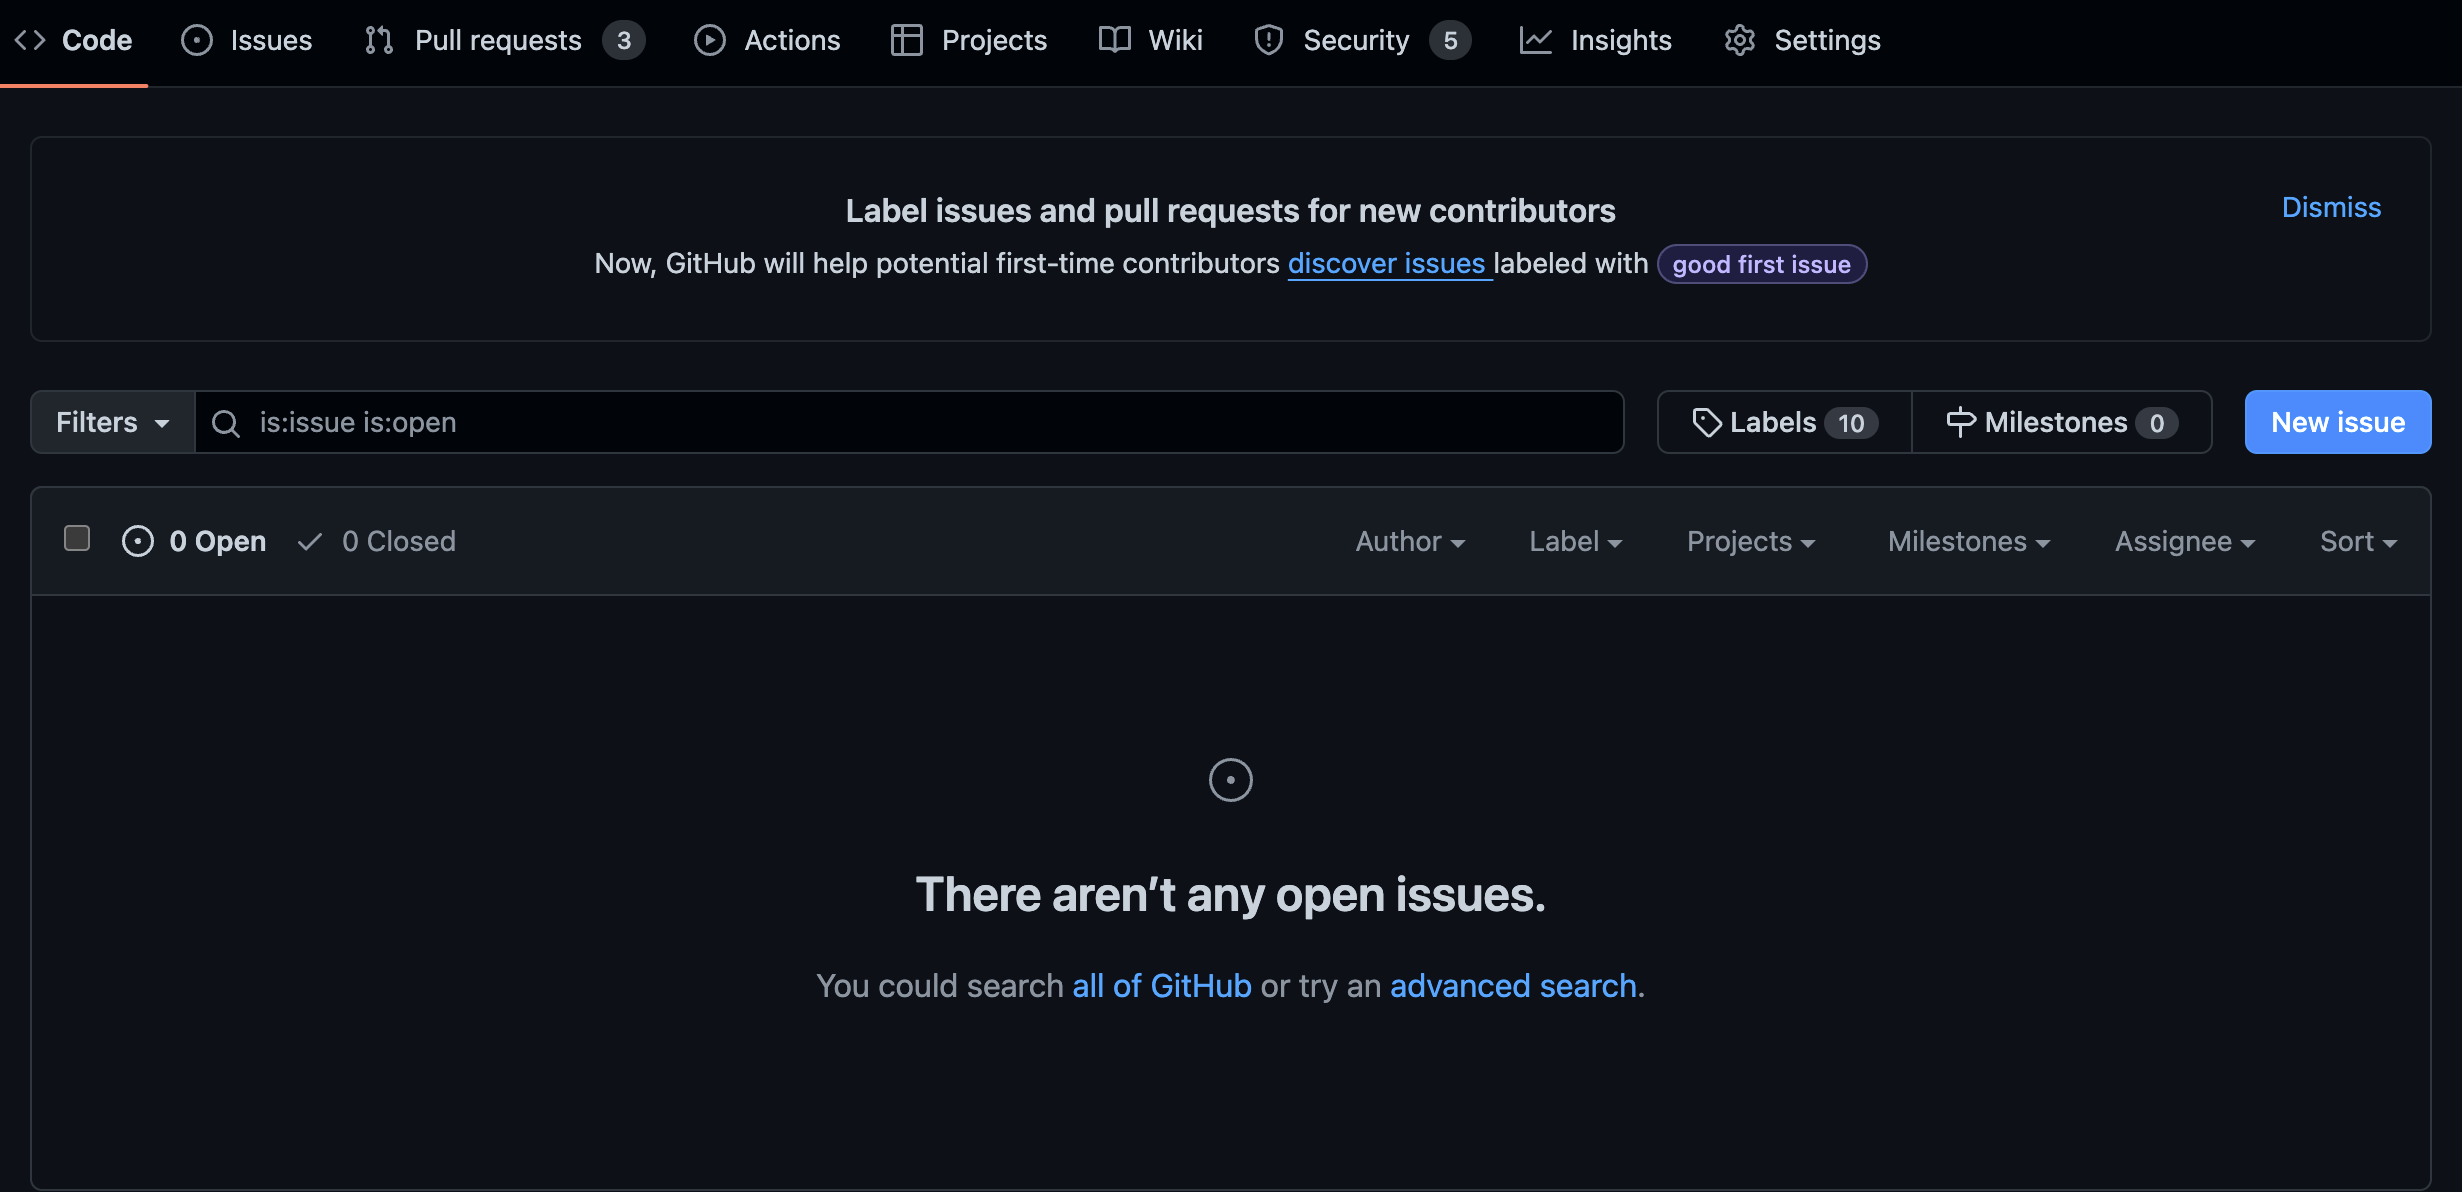
From here, add a short and descriptive title, explanation, and assign the issue to someone (if you’re the only person in the project, this obviously isn’t necessary). You may also find it useful to add a label to the issue to distinguish it from other issues later on (e.g., use the default “enhancement” label for new features and “bug” for bugs).
You can also create a GitHub issue from directly within GitKraken if you are signed into your GitHub account.
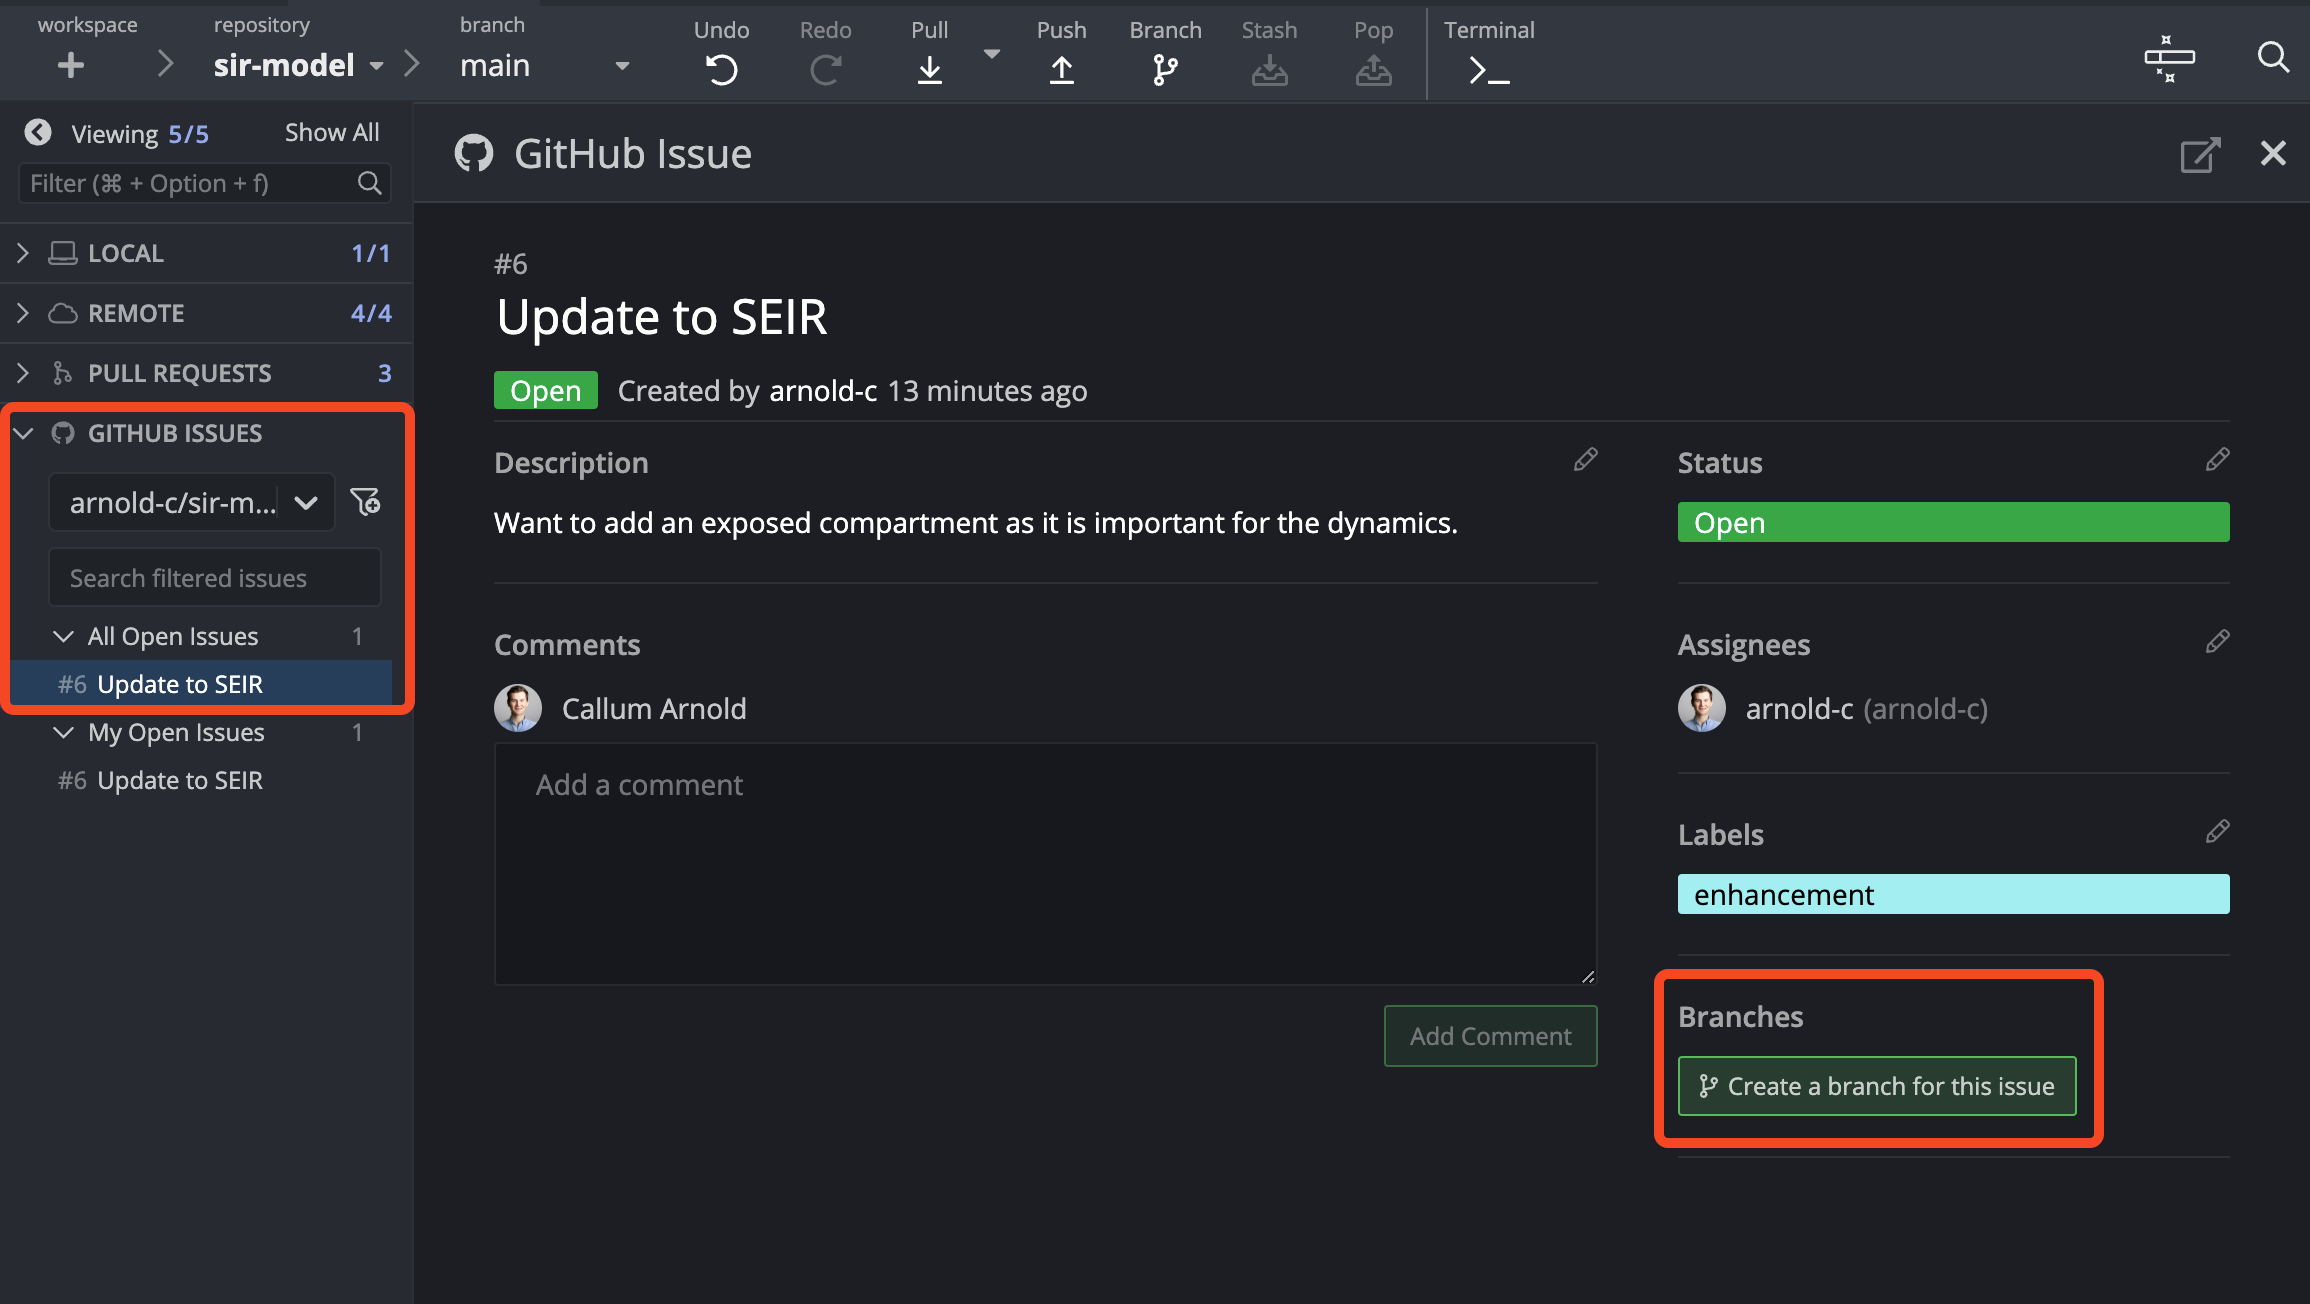
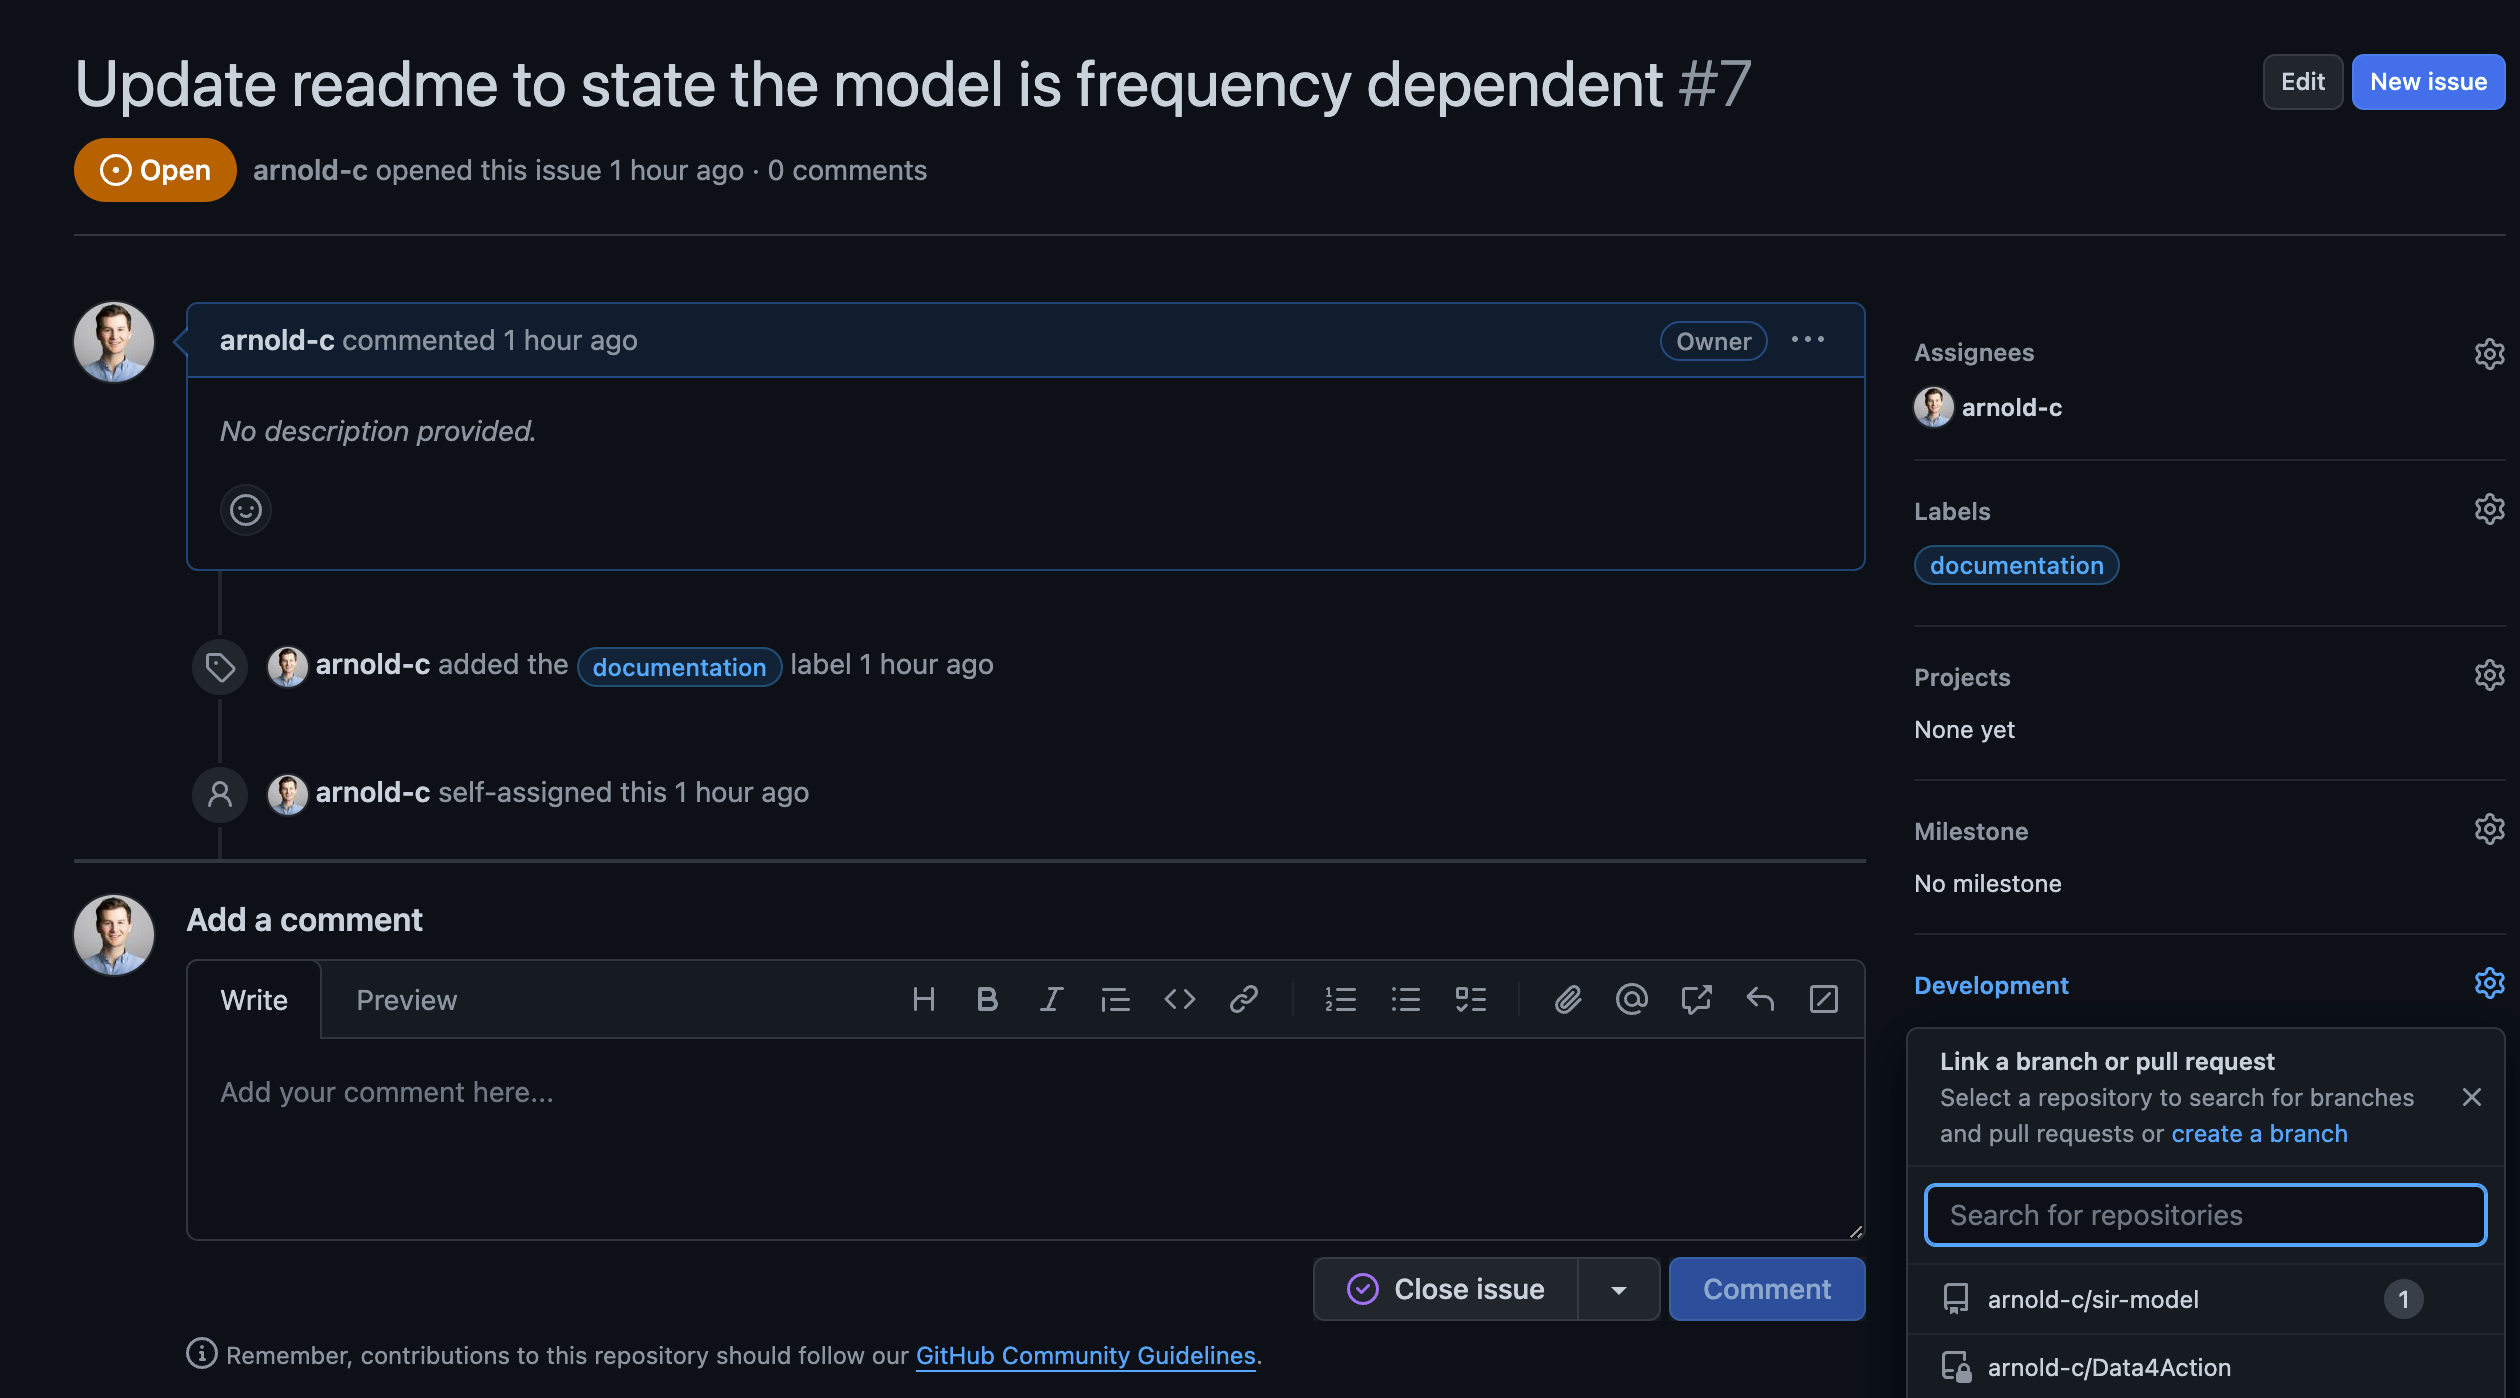
Once you have created the issue, you will see an option on the right side that suggests you “Create a branch”, under the “Development” heading. You can use this (I would recommend this approach as I find it a bit cleaner - it only requires a fetch and checkout to get working on it), or you can open up GitKraken and do the same thing there as GitKraken will create a local branch that you can get working in straight away. I’m demonstrating this way just in case you come across this feature and it doesn’t seem to connect the two as you’d expect (as it did for me, which is why the two screenshots refer to different issues). Opening up your repository, you will see in the sidebar a heading “GitHub Issues”. Clicking on that will reveal your issues, and upon selecting the correct one you will see an option to create a feature branch.
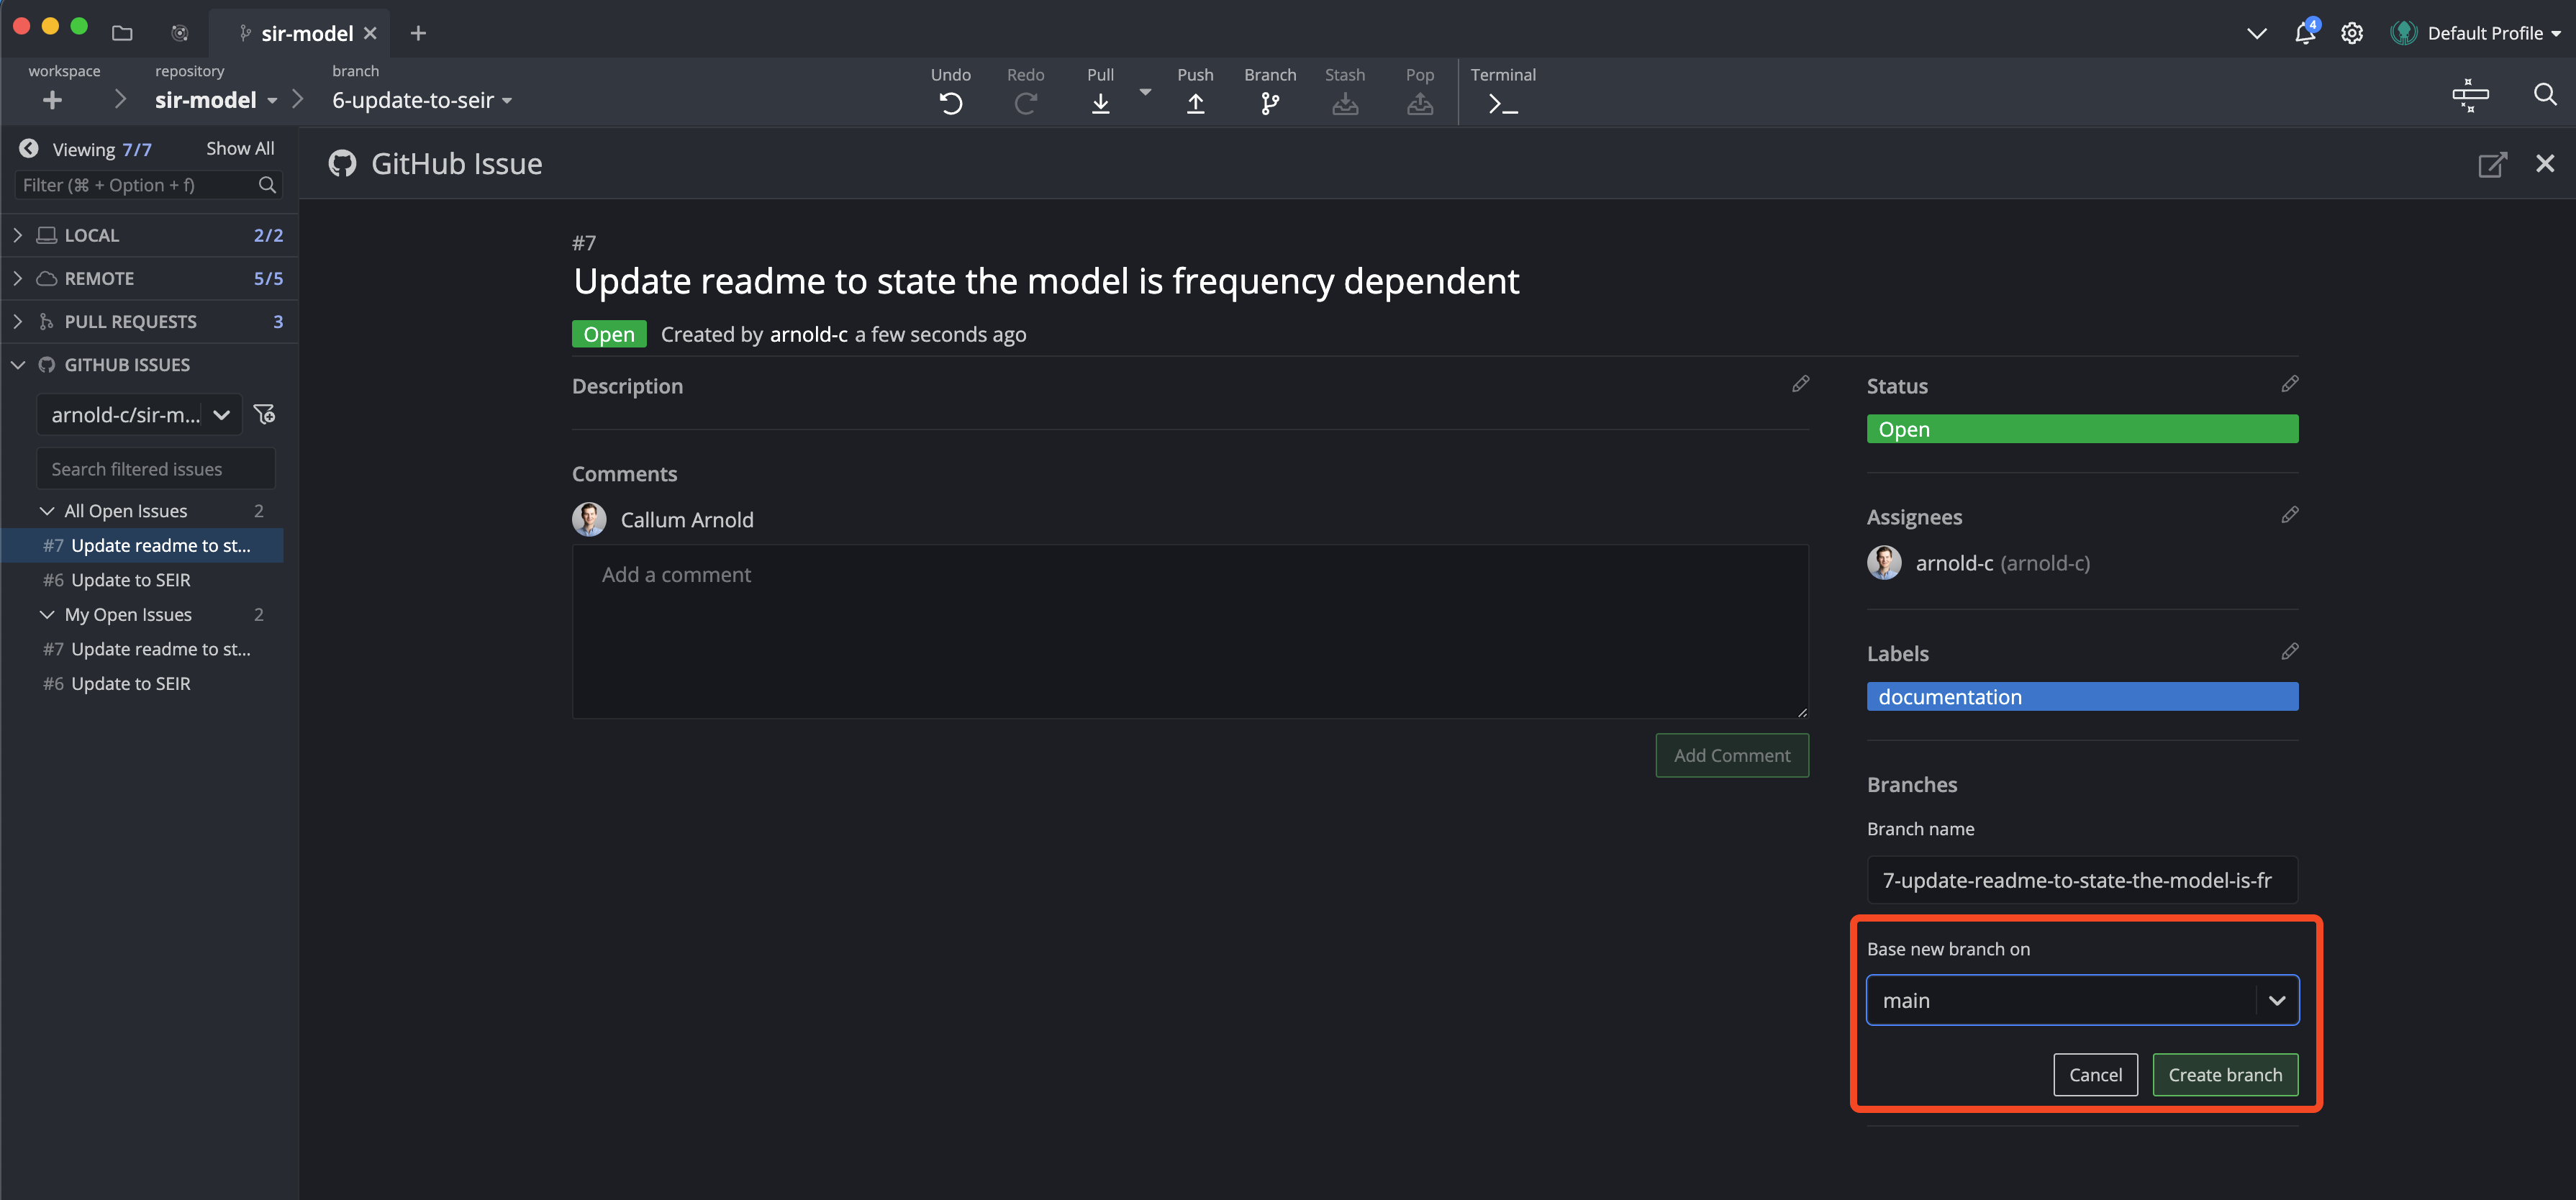
Going through the next steps, you can name your branch whatever you like (though I tend to leave the default suggestion as they’re not hanging around for long), and which branch you want to use for the base. If you’re following the short-lived branch strategy, your base should probably be the main branch, an no others should be around for long enough that extra features can be branches off of them. Once you have your new local branch created, you should push it so there is a copy on your remote repository. There is just one final thing you need to do - connect your branch to your issue. Clicking on the “Development” heading of the issue will provide you with a menu to search all your repositories and then your branches that you can choose to link with the issue. At this point, you’re ready to update your code.
Below is code that updates the simulation files (simulation.R and simulation.py). Go ahead and update your code and then commit and push your changes to your remote repository.
R Code
library(deSolve)
library(tidyverse)
library(rootSolve)

theme_set(theme_minimal())

seirmod <- function(t, y, parms) {
  # Pull state variables from y vector
  S <- y[1]
  E <- y[2]
  I <- y[3]
  R <- y[4]

  # Pull parameter values from parms vector
  beta <- parms["beta"]
  sigma <- parms["sigma"]
  mu <- parms["mu"]
  gamma <- parms["gamma"]
  N <- parms["N"]

  # Define equations
  dS <- mu * (N - S) - beta * S * I / N
  dE <- beta * S * I / N - sigma * E
  dI <- sigma * E - (mu + gamma) * I
  dR <- gamma * I - mu * R
  res <- c(dS, dE, dI, dR)

  # Return list of gradients
  list(res)
}


times <- seq(0, 26, by = 1 / 10)
parms <- c(mu = 0, N = 1, beta = 2, sigma = 1, gamma = 1 / 2)
start <- c(S = 0.999, E = 0.0, I = 0.001, R = 0)

out <- ode(y = start, times = times, func = seirmod, parms = parms)
out_df <- as_tibble(out) %>%
  pivot_longer(cols = -time, names_to = "state", values_to = "number") %>%
  mutate(
    time = as.numeric(time),
    number = as.numeric(number),
    state = factor(state, levels = c("S", "E", "I", "R")),
    number = round(number, 6)
  )

ggplot(out_df, aes(x = time, y = number, color = state)) +
  geom_line(linewidth = 2) +
  labs(x = "Time", y = "Number", color = "State")


# Candidate values for R0 and beta
R0 <- seq(0.1, 5, length = 50)
betas <- R0 * 1 / 2

# Calculate proportion infected for each value of R0
# map2_dfr is a {purrr} function that applies a function to two vectors i.e., it is a vectorized version of a for loop, and returns a data frame
final_size_df <- map2_dfr(
  .x = betas,
  .y = R0,
  .f = function(.x, .y) {
    equil <- runsteady(
      y = c(S = 1 - 1E-5, E = 0.0, I = 1E-5, R = 0),
      times = c(0, 1E5),
      func = seirmod,
      parms = c(mu = 0, N = 1, beta = .x, sigma = 1, gamma = 1 / 2)
    )

    tibble(
      R0 = .y,
      final_size = equil$y["R"]
    )
  }
)

ggplot(final_size_df, aes(x = R0, y = final_size)) +
  geom_line(linewidth = 2) +
  labs(x = "R0", y = "Final size")
Python Code
# %%
import numpy as np
import pandas as pd
from scipy.integrate import solve_ivp
from plotnine import *


# %%
def seirmod(t, y, beta, mu, sigma, gamma, N):
    # Unpack states
    S, E, I, R = y

    # Define equations
    dS = mu * (N - S) - beta * S * I / N
    dE = beta * S * I / N - sigma * E
    dI = sigma * E - (mu + gamma) * I
    dR = gamma * I - mu * R

    # Return list of gradients
    return dS, dE, dI, dR


# %%
tmin = 0
tmax = 26
tstep = 1 / 10
times = np.arange(tmin, tmax, tstep)

beta = 2
mu = 0
sigma = 1
gamma = 1 / 2
N = 1
parms = (beta, mu, sigma, gamma, N)

S0 = 0.999
E0 = 0
I0 = 0.001
R0 = 0
start = (S0, E0, I0, R0)

# %%
out = solve_ivp(seirmod, [tmin, tmax], np.array(start), args=parms, t_eval=times)

# %%
out_df = (
    pd.DataFrame(out.y).transpose().rename(columns={0: "S", 1: "E", 2: "I", 3: "R"})
)
out_df["time"] = out.t
out_df = out_df.melt(id_vars="time", value_vars=["S", "E", "I", "R"]).rename(
    columns={"variable": "state", "value": "number"}
)

# %%
theme_set(theme_minimal())

(
    ggplot(out_df, aes(x="time", y="number", color="state"))
    + geom_line(size=2)
    + labs(x="Time", y="Number", color="State")
)

# %%
# Candidate values for R0 and beta
R0 = np.linspace(0.1, 5, 50)
betas = R0 * 1 / 2

# %%
solve_ivp(seirmod, [tmin, 1e5], start, args=parms).y[2, -1]

# %%
final_size_df = pd.DataFrame({"R0": R0, "final_size": np.zeros(len(R0))})

for index, beta in enumerate(betas):
    p = (beta, mu, sigma, gamma, N)
    final_size_df.final_size[index] = solve_ivp(seirmod, [tmin, 1e5], start, args=p).y[
        2, -1
    ]

# %%
(
    ggplot(final_size_df, aes(x="R0", y="final_size"))
    + geom_line(size=2)
    + labs(x="R0", y="Final size")
)
Now that you’ve updated the model structure, committed the changes, and pushed your changes to GitHub, you will also want to update the README.md file to indicate to readers the model that you are using.
10.2 Collaborating on the Same Feature
At the same time you’re working on updating the model structure, one of your collaborators has decided to help you out and update the README.md file for the change you’re working on. If all goes well, and you’re not working on the same lines of the same file at the same time, you should be fine. In this case, the only thing to do is to regularly check GitHub for any changes that have been made to the project since you last pushed changes. Imagine the README.md file looks like this:
README.md
## SEIR Model
### About This Project

This is a test project to get used to using Git and GitHub.

The purpose of this project is to create a SEIR model in R.
An SEIR model is a model that describes the spread of a disease in a population, placing individuals in compartments based on their infection status.
The compartments are susceptible (S), exposed (E), infected (I), and recovered (R).
The model is described by the following equations:

```math
\begin{align}
\frac{dS}{dt} &= \mu (N - S) -\beta S \frac{I}{N} \\
\frac{dE}{dt} &= \beta S \frac{I}{N} - \sigma E \\
\frac{dI}{dt} &= \sigma E - \gamma I - \mu I \\
\frac{dR}{dt} &= \gamma I - \mu R
\end{align}
```

```math
\begin{align}
\mu &= \frac{1}{50*52} \\
\beta &= 2 \\
\sigma &= 1 \\
\gamma &= \frac{1}{2} \\\\

N &= 1.0 \\
S_0 &= 0.999 \\
E_0 &= 0 \\
I_0 &= 0.001 \\
R_0 &= 0.0
\end{align}
```

Here, $\mu$ is the mortality and birth rate, $\beta$ is the contact rate multiplied by the per-contact transmission probability, $\sigma$ is the latent rate, and $\gamma$ is the recovery rate.
The units for this are weeks, so the life expectancy is 50 years, and the duration of infection (inverse of recovery rate) is 2 weeks.
If you haven’t made changes to the README.md, pulling the changes won’t cause any problems. Once you have finalized you changes, push them to GitHub and create a pull request, as we did in the branching chapter. If you have both made changes to the same lines of code, you will get a merge conflict as Git doesn’t known which change to keep. This can be resolved, but we will demonstrate that in the troubleshooting examples using a slightly different example where there are multiple branches changing the same lines of code, but the concept is exactly the same.
10.3 Collaborating on Different Features
More often than someone working on the same feature as you at the same time, you will split up the tasks between individuals. You may be working on updating the model to use the SEIR structure, and your collaborator will be working on a different feature, for example, editing the README.md file to be more descriptive about the model - it is a frequency dependent model as we are scaling the transmission terms by \(N\).
You don’t need to follow along with this, but you are welcome to, to get a sense of how to deal with potential merge conflicts.
To do this, I’m first going to create a GitHub issue for the new change we want to make. This is simply going to be an issue with the “documentation” label that states the need to distinguish the model as frequency dependent in the README.md file. Then, I’m going to create a new branch for the feature we want to work on. However, before I create a new branch, I’m going to checkout the main branch, which is the one that contains the code we want to work on (your collaborator would not be creating a new branch off your short-lived branch).
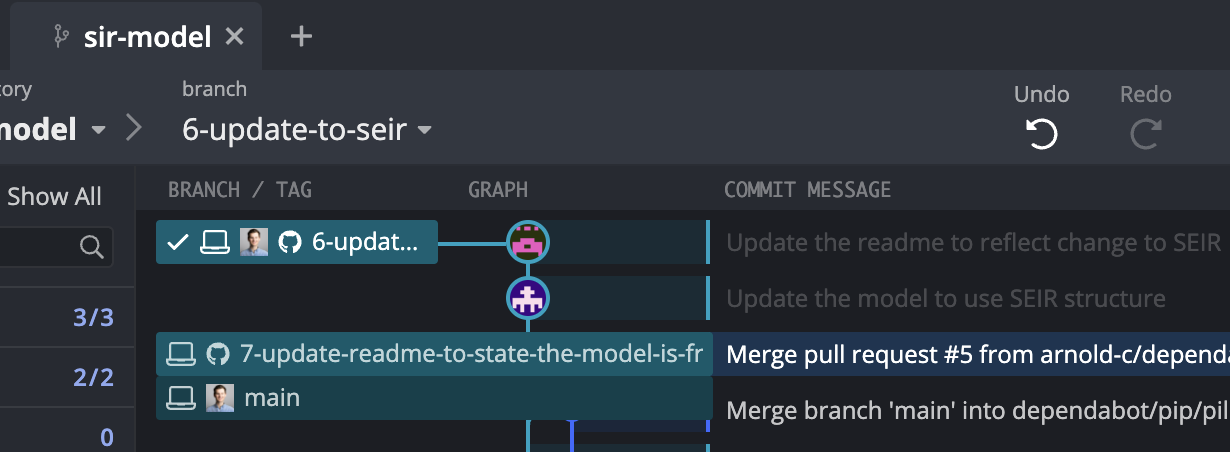
Once this branch has been created, you should see in GitKraken that your new feature branch exists in the same state as your main branch.
Now let’s imagine our collaborator steps away from their computer for a while before they get a chance to modify the README.md file to indicate that we are working on a frequency dependent model.
Their changes might look like this:
README.md
## sir model
### about this project

this is a test project to get used to using git and github.

the purpose of this project is to create a frequency dependent sir model in r.
an sir model is a model that describes the spread of a disease in a population, placing individuals in compartments based on their infection status.
the compartments are susceptible (s), infected (i), and recovered (r).
the model is described by the following equations:

```math
\begin{align}
\frac{ds}{dt} &= \mu (n - s) -\beta s \frac{i}{n} \\
\frac{di}{dt} &= \beta s \frac{i}{n} - \gamma i - \mu i \\
\frac{dr}{dt} &= \gamma i - \mu r
\end{align}
```

```math
\begin{align}
\mu &= \frac{1}{50*52} \\
\beta &= 2 \\
\gamma &= \frac{1}{2} \\\\

n &= 1.0 \\
s_0 &= 0.999 \\
i_0 &= 0.001 \\
r_0 &= 0.0
\end{align}
```

here, $\mu$ is the mortality and birth rate, $\beta$ is the contact rate multiplied by the per-contact transmission probability, and $\gamma$ is the recovery rate.
the units for this are weeks, so the life expectancy is 50 years, and the duration of infection (inverse of recovery rate) is 2 weeks.
Any time multiple people are working on a project and numerous features are being worked on, there is the potential for conflicts when the same file is edited simultaneously and Git doesn’t know which is the “correct” version. To try and avoid that problem, our collaborator should be regularly checking to see if we have made changes to files they are working on (in this case the README.md file). Because we’ve committed and pushed regularly, they see we have changed the file and will want to pull down the changes into their branch. And given we’re working in a short-lived branch, we will have just completed our changes and submitted them as a pull request, but the issue here is that the base of our collaborator’s branch is now out of date - it refers to before you implemented that changes to model structure and README.md. So how does our collaborator resolve this issue?
There are a number of methods to do this, but I’ll just outline the common methods you may see here.
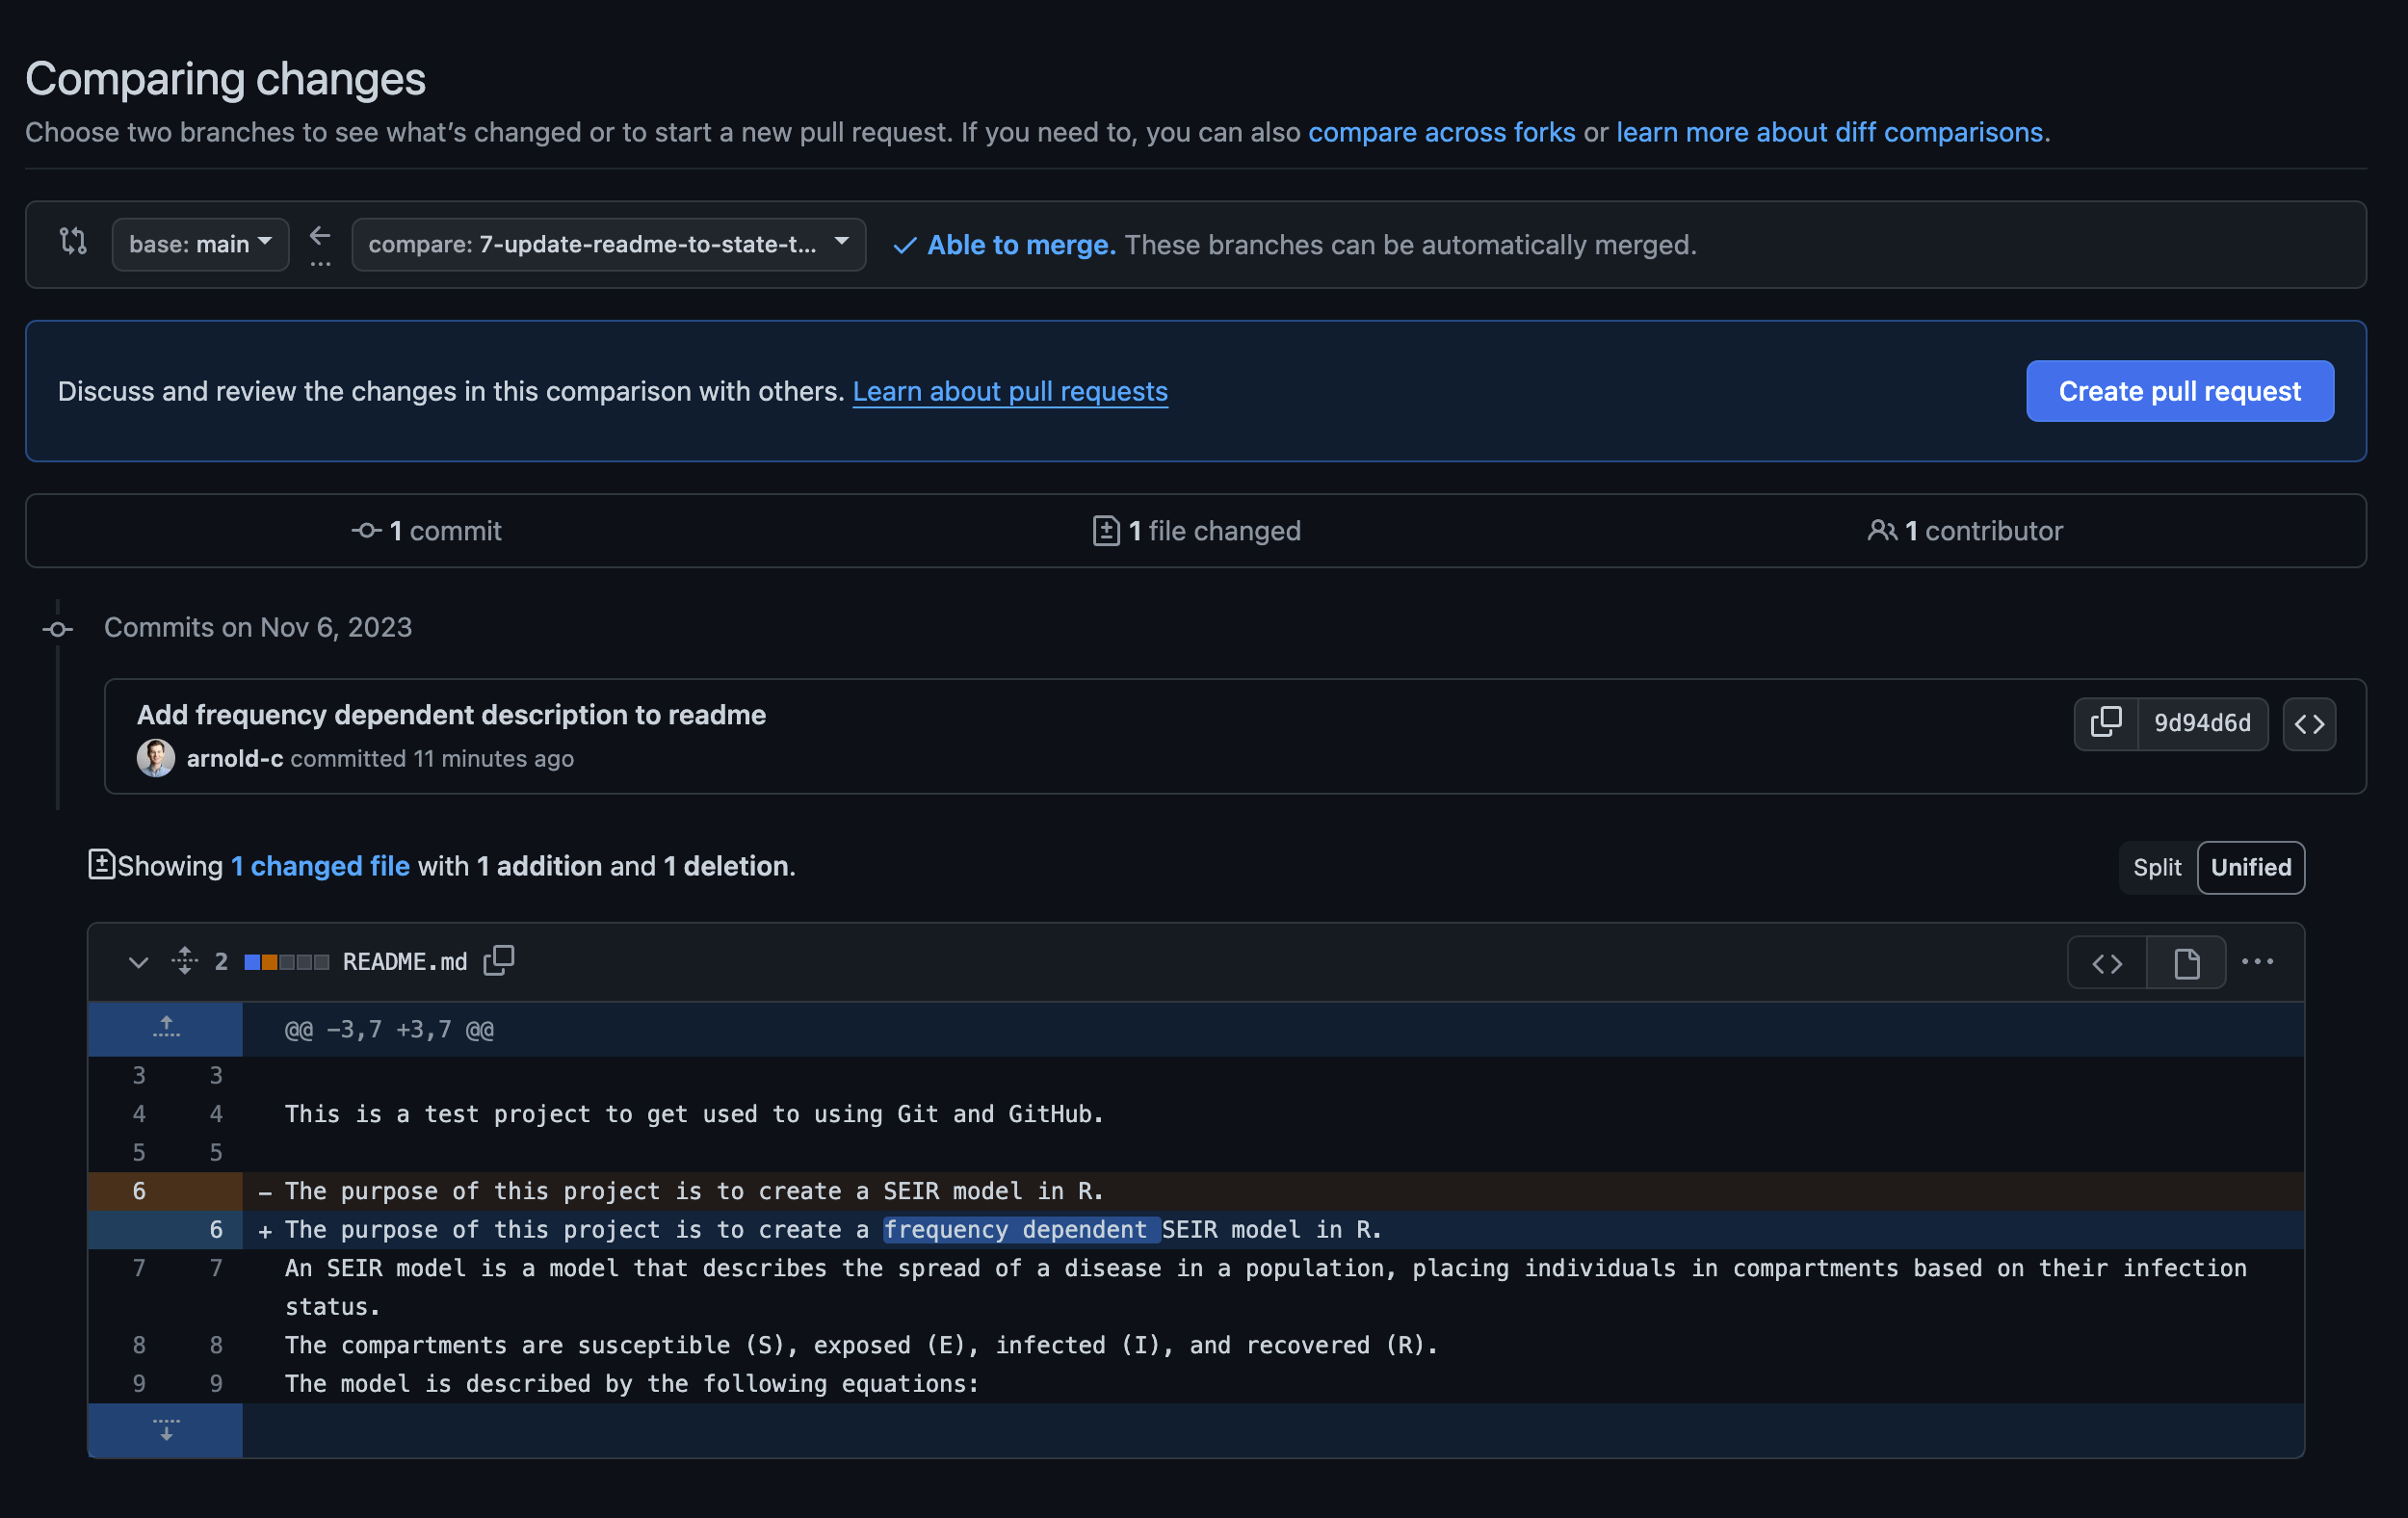
10.3.1 Carry On as Usual & PR
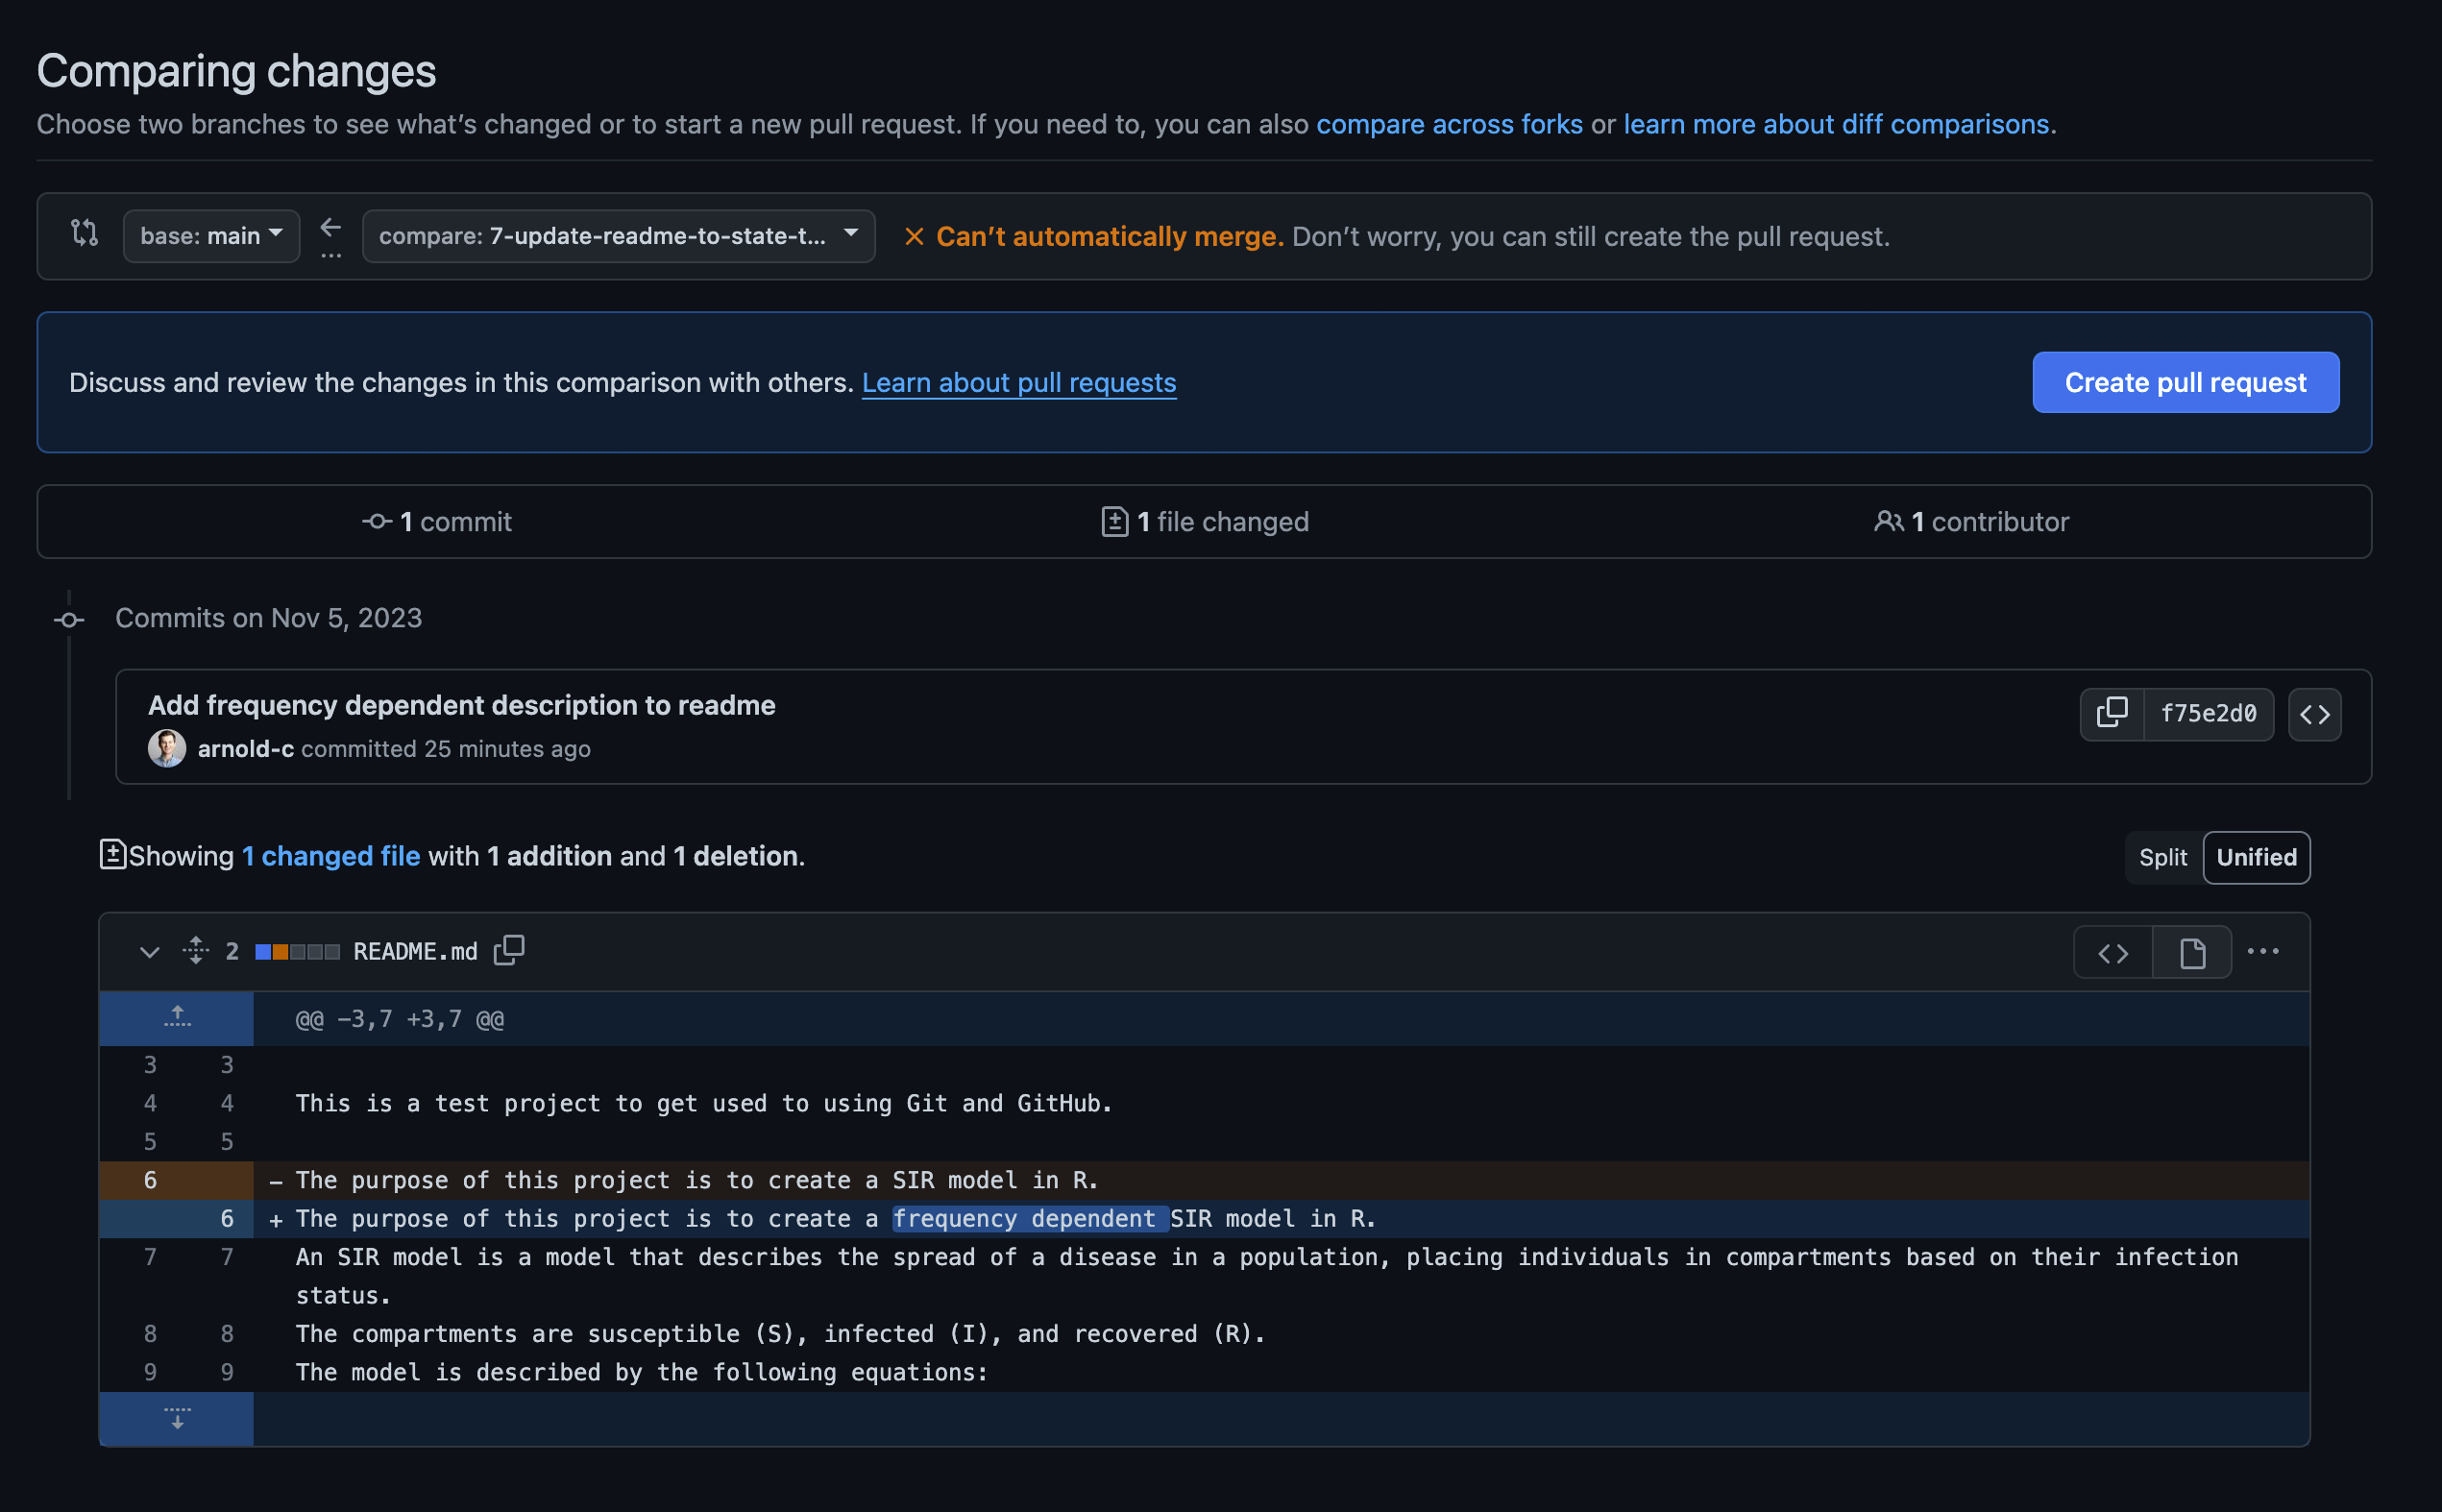
In this strategy, your collaborator doesn’t need to do anything different. They will simply finish their changes, push to their feature branch on GitHub, and then create a pull request to merge back into the main branch. Doing this, they will be faced with a merge conflict on trying to complete the pull request. They can go ahead and create the PR, but they will have to resolve the conflicts before they can be merged into the main branch.
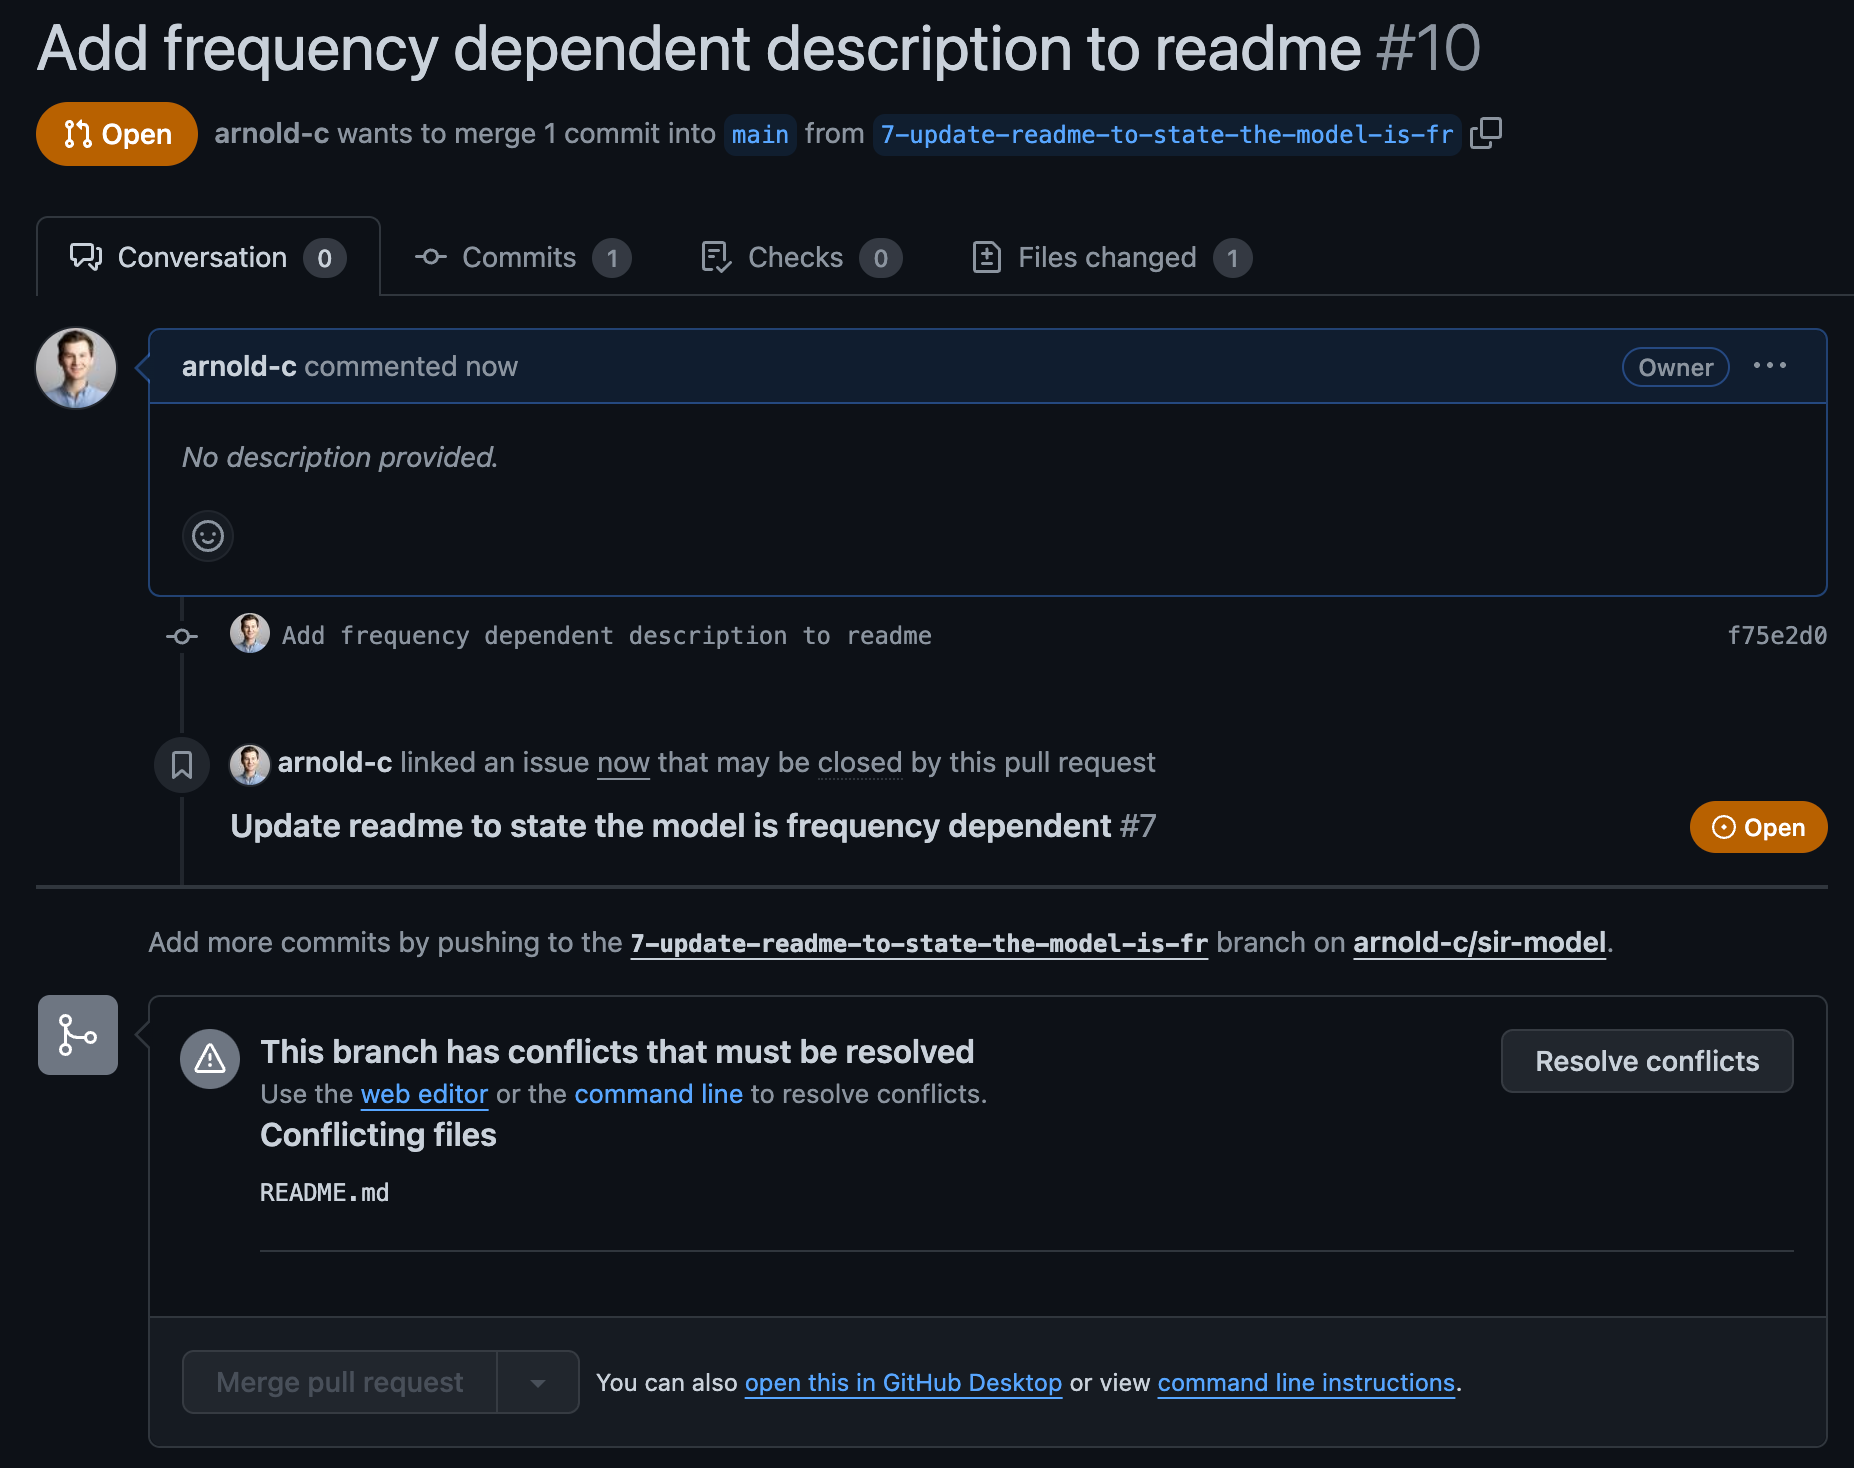
Clicking on the “Resolve conflicts” button will bring up an online editor that will allow them to select the correct version of the code for each conflicting line. The sections that conflict will be between:
<<<< feature-branch
...
=======
...
>>>> main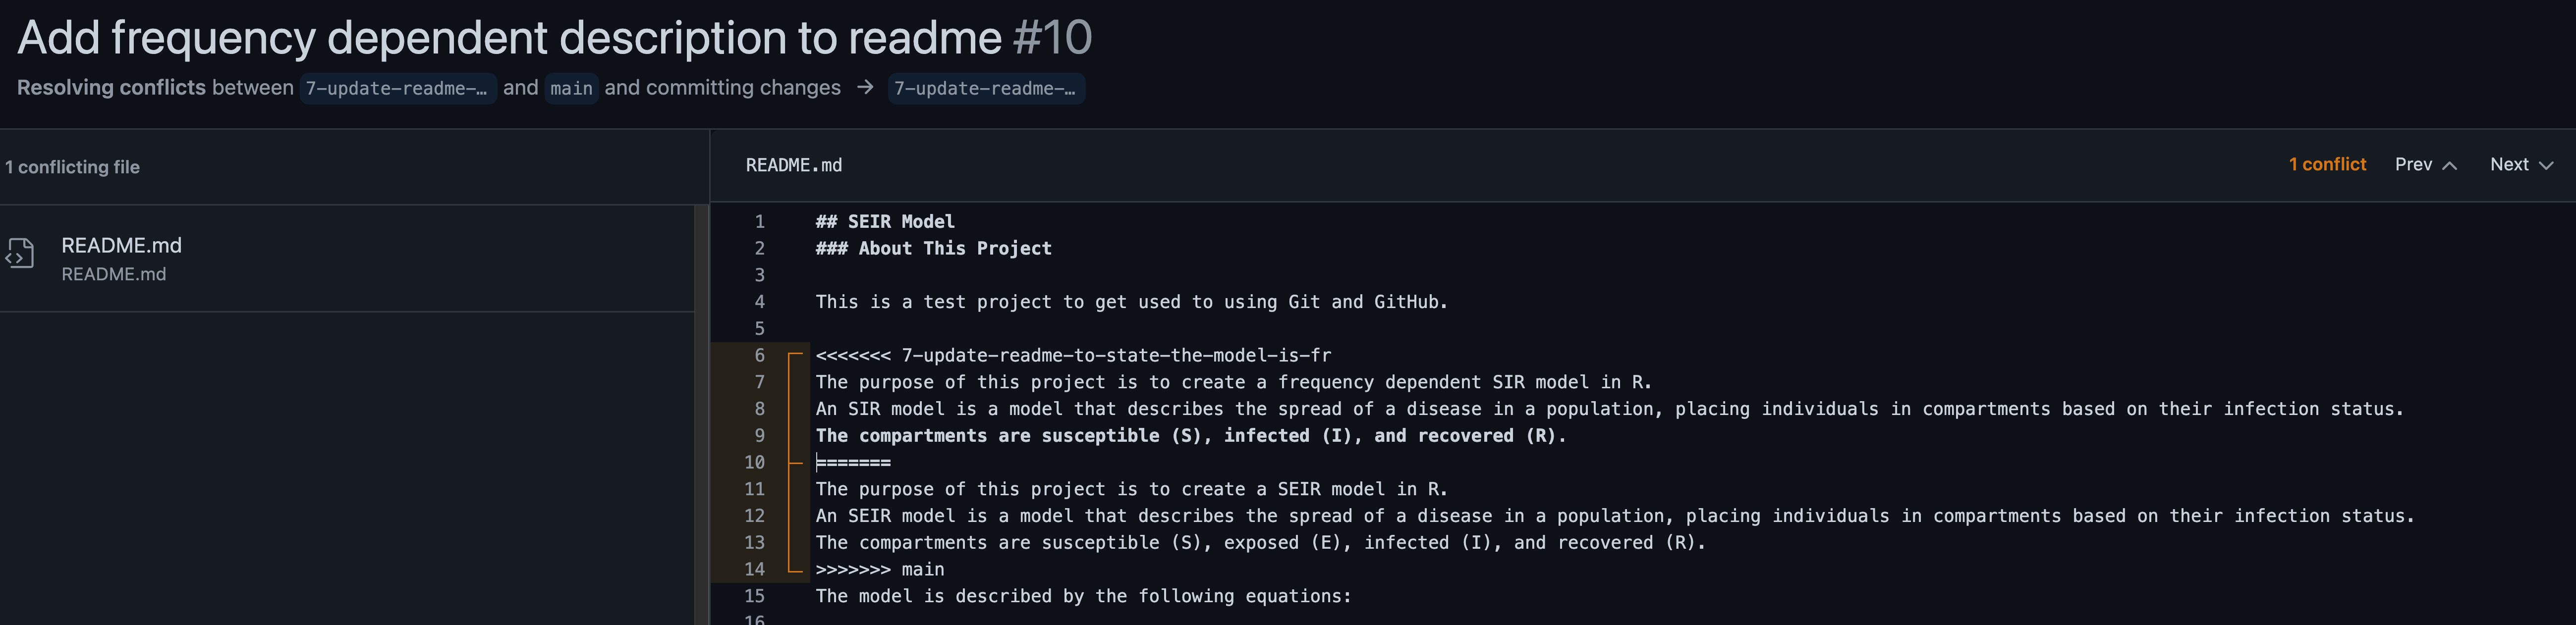
After deleting the incorrect code and surrounding braces, the collaborator can just click on the “Mark as Resolved” button in the top right corner (not shown above) to save this update to the file (often there is more than one file that needs to be corrected), and then click on “Commit merge”.
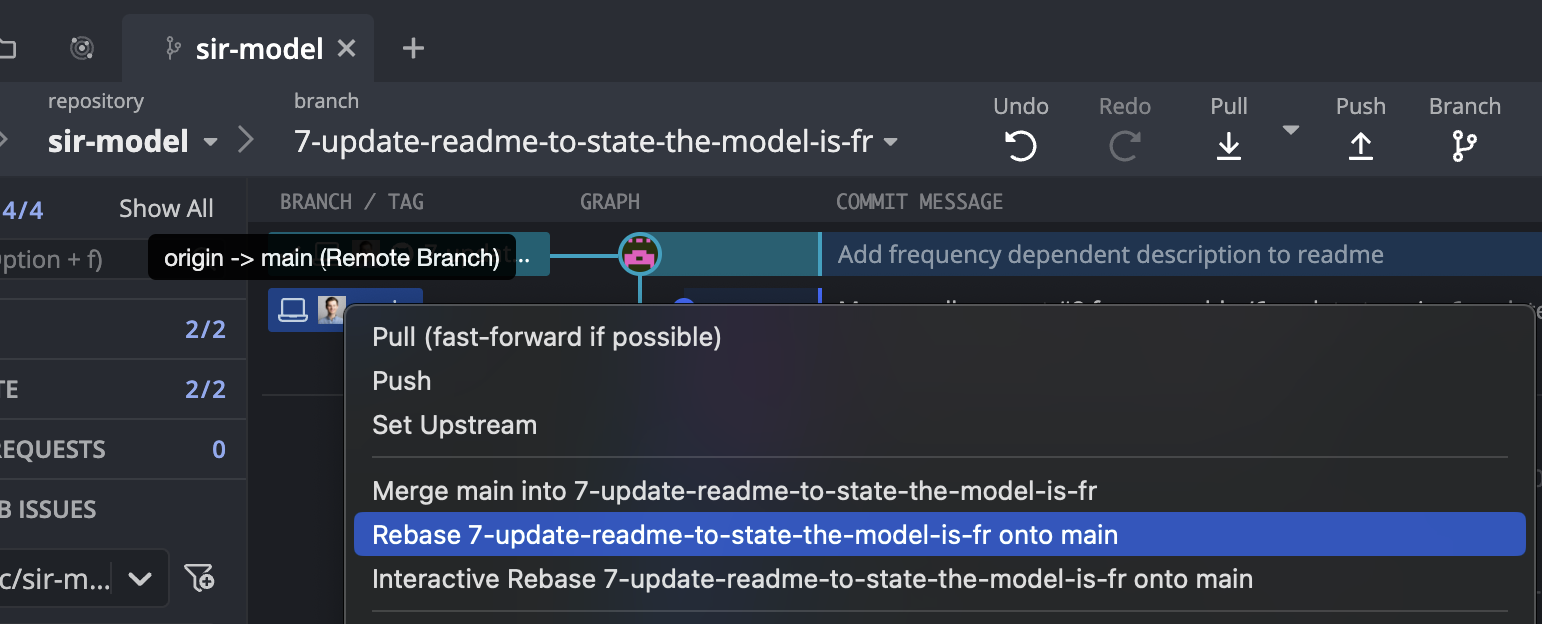
10.3.2 Rebase & PR
This method requires that your collaborator first updates their main branch to the most recent version that is on the remote. From here, there ensure they are checked out on their feature branch. Right clicking on main will bring up a menu that has the option “Rebase feature branch onto main”.
This will try to perform a rebase, and will fail due to a conflict, which it will ask your collaborator to resolve. The conflict can be fixed in GitKraken, or in a regular editor.
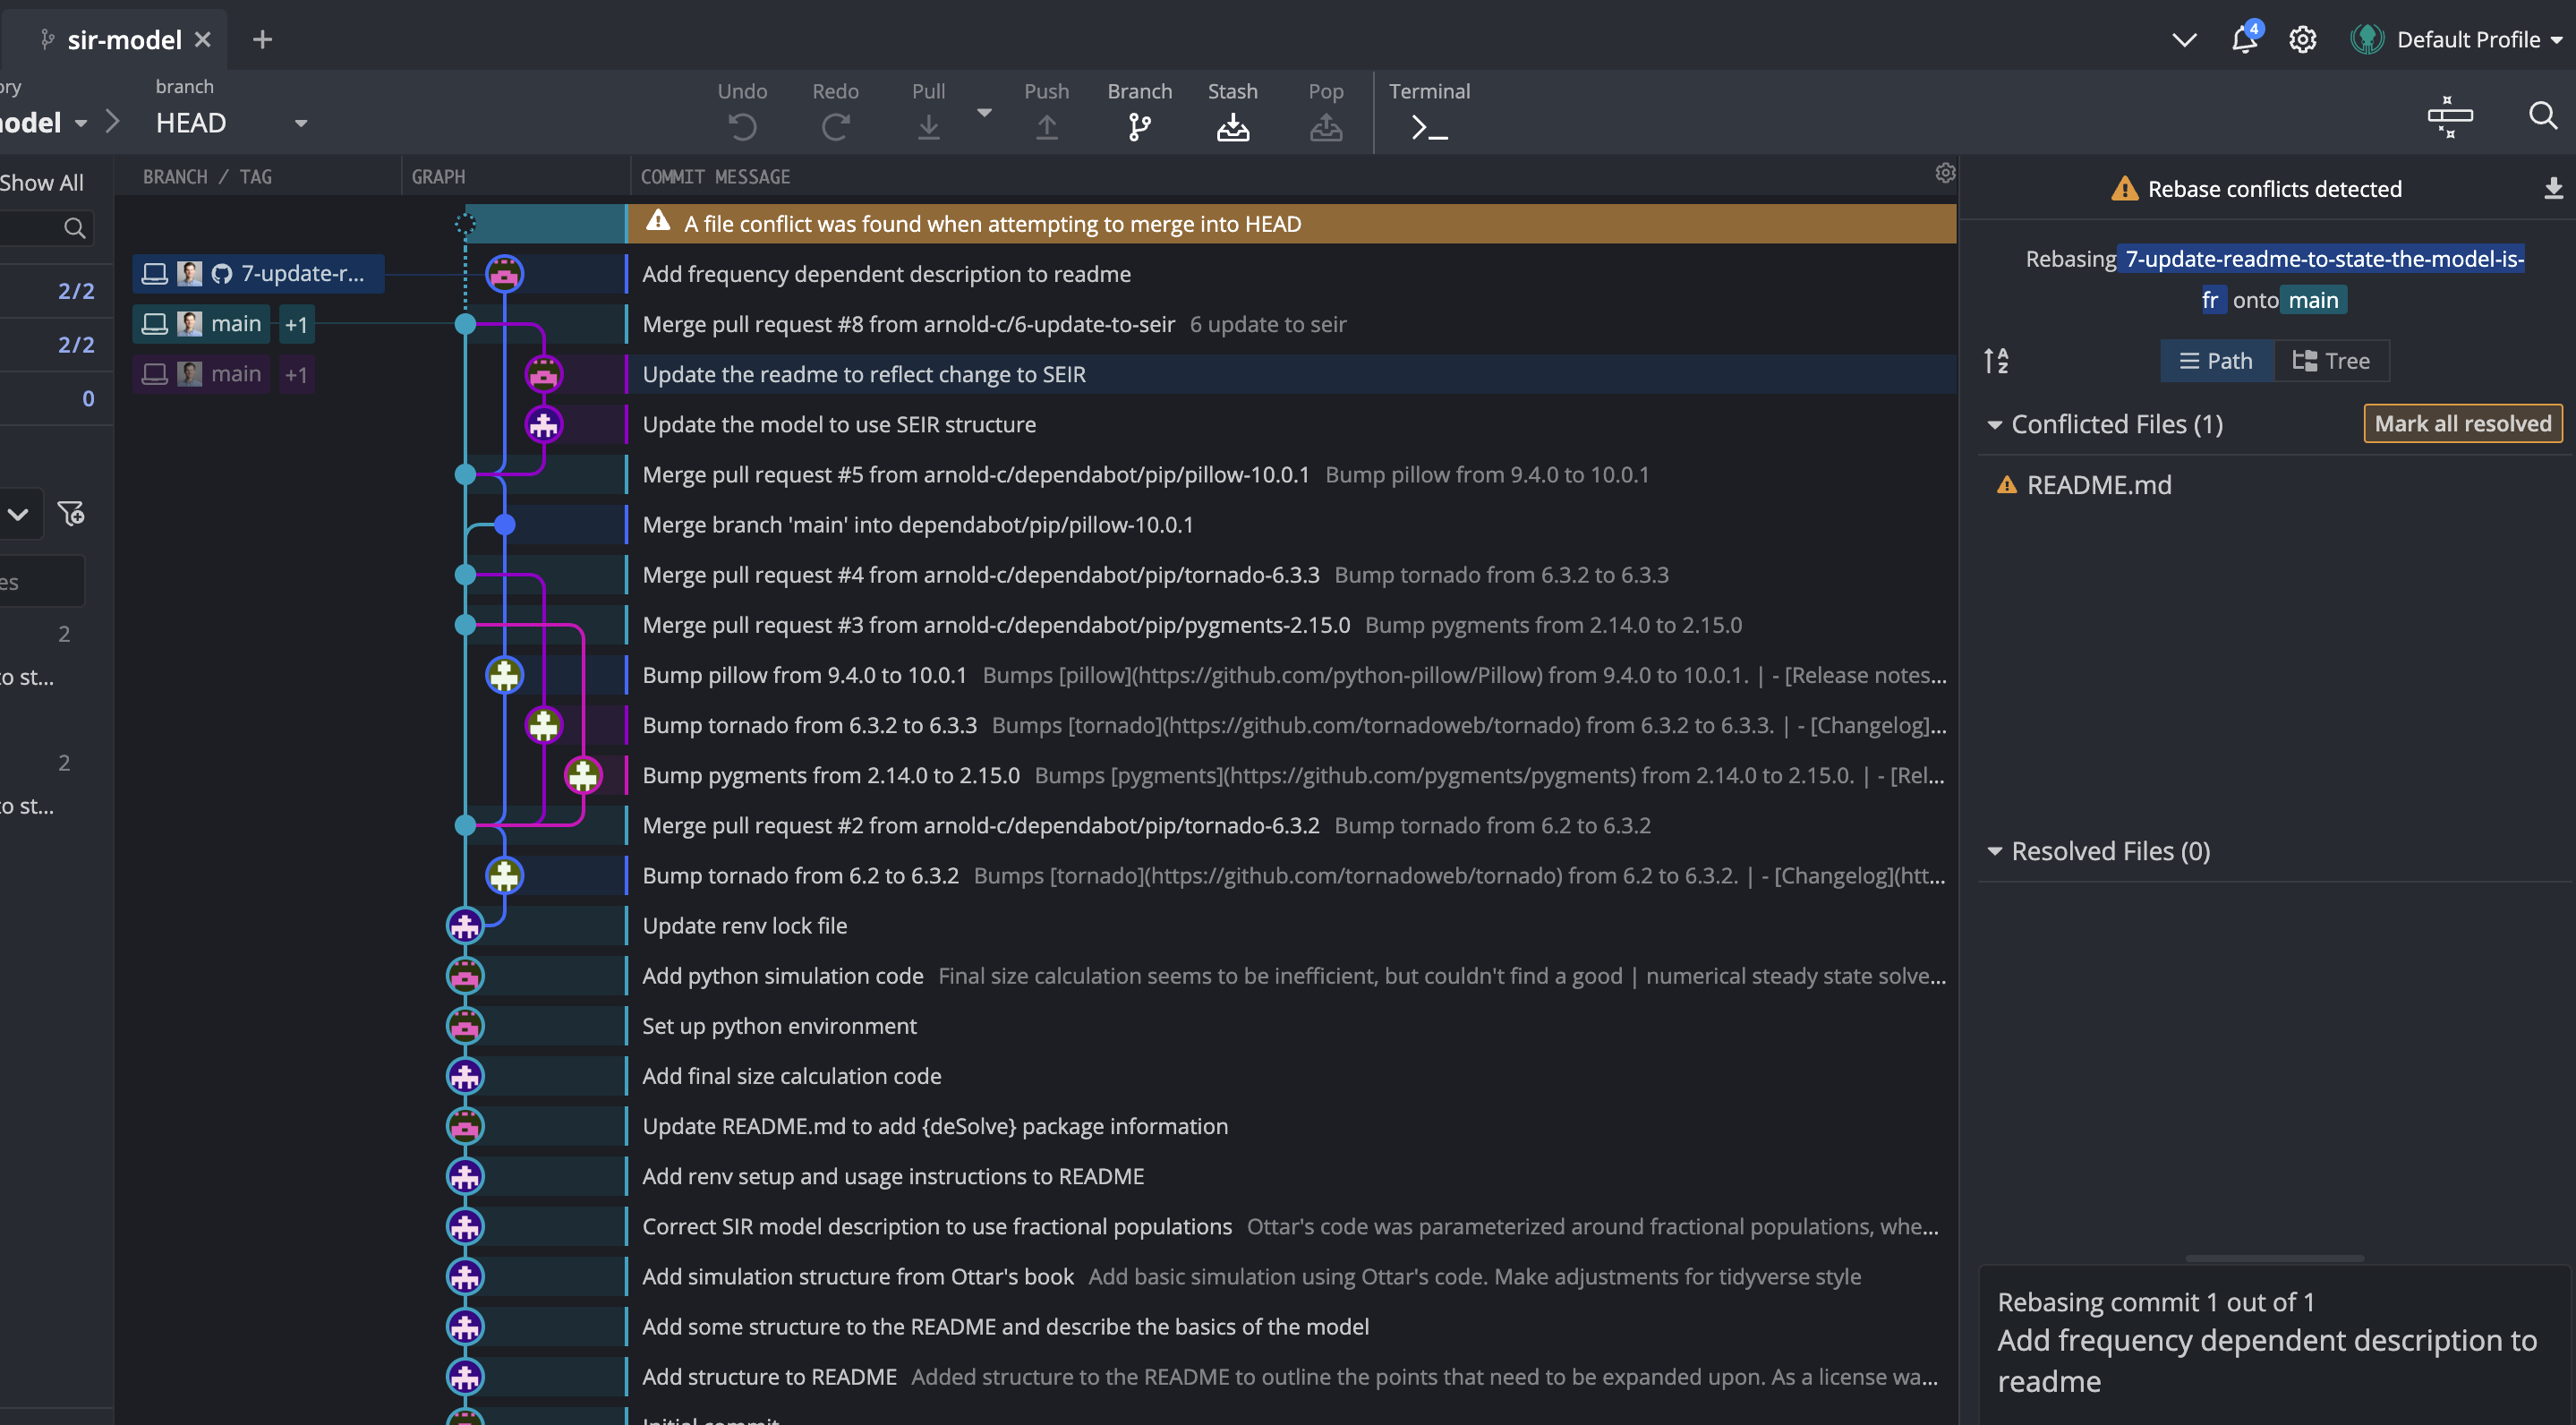
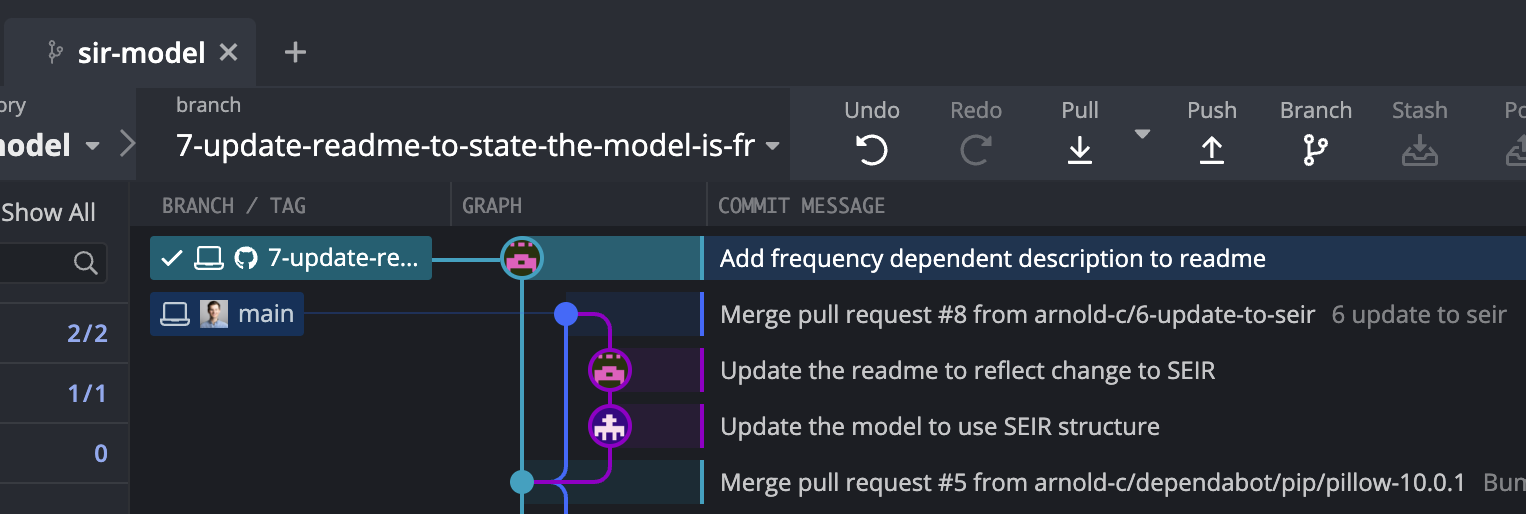
As you can see, the way rebase works is a little different than merge. Instead of creating a new commit to join the branches, rebase copies the commits made on the feature branch and then tries to sequentially apply then to your base branch (in this case, the main branch). As a result, after the rebase has been successfully completed, the base of the feature branch has been shifted up the Git tree. To visualize this, take a close look at where the feature branch joins main in the before and after (below) images.

Because rebase creates a copy of your commits to reapply (it doesn’t just move them), your commit history is technically different and changed. For this reason, you should be careful about rebasing when someone else has already checkout out the feature branch, as you will be altering Git history and no longer pointing to the same commits (even though the code is identical between the original and the copy rebase creates).
Now, your collaborator can push the corrected code to GitHub and create a pull request to merge back into the main branch.
To learn more about Git rebase, I would strongly recommend watching this short video by The Modern Coder, which does an amazing job of explaining the difference between merge and rebase and why one may be an advantage over the other in certain contexts.
10.3.3 Local Merge
First, checkout the feature branch, ensure your main branch is up to date, and then right click on main and select “merge feature branch into main”. As before, you will be prompted to resolve the conflicts, and after doing so, can push the changes to GitHub where main will be updated.
If you are using merge, you should be careful about merging your changes into the main branch as this should represent the correct version of the code. For this reason, it is often advised that you apply branch protection rules to the main branch to prevent accidental changes to the main branch that are not complete features. If you do this you will no longer be able to push directly to the main branch, so the merge method will not work, and will instead need to create a pull request. This has the added benefit of allowing your collaborators to review the changes before they are merged into the main branch.
10.3.4 Local Merge & PR
There is a second merge method - instead of merging feature branch into main, you can merge main into feature branch. This process is identical to the rebase method, except that you use merge instead of rebase. This has the advantage (relative to the other merge method) that you can push directly to the feature branch without needing worry about branch protection rules stopping your push. And relative to the rebase method, it doesn’t copy and reapply the commits you have made, so you are not altering the Git history, making it safer when multiple individuals may be working on the same feature branch simultaneously. However, it has the disadvantage that it produces more merge commits, so your Git history is a little messier than with the rebase method, so you will need to decide how much that matters to you (probably shouldn’t be much).
First, checkout the main branch this time, ensure your main branch is up to date, and then right click on the feature branch and select “merge main into feature branch”. As before, checkout the feature branch where you will be prompted to resolve the conflicts, and after doing so, can push the changes to GitHub where feature branch will be updated. Finally, create a pull request to merge back into the main branch.
10.3.5 Pull Directly into the Branch
This is quite a nice and clean method to resolve conflicts. The only thing your coworker needs to do is to use the following command in the terminal (assuming they have already checked out the feature branch):
git pull origin mainThis will result in exactly the same process as the PR version above, but this time it is within the local branch, so your collaborator can edit the files directly in the code editor rather than GitHub. It might also show HEAD instead of the feature branch name.
<<<< HEAD
...
=======
...
>>>> mainIf you get a warning about hint: You have divergent branches and need to specify how to reconcile them, you might need to look into either using the flag --ff-only or --no-ff.
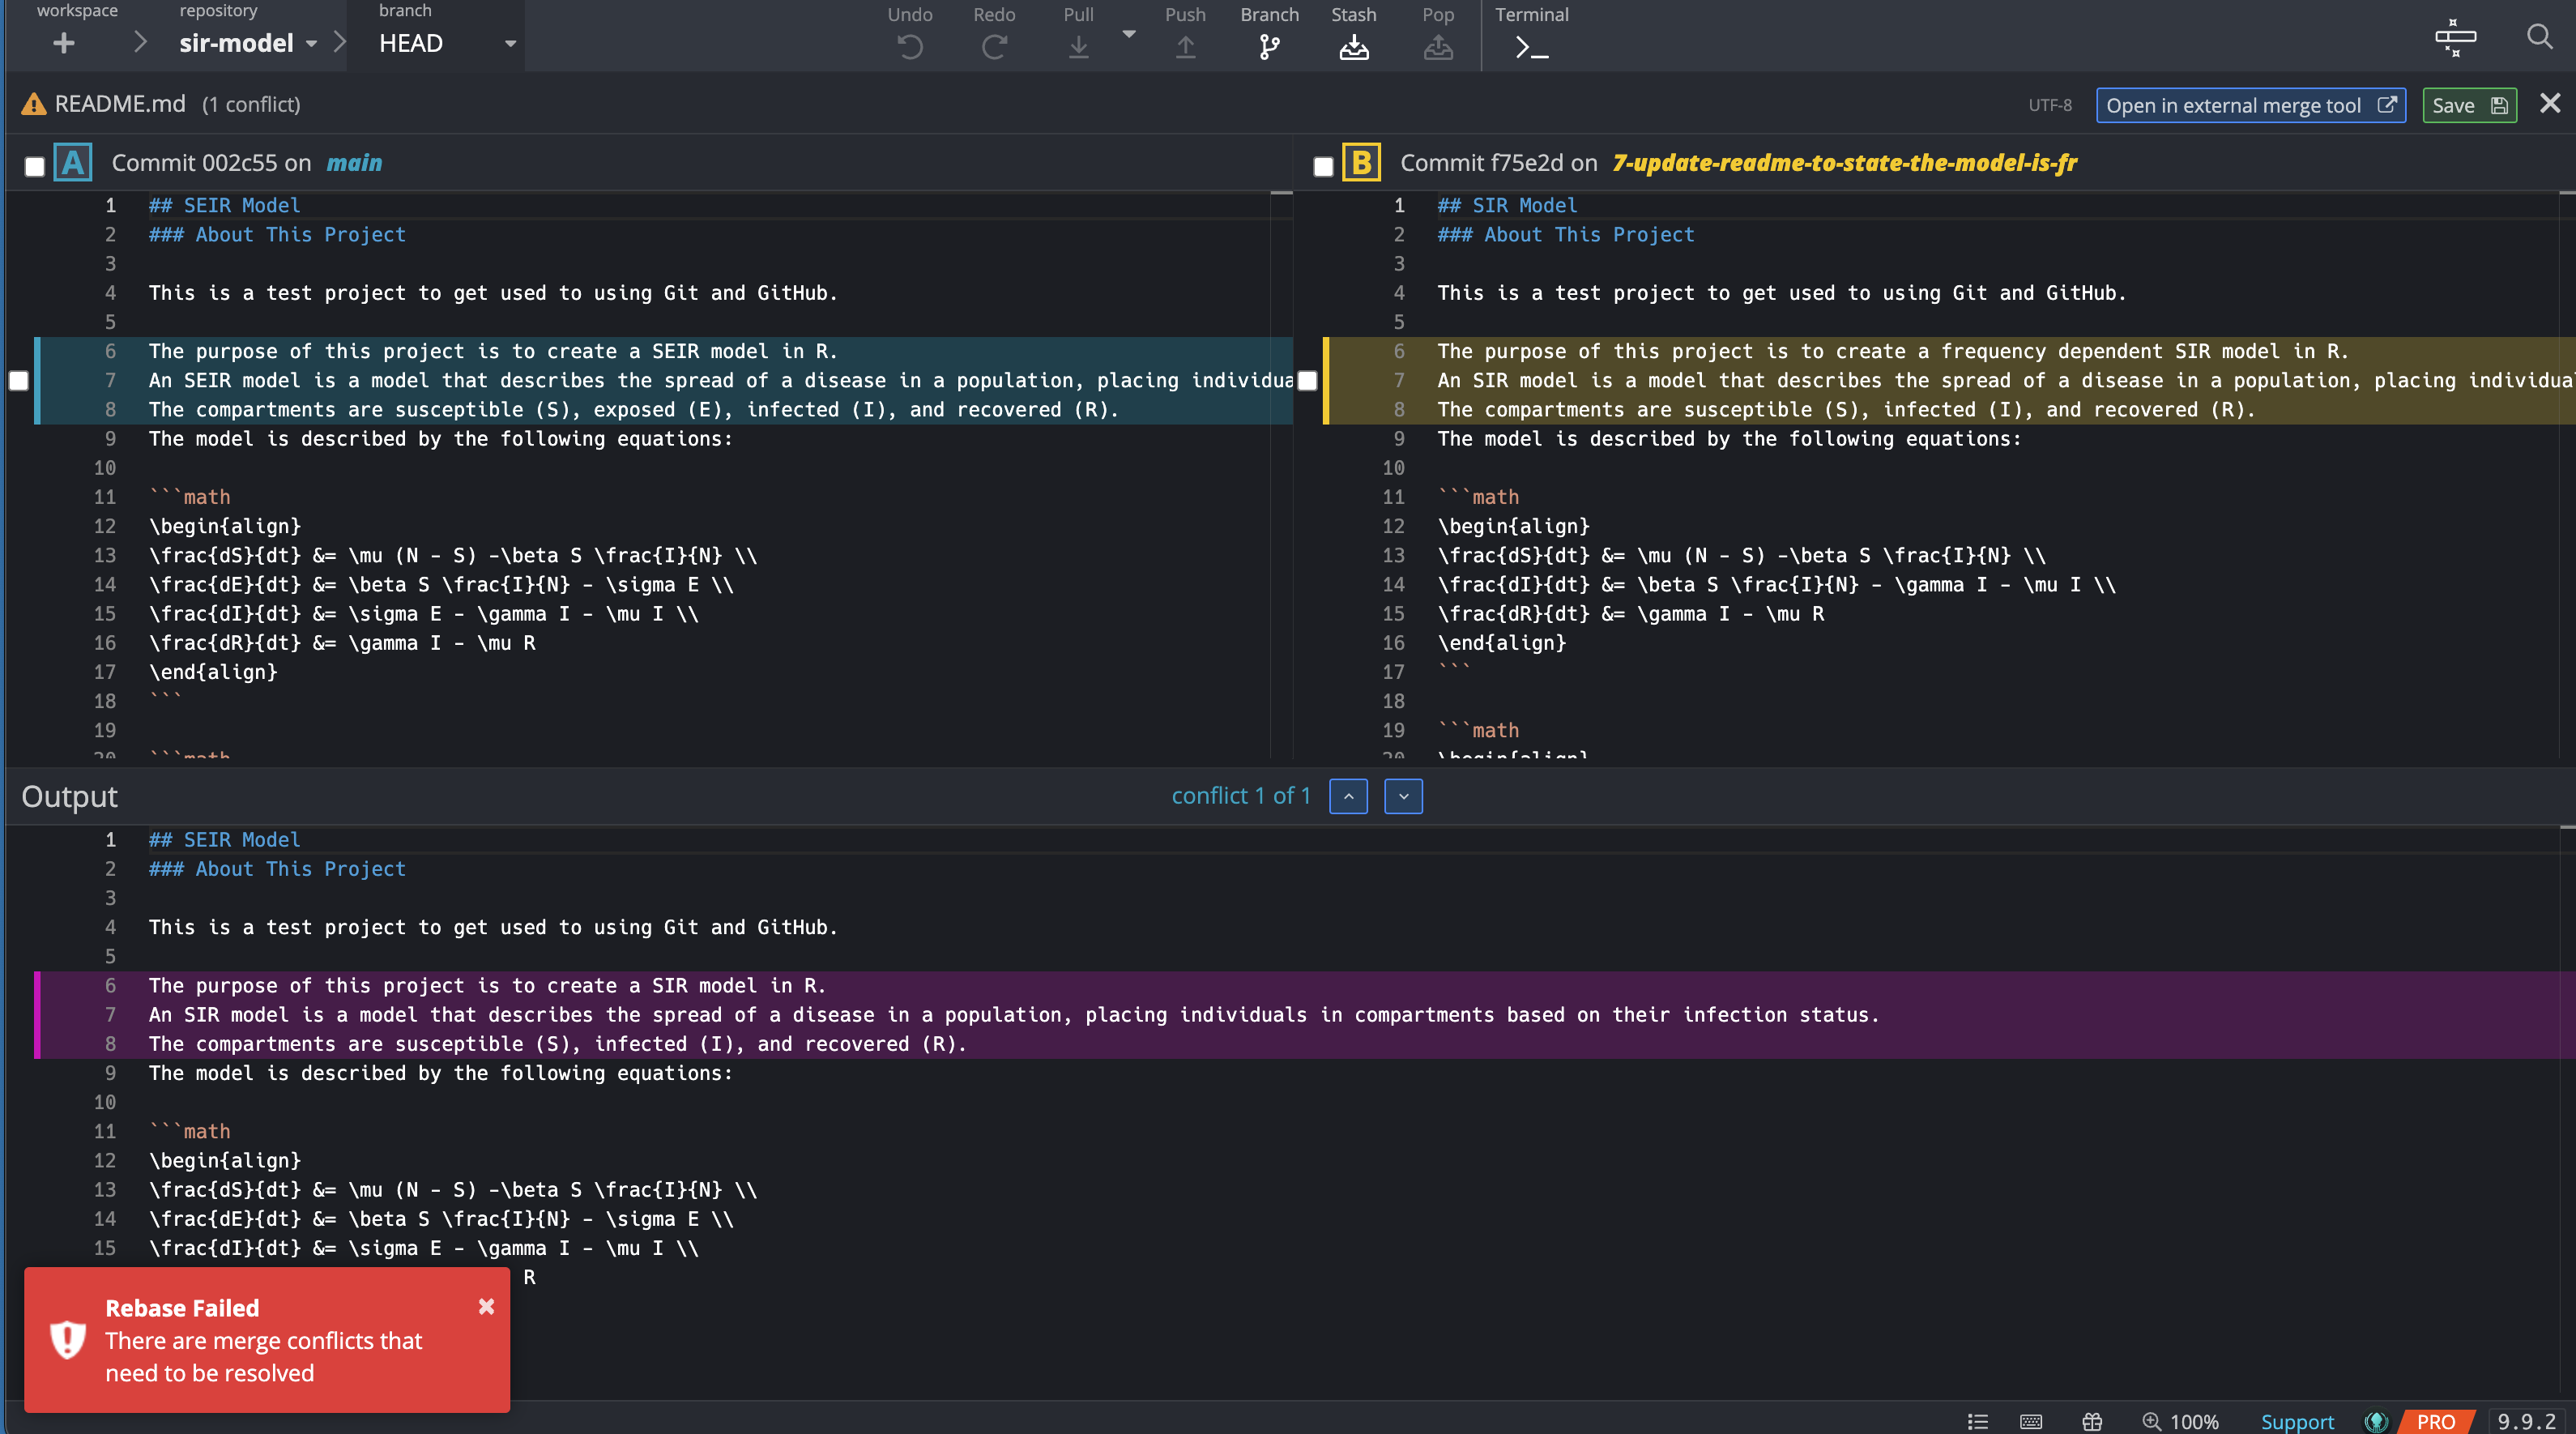
Here, it is also possible to view the conflict (and edit it) in GitKraken. It looks like this:
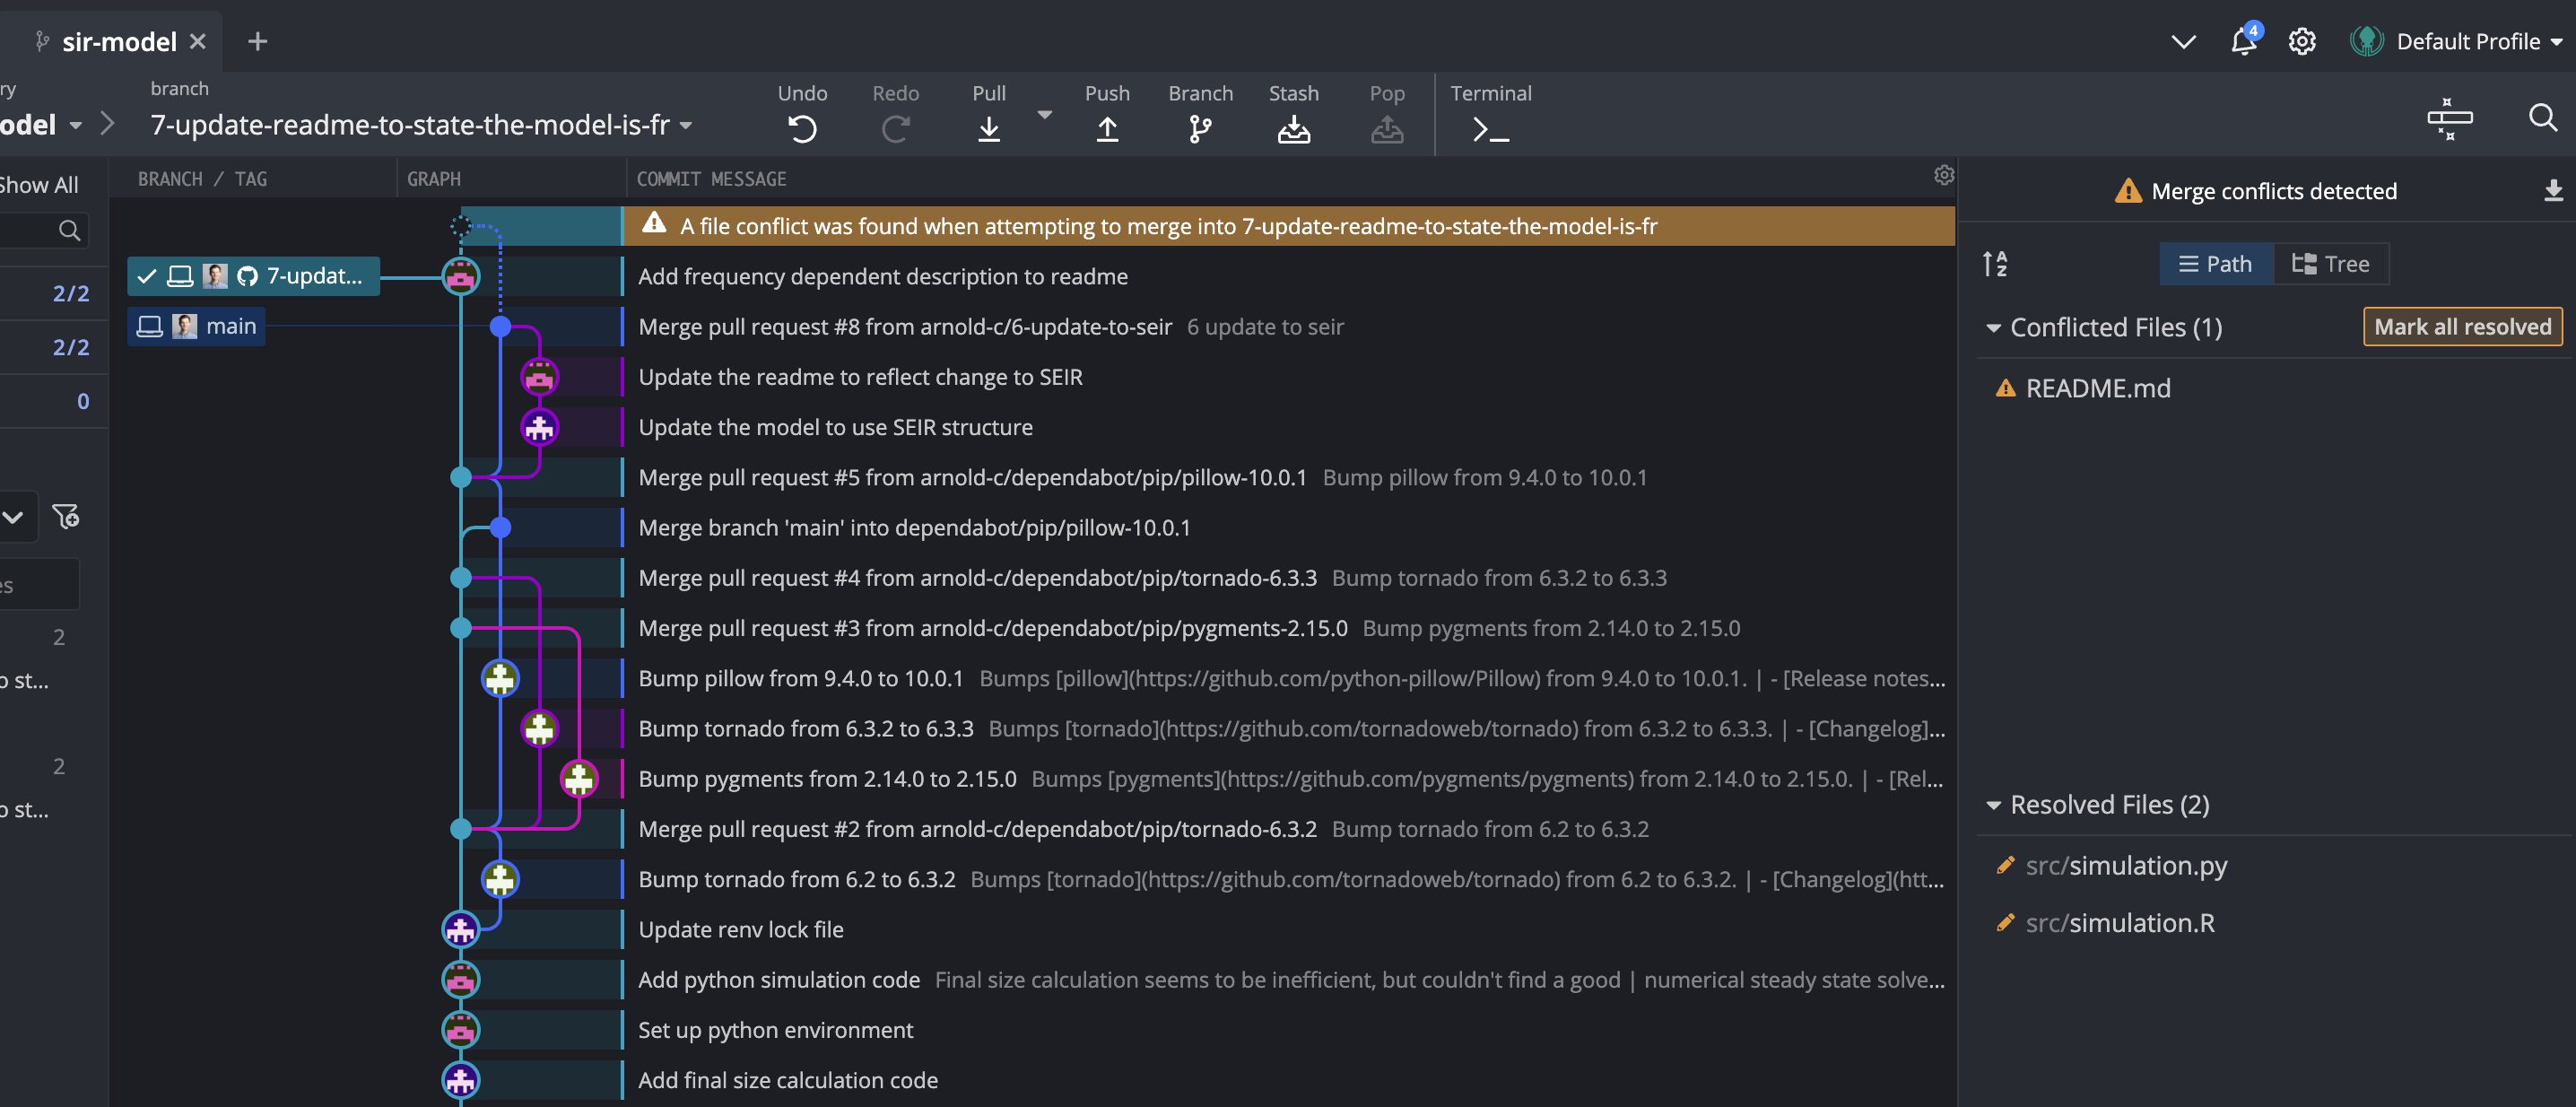
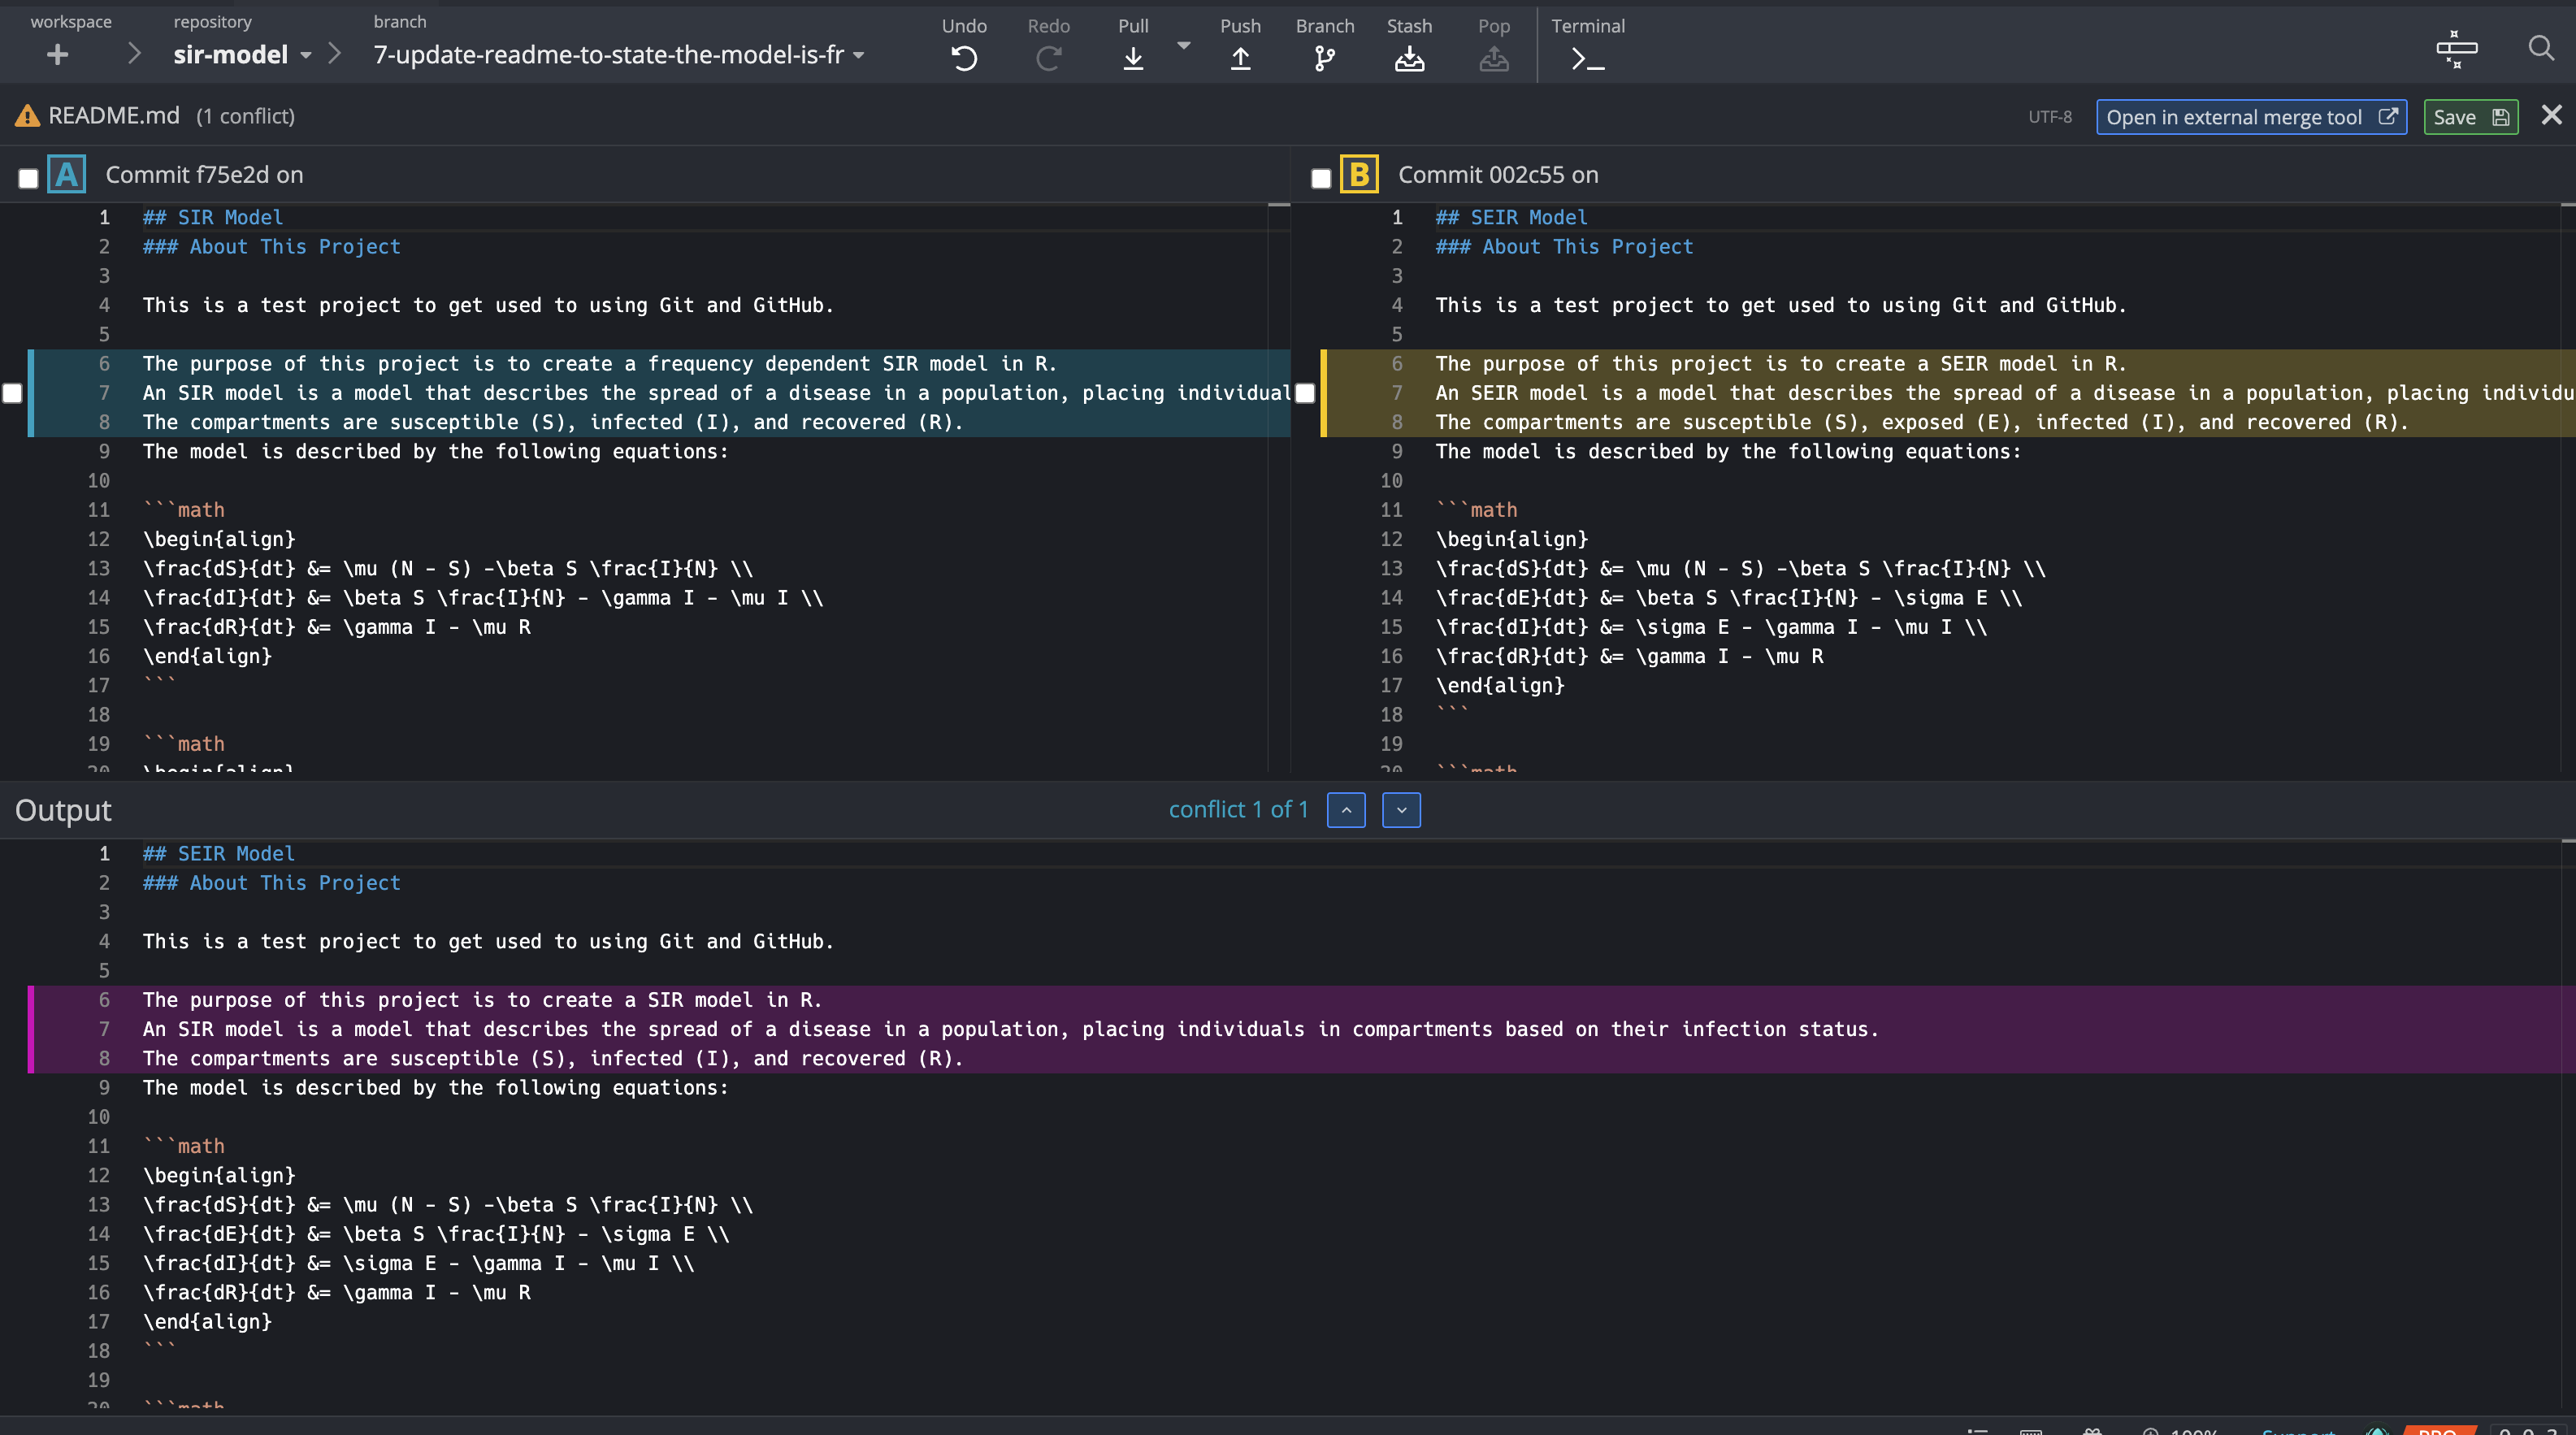
Similar to the rebase method, your collaborator can then push the corrected code to GitHub and create a pull request to merge back into the main branch.