6 Making Your First Git Repo
In general, there are two ways to make a Git repo. You can start with a local repo and push it to GitHub, or you can start with a GitHub repo and clone it to your local machine. If you don’t have any existing code, it’s marginally easier to start with GitHub, which is why we’ll start with this workflow. But no problem if you have code on your local machine - you just need to follow slightly different steps to connect the two. You will have to make the exact same decisions about repository structure, regardless of the workflow you use, so it’s worth reading through the GitHub First section as we’ll go into the most detail here.
6.1 GitHub First
If you have the GitKraken client installed, and it is connected to your GitHub account, you can create a new repository on GitHub directly in the GitKraken client, and it takes care of cloning the remote repository directly to your local machine (e.g., the cloning section). This makes the set up a little bit easier, as you don’t have to use your browser or clone the repository. Otherwise, it works through exactly the same steps as the browser-based workflow, which I’ll walk through below in case you do not have GitKraken.

6.1.1 Creating the Repository
Log in to your GitHub account. From here, setting up a new repository is quick and simple - just click on the + button in the top right corner and then select “New repository”.

From here, you’re off to the races. You’ll be presented with the following options, that we’ll go through one-by-one.
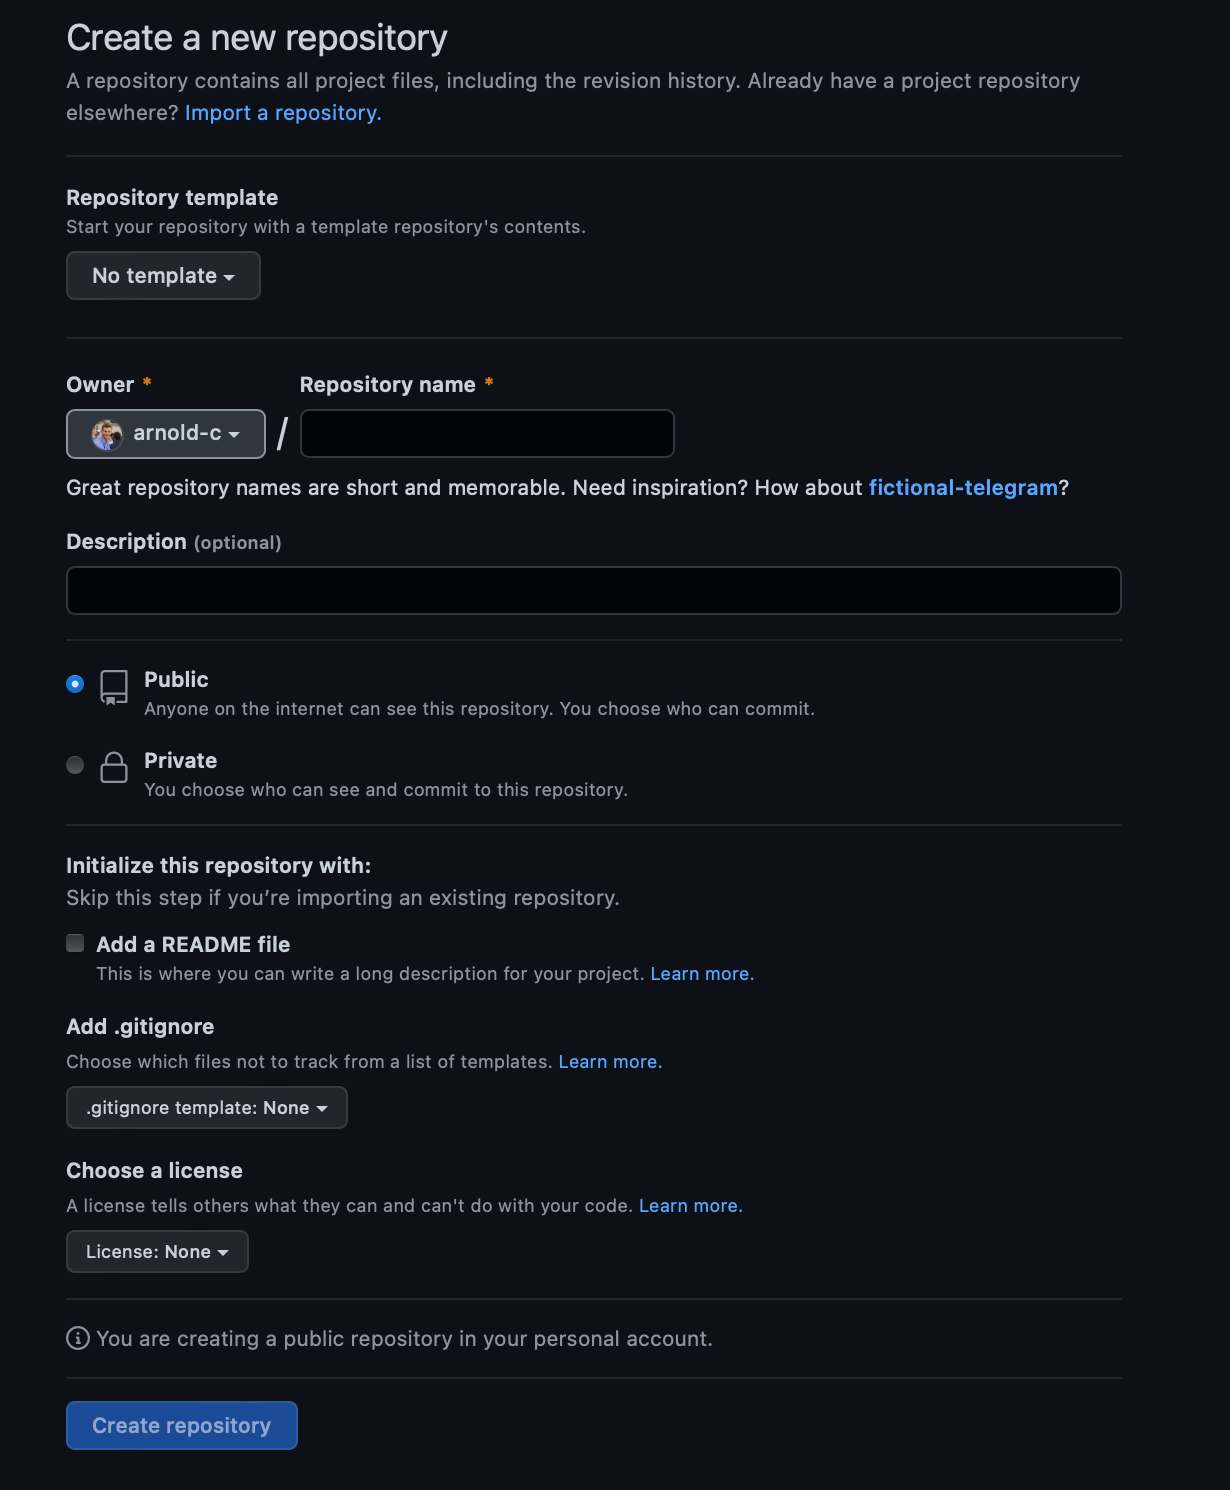
6.1.2 Repository Name
When choosing a repository name, you’ll want something short, memorable, and descriptive of the project that you’re working on. Ideally, you should follow Jenny Bryan’s excellent guidelines when it comes to file and repository naming (after all, a repository is just a project folder), but as an overview:
- Use
-to separate words - Use
_to separate metadata (e.g. dates from script description) - Try to be consistent in how you use case e.g.,
CamelCasevscamelCasevssnake_casevseverythingmashedtogether
For example, the repository for this workshop book is psu-into-to-git. I’d highly recommend skimming these slides to learn more and save you some hassle in your digital life.
6.1.3 Description
The description is an optional part of the setup, but is worth completing. In a few short words, you should describe what you’re trying to do with the project. For example, the description for this project is:

6.1.4 Public vs Private
Obviously this is a personal decision, but one of the benefits of learning and using Git is that it facilitates collaboration. While not all code can be open-sourced for legal, ethical, or other reasons, if you can, I would encourage you to try and publish the code as a “Public” repository. Not only is it in keeping with the principles of open and collaborative science, particularly when it comes to peer-review, but you also might get helpful feedback on your work from interested parties. If you’ve done something great that you want to share with the world, say, you’ve developed an awesome package or method of analyzing your data, it’s cool if people can build off your work. But from a personal perspective, members of the community can, and often will, help you improve your code and move it forwards, giving it robustness and allowing you to do new things that you hadn’t thought of.
You can always change the visibility of the repo later by going to the “Danger Zone > Visibility” option at the bottom of the “Settings > General” page.
6.1.5 README
The README.md acts as the landing page to your repository. You don’t need it, but each repository should have one. The point of the README is to tell the reader what the repository is all about. As hinted by the file extension, the README.md is a markdown file. Markdown is very simple to use - you just type and let your syntax take care of the formatting. See this document from GitHub for an overview of how to use markdown.
At a minimum, start with these few items:
- Repository title
- About this project
- Give a short (paragraph) overview of the project and what you hope to achieve with the work
- Repository structure
- Tell the reader about the layout of the repository
- What are your folder names, and what is contained in each folder
- What do the key files do e.g. I have a file in one of my projects called student_missing-data-analysis.Rmd with the description “notebook that explore the missingness present in the data as a whole, but particularly among students with PSU samples. It examines the effects of imputation on the GLM ORs”
- Tell the reader about the layout of the repository
- Built with
- What are the key packages that you used in the project?
- I often use the
{targets}package for automating R analysis pipelines and{renv}package for R package management
- I often use the
- What are the key packages that you used in the project?
- Getting started
- How to download the repository and get set up to run the analysis
- Include the cloning commands
- Tell the reader what packages to install, and how (some packages you use may not be standard and you may need to use special instructions e.g.,
{JAGS}often requires installation from SourceForge)
- Usage
- Tell the reader how to re-run your analysis
- Hopefully this will be fairly simple if you clearly describe your repository structure above
- Because I often use
{targets}when I’m working in R, I like to add a quick description about how to use{targets}, specifically that it is based around the functional programming concept, so it is a little unfamiliar to people used to writing and using scripts
- License
- This can be a link to your LICENSE.txt file
- It is particularly important if your code is public-facing
- Contact
- Acknowledgements
6.1.6 .gitignore
The .gitignore file is a special “dot” file that stays in your project root and tells Git to not track a file, or a group of files if you specify a folder or use the * wildcard. For example, we often do not want to html files as they are typically the outputs of our analysis e.g., rendered notebooks that we want to look at and share with collaborators. To exclude all html files, we simply add *.html to the .gitignore, and html files will stop being tracked. To exclude a folder, we would add my-folder/ to the .gitignore.
If you have multiple files with the same name, but in different folders within the project, e.g. folder01/eda.Rmd and folder02/eda.Rmd, you may only want to ignore one of them. In this situation, you should specify the path i.e., folder02/eda.Rmd. If you just add eda.Rmd to .gitignore, both files will be ignored.
As you can see in the setup image, GitHub provides optional templates for the .gitignore. It’s worth taking advantage of this and using the one for your language of choice e.g., R, python, Julia etc. It will provide you with a good starting point that you can customize as necessary.
.gitignore will not remove files from the Git history.
To do this, you would have to very carefully cherry pick and change past commits, particularly if you have already pushed your local changes to GitHub, and that is far beyond the scope of this workshop. So it’s better to preemptively exclude a file or file type from Git tracking if you think you might not want it in the Git history later on e.g. put all sensitive data and outputs into folders that are ignored by Git.
6.1.7 License
Most people place their license in a /LICENSE.txt file and a state what license type you want to use e.g., MIT. Then in the README.md, you can just type in the location of the license e.g., /LICENSE.txt, and it will provide a link that readers can click on for the full details. You can use this helpful website to decide what license is appropriate for you and your project.
6.1.8 Repository Template
Despite being first in the list, I’ve left this to the end for a reason. Firstly, when you get started with Git and GitHub, you won’t have anything set up to use as a template. Secondly, it’s important to understand how to use GitHub before you try and automate away the set up tedium.
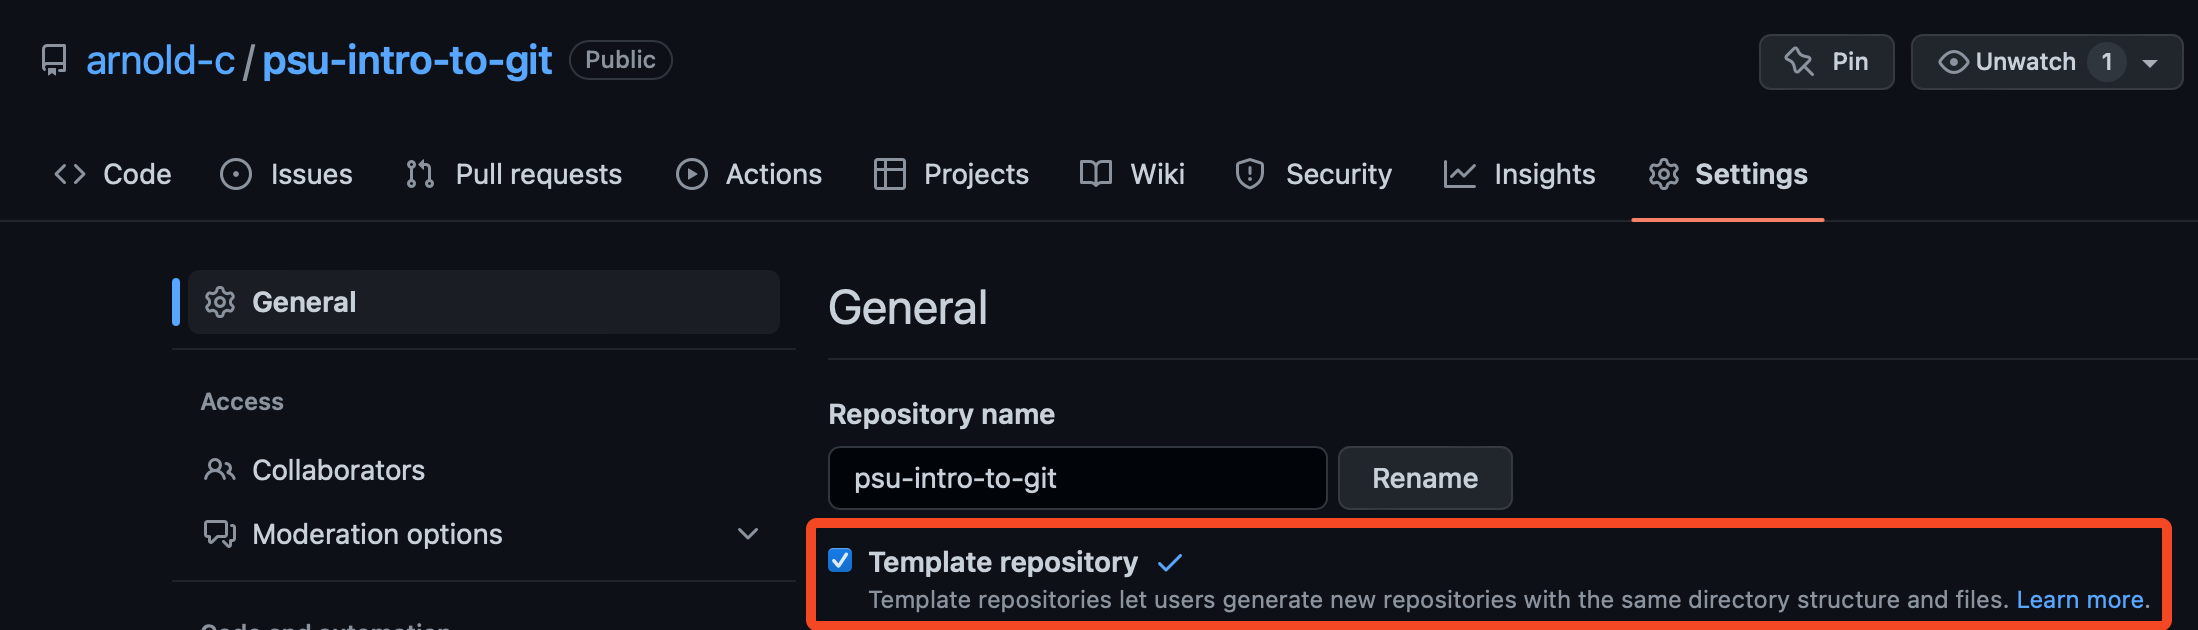
Now we’ve got that out of the way, after you’ve created a repository with a structure you like (e.g., it has all of the components stated above), you can turn that into a template you can use for your next repository. To do so is very easy. Simply go to “Settings > General” and click on the “Template repository” button under your repository name.
The next time you go to create a repository, your previous repo will show up in the templates drop-down for you to use and then edit. If you felt so inclined, you could even create a separate repository that is only for your template, so you don’t have to go through and delete parts of the README.md.
6.1.9 Cloning to Your Local Computer
Now comes the fun part - getting your project set up on your computer where you can do your work. Thankfully, GitHub makes this incredibly easy to do, particularly if you have a Git client like GitKraken installed.
The first thing you need to do is create a local folder to clone your repository to. I like to have all of my repositories, work or otherwise, in one location on my computer, making it easy to find and switch between them. For example, I keep my repositories in ~/Documents/Repos/ , therefore the repository for this project is at ~/Documents/Repos/psu-intro-to-git. Note that ~/ just means /users/username/ on MacOS, which would translate to /home/ on Linux, and C:\Users\username\ on Windows.
It’s not necessary to choose a directory name as the repository name on GitHub, but it’s good practice and helps minimize confusion.
If you have a Git client, you can open it up, and assuming that it is connected to GitHub, there should be a “Clone button” you can click on. If you use GitKraken, pressing cmd+N/ctrl+N should bring up the clone window that looks like this below.
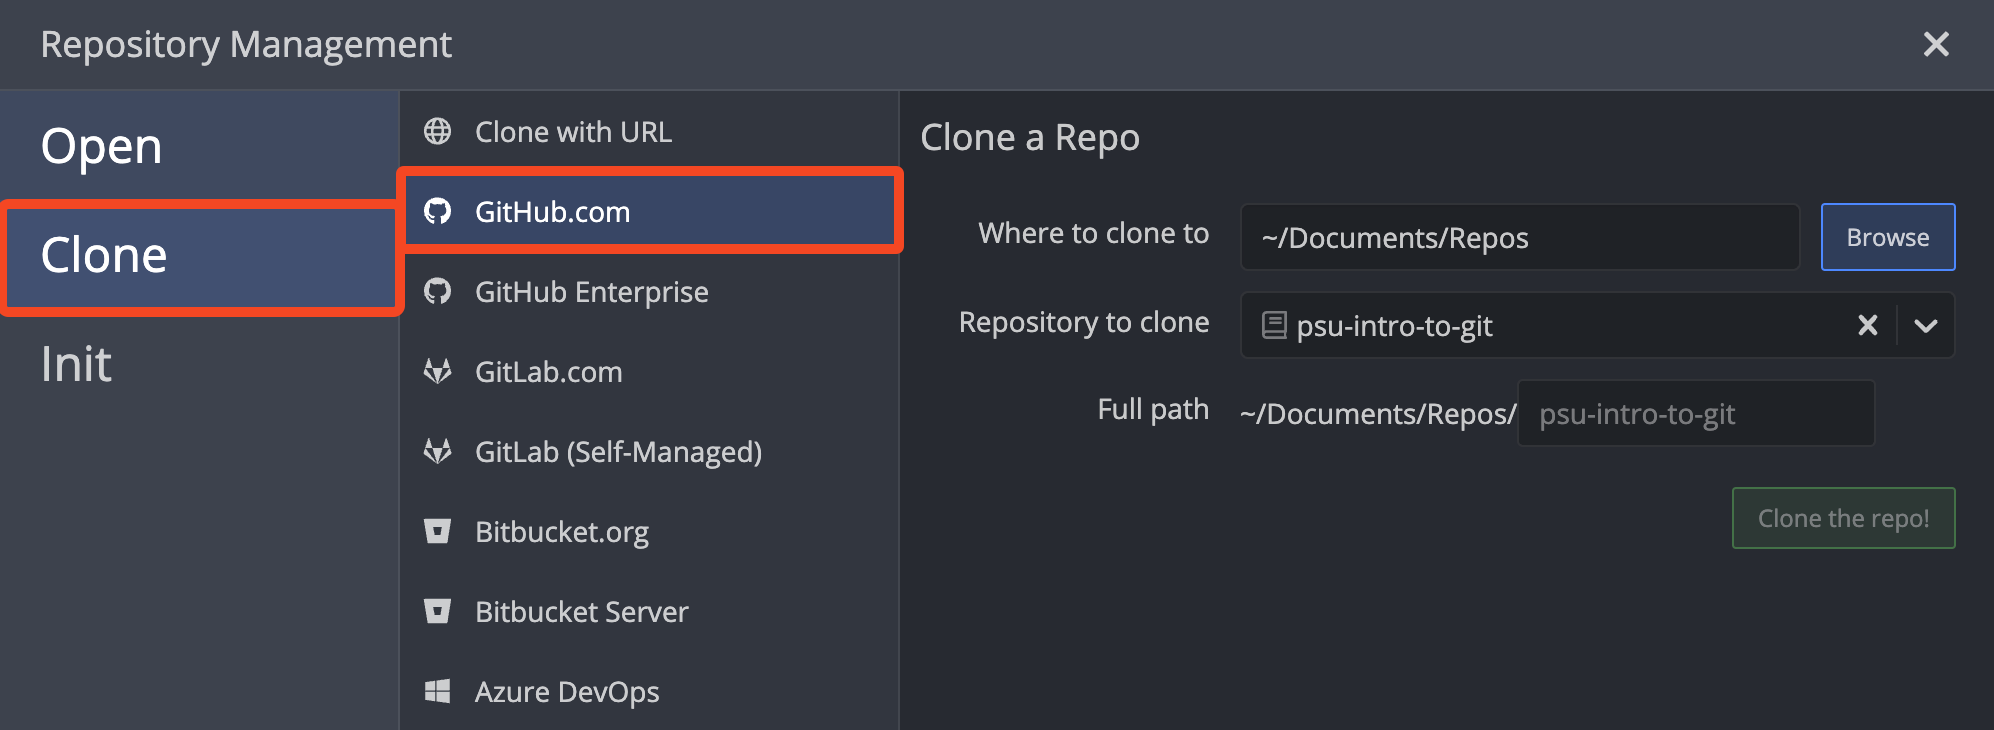
If you have connected GitKraken to GitHub, you can search through your GitHub repositories, otherwise you can paste in the HTTPS or SSH urls in the “Clone with URL” section.
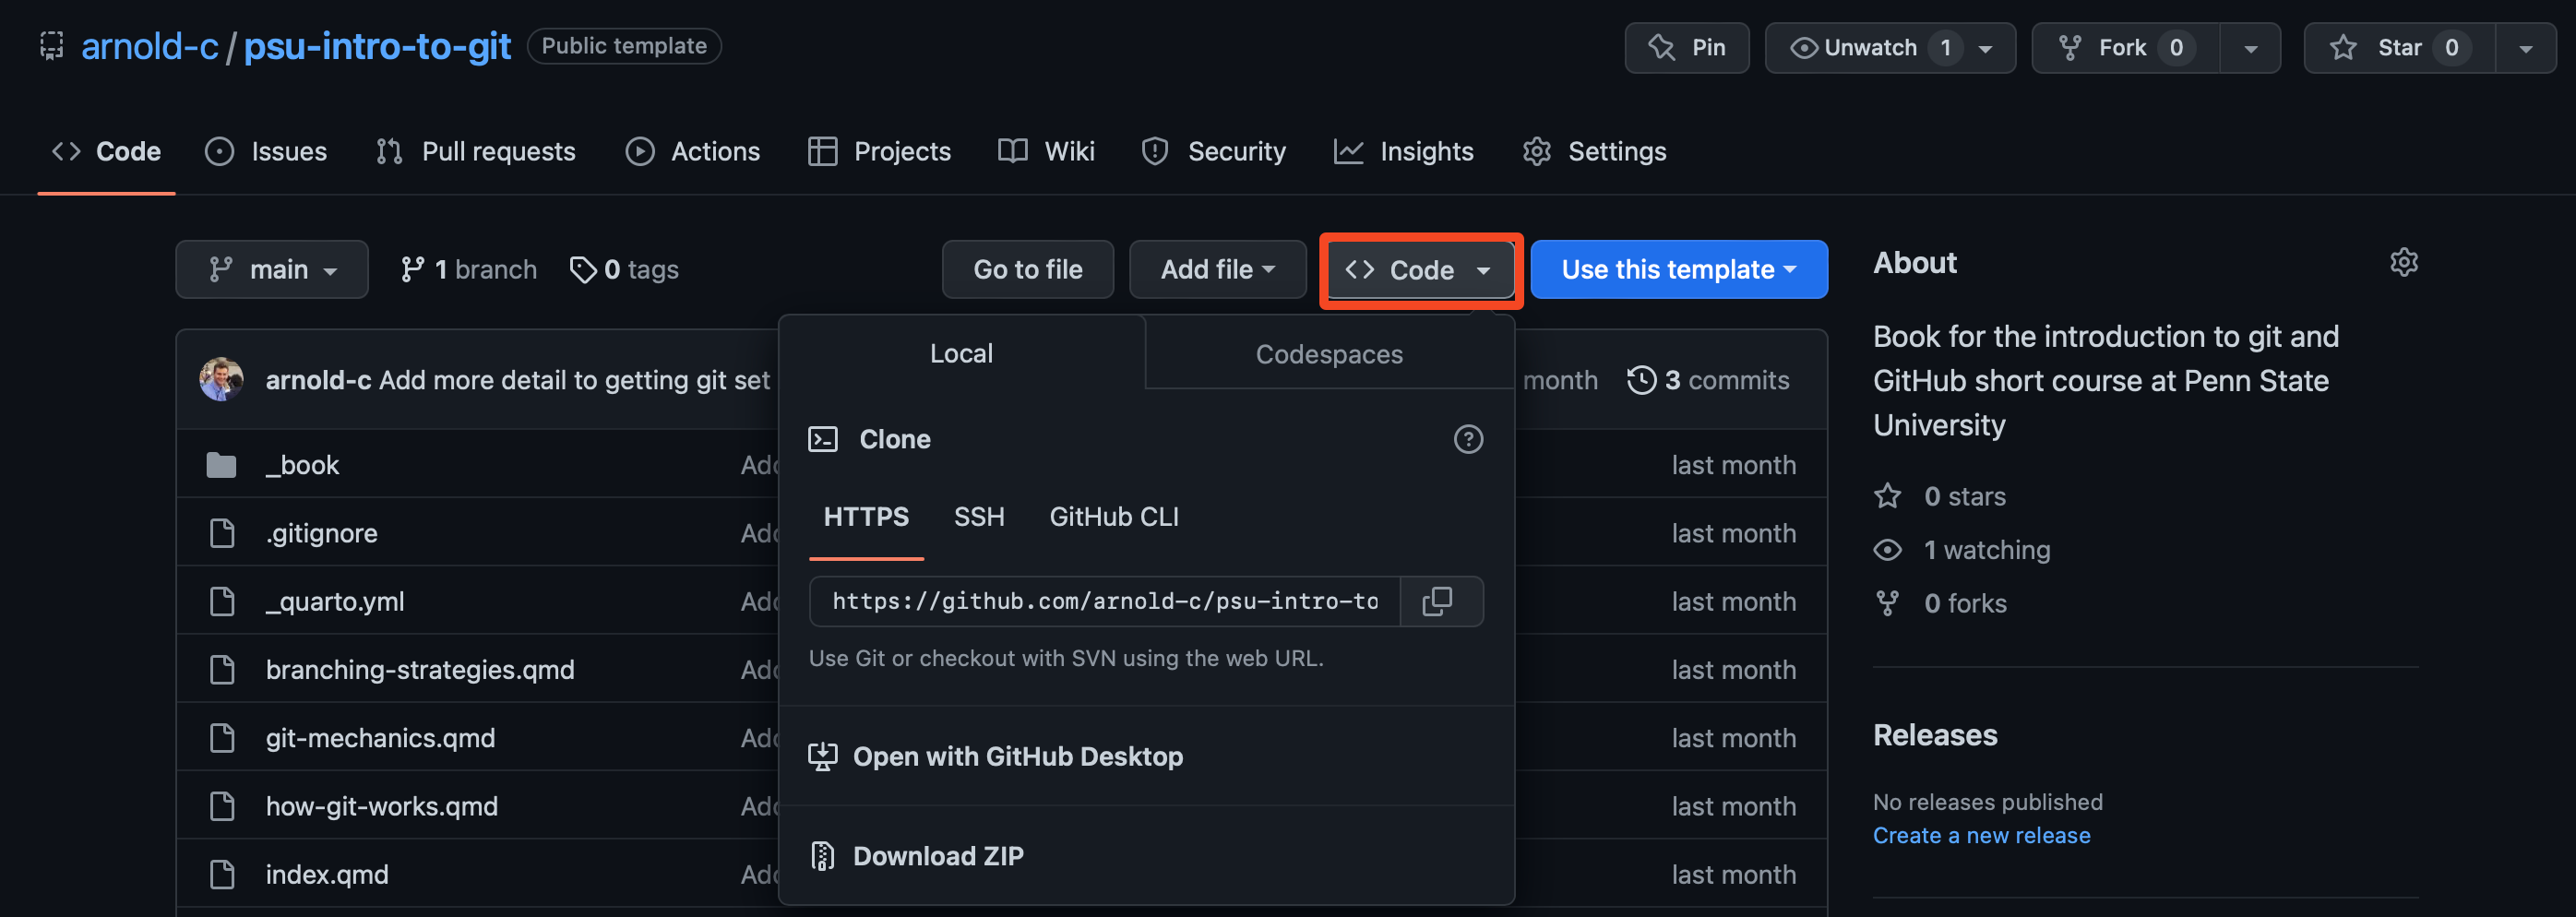
To find your HTTPS/SSH urls, navigate to the repository, and click on the < > Code button, before selecting either HTTPS or SSH, depending on your initial GitHub setup. These urls have a consistent pattern, so you don’t always have to go to GitHub to find them.
For HTTPS, they are https://github.com/GITHUB_USERNAME/REPOSITORY_NAME.git.
For SSH, they are [email protected]:GITHUB_USERNAME/REPOSITORY_NAME.git.
If you do not have a Git client, navigate to the directory where you would like to keep your repositories; for me, this is ~/Documents/Repos/. Then open up the terminal/Git Bash command line in this location. From here you have two options.
- Create a folder for your repository (ideally use the same or a very similar name to the one on GitHub) and use the terminal command
Git clone [email protected]:GITHUB_USERNAME/REPOSITORY_NAME.Git .(if you are using SSH) from within this folder to clone the contents of the GitHub repository into this folder. - Enter the command
Git clone [email protected]:GITHUB_USERNAME/REPOSITORY_NAME.git(if you are using SSH) to create and clone the repository into ~/Documents/Repos/REPOSITORY_NAME (note the lack of the.at the end of the command)
That’s it, you’re ready to start using Git!
6.2 Local First
Sometimes you already have code on your computer that you want to turn into a Git project. As mentioned, this is a pretty easy problem to solve. You will still need to go through the same repository structure steps and decisions as above, so I recommend going back if you’ve just skipped ahead to here, but assuming you’ve already covered that material, the first thing you need to do is turn your local repository into a Git repository.
6.2.1 Git Client
If you have a Git client installed, such as GitKraken, it’s not too hard to turn an existing directory into a Git repository, before pushing to GitHub. First, open GitKraken and enter cmd+I/ctrl+I to open up the “Init” window. From here, navigate to “Local Only”, which tells GitKraken that you want to turn a directory local to your computer into a Git repository. Ensure that your “Initalize in” Path is in the correct parent directory (for me, I keep my repositories in ~/Documents/Repos). Now just enter the name of the directory you would like to turn into the repository and click “Create Repository”.
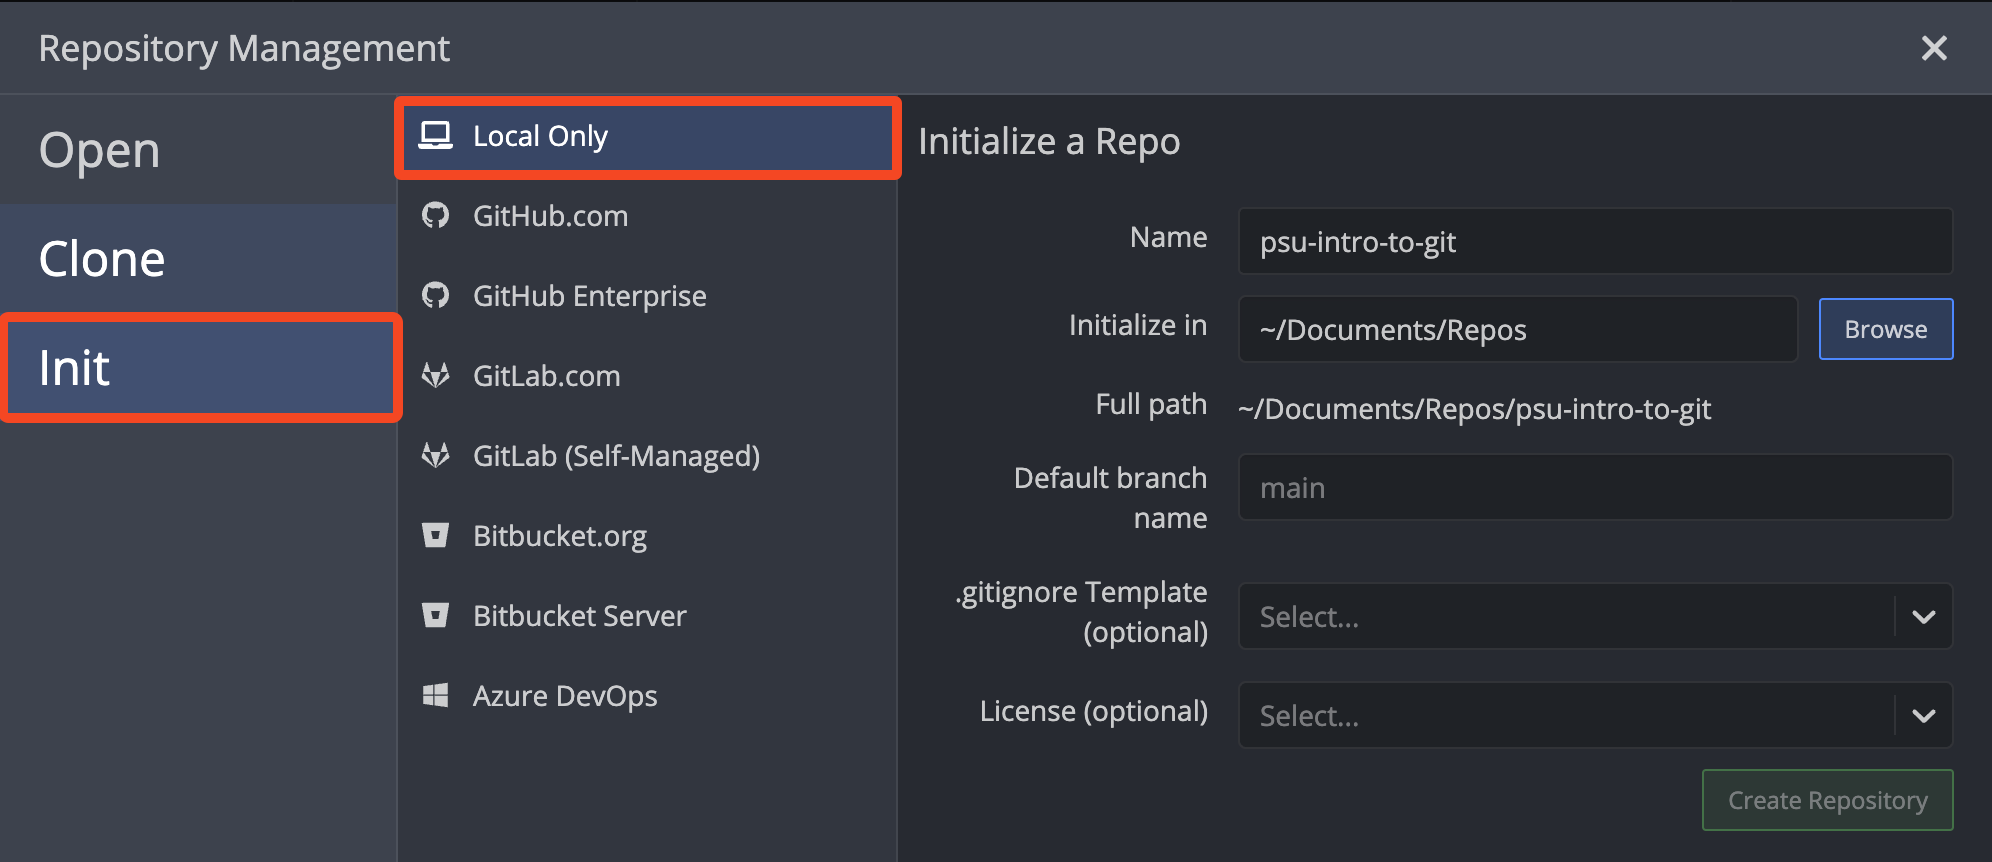
This will not overwrite your file, just add the necessary Git components and add the .gitignore, LICENSE.md (if selected), and a blank README.md (if you haven’t already created one) as your first commit. All other files will be added (i.e., git add .), ready to be staged and committed, though we’ll explain what this means in more detail shortly.
From here, you need to connect your local repository to GitHub. In GitKraken, open up the repository (if it didn’t open automatically after creating), and click on the sidebar button labelled “REMOTE”.
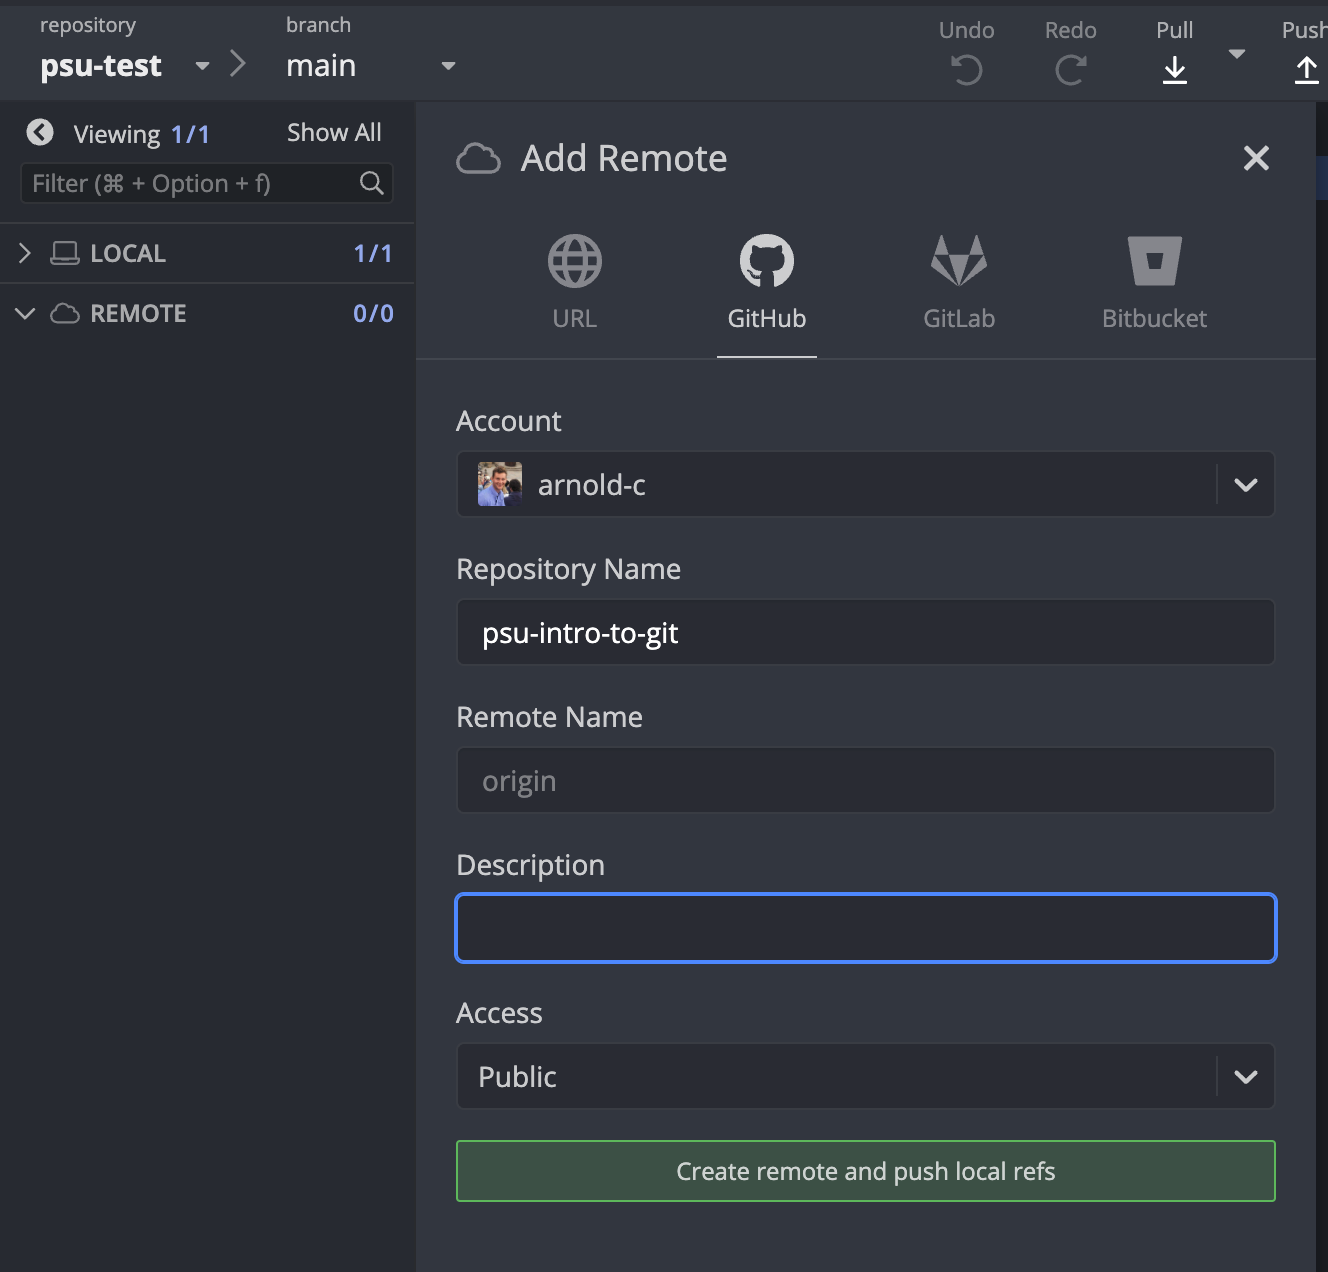
From here:
- Select GitHub
- Choose your account (assuming you have linked GitKraken with GitHub)
- Choose the repository name you’d like for GitHub (I’d recommend the default, which is your local repository’s name)
- Add a quick description
- Select the level of visibility you would like
I would leave “Remote Name” as origin as lots of standard commands refer to origin, so it’ll make your life easier if you have to troubleshoot things later on in your Git adventures
And that’s it.
6.2.2 No Git Client
Firstly, go install a Git client if you are learning Git - you’ll save yourself a lot of time and heartache when it comes to the day-to-day of using Git. But if you’re insistent that you need to use the command line at this stage, or just are interested in understanding what commands your GUI is performing, carry on reading.
From here, your code will vary slightly depending on whether you set up Git using SSH or PAT token, but the structure is generally the same. If you already have code, you can ignore echo ... in step 2 as you have files Git can track (though you should add a README.md!), and replace README.md with the file(s) you wish to track.
- Open a terminal/Git Bash command line in your directory
- All the following commands should be entered in the terminal from within the directory
- You will need to turn your local directory into a git-tracked repository
- Git will not track a completely empty directory, so you need to first add a file
echo # PROJECT_NAME > README.mdgit init
addand commit the README.md file to the Git history so you have something to push to GitHubgit add README.md- Use
git add .to track all the files in a repository with changes e.g. if you have existing code in a folder that you are converting into a Git repository
- Use
git commit -m "Initialize project with README"
- Rename your default branch to main
git branch -M main
- Connect your local repository to your GitHub repository
- For PAT token setup
git remote add origin https://github.com/arnold-c/psu-intro-to-git.git
- For SSH setup
git remote add origin [email protected]:arnold-c/psu-intro-to-git.git
- For PAT token setup
- push your commit to GitHub
git push -u origin main
- Navigate to GitHub, and edit the visibility of the repository if desired
- By default, GitHub will publish the repository as public access
If you already have a Git repository on your local computer, but for some reason haven’t connected it to a remote (e.g, GitHub) you can do so by following commands 4-7 inclusively.